Apple
How to Set Up Hide My Email on iPhone or iPad

Apple has released a cool new privacy tool known as Hide My Email. This feature, which does exactly what the name suggests, hides your email address when you sign up for services. This feature was launched alongside the iOS 15 and iPadOS 15 software upgrades as part of the company’s new iCloud+ service, emphasizing the user’s privacy. It is a component of the company’s premium iCloud plans and was made available simultaneously. Learning how to use the Hide My Email feature introduced in iOS 15 could be a simple approach to prevent unwanted emails from entering your inbox, which is prone to become cluttered with spam in a short time. This guide will walk you through the steps to configure hide my email on your iPhone or iPad. So let’s get started:
Read Also: How to Delete Photos from iCloud on iPhone or iPad
How to Set Up Hide My Email on iPhone or iPad
We would like to inform you that to utilize the “Hide My Email” feature on your smartphone; you need to be connected to a paid iCloud plan. Additionally, your device must be running iOS 15/iPadOS 15 or later to discover this feature in the settings. As long as you satisfy the prerequisites, you are free to proceed with the processes that are outlined below:
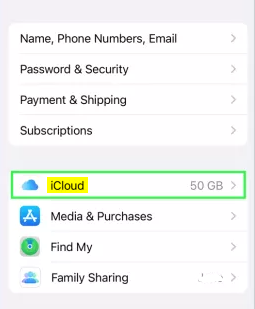
1. Navigate to the “Settings” menu using your iPhone or iPad. Tap on your “Apple ID name” that is placed at the very top of this screen.
2. After that, click iCloud under the settings menu for your Apple account.

3. You will discover the “Hide My Email” feature and the other apps and services underneath the information regarding your iCloud storage space. Tap on it.

4. A setup screen will appear for you to complete if you use Hide My Email for the first time. If you have previously concealed your email address using Apple’s Sign-in with Apple service, you will see all those websites here. Select the “Create new address” option from the menu to get started.

5. You will now see an email address generated randomly by iCloud appear on your screen. You can produce a new address by selecting the option to “use a different address” if the one you were given isn’t satisfactory. Alternatively, you can move on to the next stage by tapping the “Continue” button.

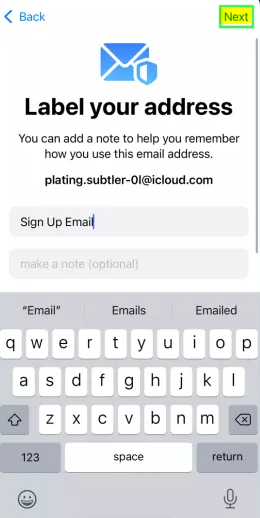
6. To complete the setup, all that is required of you at this point is to give your new email address a name, write a note to it so that you can keep track of why you’re using a random email address, and then press the “Next” button.

That sums it up nicely. Hide My Email allowed you to generate a random email address for use successfully. Congratulations! You can now use this email address when prompted to sign up for an online account anywhere on the world wide web.
FAQs
Does hide my email work on iPad?
If you or someone else in your Family Sharing group has an iCloud+ subscription, you will have access to Hide My Email on all of your Apple devices, including your iPhone, iPad, iPod touch, and Mac, as well as on iCloud.com. Check out the Create one-of-a-kind and random email addresses with Hide My Email and iCloud+ article for a summary of the feature.
How do I set up hide my email on Apple?
To hide your email address in System Preferences on macOS Ventura, click [your name] at the top of the sidebar, then select iCloud on the right, and then click Hide My Email. You can see and control all your unique, random email addresses. Within the Preferences of System (macOS 12): Click Apple ID, then in the sidebar, select iCloud, and last, next to the Hide My Email option, click Options.
Does hide my email hide my name?
It functions very similarly to an email relay service, with the exception that Apple will remove your name before sending it on to the receiver. Only your ‘Hide My Email’ email address should appear in the “From” field for the recipient to see.
Is Hide My email permanent?
When you delete an address that was generated with Hide My Email, that deletion is permanent, and it takes effect across all of your devices that are configured to use Hide My Email. There is no way for you to reactivate the address. on the toolbar, followed by clicking the “Hide My Email” button. Scroll all the way down until you reach the bottom of the list, then choose an email address from the section labeled “[number] inactive email address(es).”


