Guide
How to Fix Camera Not Working On Lenovo Laptop

Did the camera on your Lenovo laptop fail to function during your most recent Zoom meeting? When the camera on your Lenovo laptop stops working, this article will show you how to fix the problem. You’ll be back to Zoom in no time at all, I promise (for better or for worse).
Read Also: How to Screenshot On a Lenovo Laptop
Causes for Lenovo Laptop Camera Problems
There’s no root issue for Lenovo laptop camera problems. Here’s a list of possible reasons why the camera is not working.
- You haven’t selected the camera in the program you’re using.
- The program you’re using doesn’t recognize the camera.
- Another program is already using the camera.
- Your privacy settings are blocking the camera.
- The camera driver has encountered an error.
- Windows has failed to recognize the camera properly.
- Your laptop’s firmware has encountered an error.
- The camera is defective.
How to Fix It When a Lenovo Laptop Camera Is Not Working
The following techniques will resolve the majority of Lenovo laptop camera issues. It is critical to complete the stages in the correct order, as skipping steps may result in the issue’s root cause being obscured.
1. Check to see that your camera is operational. A switch near the camera on a newer model Lenovo laptop (2018 and newer) may allow you to cover or uncover the built-in Lenovo camera lens. If you have a newer model Lenovo laptop (2018 and newer), this switch may be located near the camera. It is possible that any app that uses the camera will display a blank image if it is closed. This switch should be checked to ensure that your camera is not disabled.
2. Check the settings of the programme that you’re attempting to utilize with the camera on your Lenovo laptop. It’s possible that you haven’t selected the camera in the software you’re working with. It’s possible that Zoom isn’t configured to use the camera. Lenovo laptop cameras will most likely be displayed as an Integrated Camera on the Lenovo laptop. If it isn’t already set as the default camera in the app, do it now by tapping on it.
3. Resolve any software incompatibilities that may have occurred. If the light on your camera indicates that it is in use, have a look at it to make sure it is on. There is currently a software employing the camera if this is true. A camera can only be used by one application at a time, therefore you’ll need to locate and close the programme that is presently using the camera before you can use it in another.
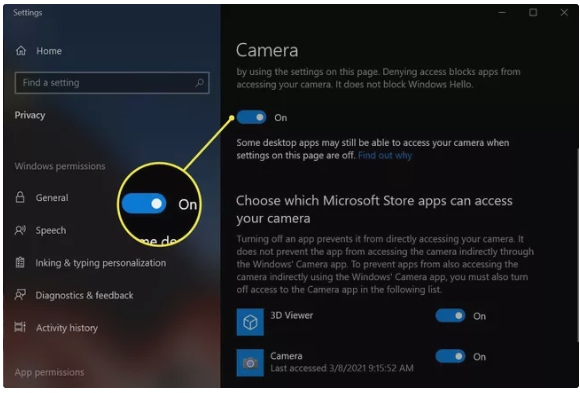
4. Examine the privacy settings on the camera. Open the first item that appears when searching for Camera Privacy Settings in Windows Search. A number of toggle buttons will be shown in the menu that appears. Check to see if the Allow apps to access your camera toggle is turned on in your settings. After that, locate the software you wish to use with your webcam in the list below and make sure its toggle button is turned on (see image below).
5. Restart your laptop if necessary. This should resolve any unexpected bugs or configuration difficulties that may have occurred. It will also close any software that is using the camera in the background, allowing the camera to be used by other applications.
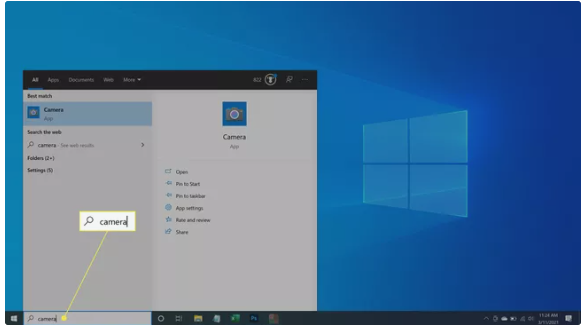
6. Check to see if the camera is operational. Open the Camera application by performing a Windows Search for it. If the app recognizes your Lenovo laptop camera and displays an image, the camera is functioning properly and the problem is with the programme you’re attempting to run on the laptop. Instead of troubleshooting the camera on your Lenovo laptop, you’ll need to troubleshoot the programme itself, such as Zoom or Microsoft Teams.
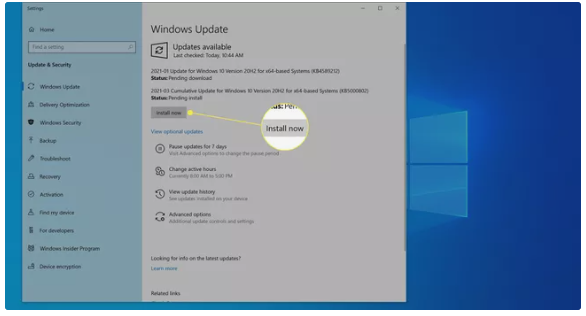
7. Updates should be checked for and installed. To install any Windows and driver updates that are currently available, launch Windows Update and select “Install Updates.” Doing so will resolve any known problems or configuration issues that have been fixed as a result of recent software and driver updates.
8. Check for and install driver updates on a manual basis. Visit the Lenovo support page for more information. Select Detect Product from the PC support category by hovering over it. Lenovo Support Bridge will be downloaded as a result of this action. Using the utility to scan for driver updates after it has been installed and launched is very simple. Install any software that is accessible, including those that are not linked to the camera, and then restart the laptop to take effect.

9. Manually reinstall the camera on your computer. Device Manager can be found by performing a Windows search for it and then opening it. Locate the Cameras category in the list of devices and click on it to open it. Uninstall the Integrated Camera by selecting it from the context menu of the right-click button. In addition, select the Delete Driver Software checkbox to the right. The Action menu can be found at the top of the window. Open it and then select Scan for Hardware Changes from the drop-down menu. The Integrated Camera should now be visible once more.

The procedures outlined above should be sufficient to resolve any troubles you are having with your Lenovo laptop camera. If the problem persists, it is likely that the camera has a hardware defect that needs to be addressed. For additional troubleshooting and repair, please contact Lenovo support.
Video

Vampire Crawlers Coin Farming Guide

Forza Horizon 6 Performance: Why 60 FPS Is Still the Console Standard

Yoshi and the Mysterious Book (2026) – Full Completion Guide, Rewards & Secret Ending

How to Get Free Pets in Adopt Me: A Guide for Players

Roblox Username Generator – Create a Cool & Unique Username in Seconds
How to Get Free Pets in Adopt Me: A Guide for Players

Grow a Garden Recipes in Roblox: Guide to Cook (Donuts, Sushi, Pie, Pizza & More!)
Roblox Username Generator – Create a Cool & Unique Username in Seconds
Yoshi and the Mysterious Book (2026) – Full Completion Guide, Rewards & Secret Ending


