Guide
How to Fix Curser From Moving Around in Windows 10

When you’re working on a computer, your cursor will occasionally appear to move on its own without your intervention. Instead you calling the exorcists just yet, consider that there are various reasons why a pointer can wander around when you are not moving the mouse.
Let’s look at some possible solutions to this situation.
Read Also: How to Open RAR files in Windows 10
How to Fix Curser From Moving Around
1. Double-Check Your Hardware
Before doing any checks or making any changes to your laptop or PC’s settings, make sure to verify all of the hardware components that might be causing the issue. Examine the mouse cord, USB ports, or remaining battery charge if you’re using a wireless mouse to see if anything needs to be replaced.
2. Double-Check Your Mouse’s Surface
If the hardware appears to be in working order, examine at the surface on which the mouse is sitting. It’s possible that your desk has scratches or has uneven surfaces. If you use a mouse pad, it is possible that it has been worn out and is providing inaccurate information to your mouse regarding its movement.
3. Change Touchpad Settings
If you have the sensitivity of your laptop’s touchpad set too high, the pointer will move with the slightest pressure on the pad. As a result, you should examine the sensitivity setting on your camera. The following steps will show you how to adjust the touchpad sensitivity on your laptop:
- After clicking Start, navigate to Settings > Devices.
- Touchpad may be found on the left-hand side of the screen.
- Change the sensitivity of the touchpad by selecting it from the drop-down menu underneath Taps.
The change will be visible in real time, allowing you to experiment with different settings until you find one that you prefer.
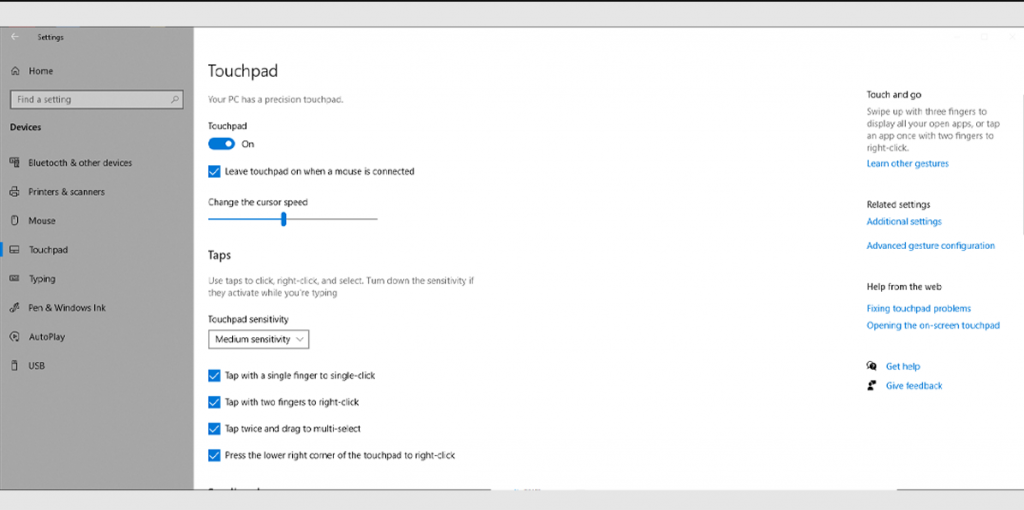
It is possible to deactivate the touchpad at the top of the window if you have attached a mouse to your Windows 10 laptop and do not intend to use the touchpad. Additionally, uncheck the box labelled Leave touchpad on when a mouse is attached if you want Windows 10 to automatically disable the touchpad when a mouse is connected.
It’s important to note that the pointer may move on its own if the touchpad has gathered dust over time. Alternatively, you might try cleaning your laptop and seeing if it solves the problem.
4. Disconnect Other Devices
Using a joystick, graphics tablet, or other input devices linked to your laptop or PC might be the source of the issue you are experiencing. Because some of these are also capable of controlling the cursor, it is possible that they will come into conflict as they compete for power.
You may either detach all of your devices and rejoin them one at a time to figure out which one is causing the problem, or you can disable them temporarily when you aren’t using them anymore.
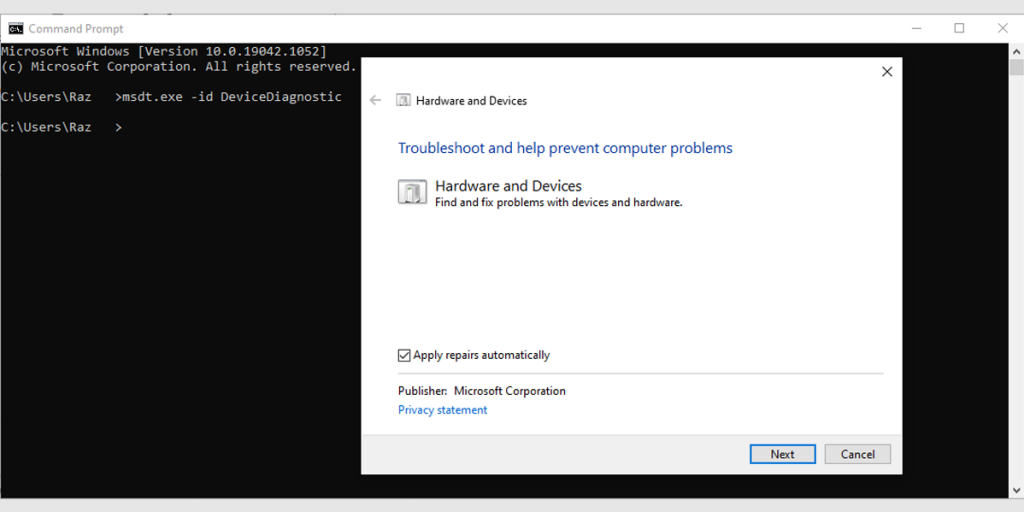
5. Run the Hardware Troubleshooter
In spite of the fact that Windows 10 does not have a dedicated mouse troubleshooter, you may reach the Hardware troubleshooter by using the Command Prompt.
This is how you may go about it:
- Search for command prompt in the Start menu search box and select Run as administrator from the results.
- Enter the command msdt.exe -id DeviceDiagnostic.
- To continue, hit the Enter key. The Hardware and Devices troubleshooter will now be launched by Windows 10.
- Select Advanced > Apply repairs automatically from the drop-down menu.
- Next should be selected.
6. Update Your Mouse’s Drivers
Over time, the drivers for a mouse may get out of date or corrupted, and you will need to download and install new ones in order to restore them back into working condition. If your hardware is being negatively affected by incompatible or defective drivers, it’s worthwhile to give them a second chance.
Video

Roblox Username Generator – Create a Cool & Unique Username in Seconds

Grow a Garden Recipes in Roblox: Guide to Cook (Donuts, Sushi, Pie, Pizza & More!)

Job Opportunities in Dubai – 2026

Mr Bit at the SBC Awards Europe 2025: The Bulgarian Brand Setting New Standards in the European Gaming Industry

Dennis Rodman Net Worth 2026 – Everything You Need to Know

Bloxburg Neighborhood Codes 2026
Grow a Garden Recipes in Roblox: Guide to Cook (Donuts, Sushi, Pie, Pizza & More!)
Job Opportunities in Dubai – 2026
Dennis Rodman Net Worth 2026 – Everything You Need to Know


