Guide
How To Insert Line In Word

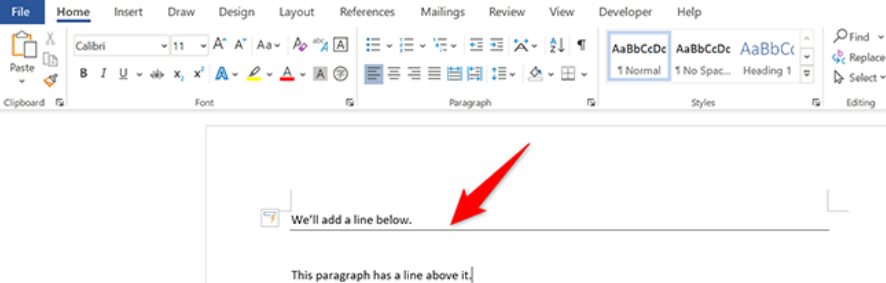
You are able to make a signature line or visually distinguish different sections of text in your papers by using lines. We’ll walk you through the process of adding different line kinds to your papers using Microsoft Word, which provides a wide variety of line types for that purpose.
How To Insert Line In Word Quickly
Make advantage of Word’s shortcut characters whenever you need to rapidly add a line to your page. When you hit these symbols on your keyboard three times in a row, Word will insert a specified line in your document. These symbols are standard and may be found on your keyboard. Keep in mind that you are unable to personalise these kinds of lines in any way.
To begin using this strategy, launch Microsoft Word and then proceed to open your project. Put the cursor on the spot in the document where you want to put the line you wish to add.

On your keyboard, press the following characters to add a line:
- — (three hyphens): This adds a regular line.
- === (three equal signs): This adds a regular double line.
- ___ (three underscores): This adds a bold line.
- *** (three asterisks): Use this to add a dotted line.
- ### (three hashes): This adds a triple line.
- ~~~ (three tildes): Use this to add a wave line.
Because the line that Word inserts spans the whole width of your page, you won’t need to bother about manually adjusting its dimensions. The end, as they say.
Read Also: How To Transfer Apple Pay To Bank
How To Add Custom Line In Word
Utilize this approach in the event that you want to manually introduce a line into your document and then personalise it.
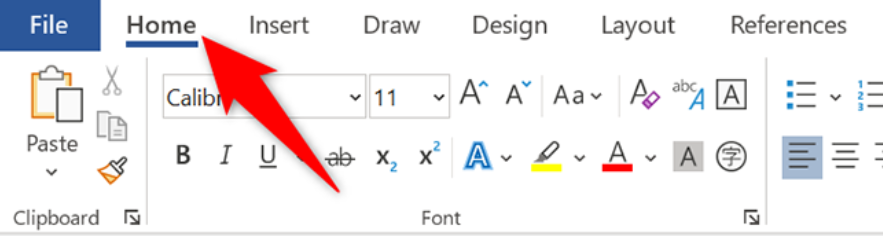
Put the cursor in the spot where you want to add a line in the document you have open in Word. After that, on the ribbon that’s at the top of Word, pick the “Home” tab.
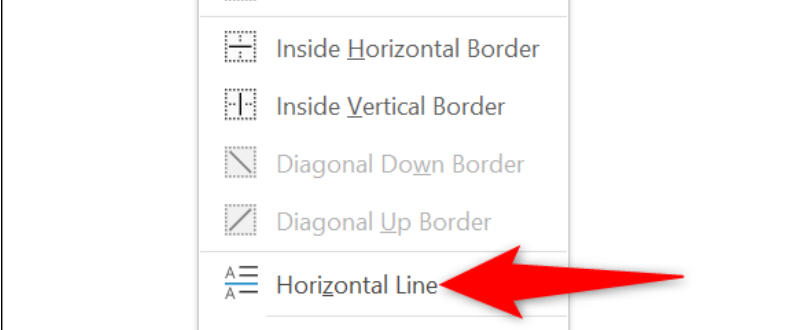
Select the down arrow icon that is located next to the “Borders” heading in the “Paragraph” section of the “Home” tab.

Choose “Horizontal Line” from the menu accessible through the down arrow symbol.
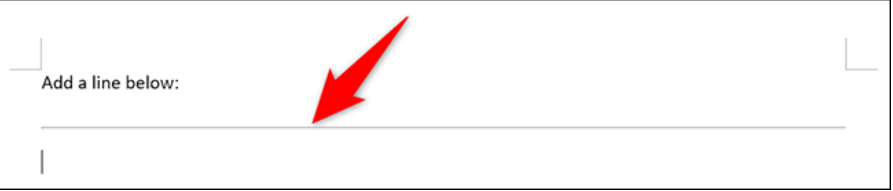
- Word will insert a line that spans the whole width of your page into your document.
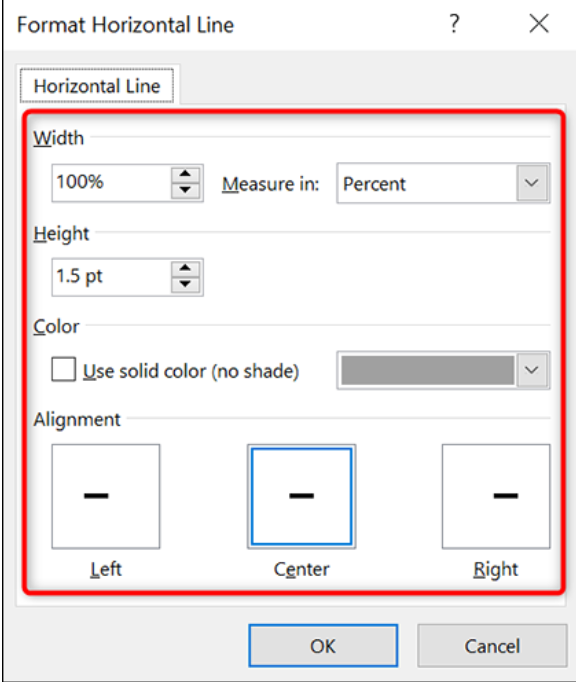
Simply double-click the line you just added to bring up the “Format Horizontal Line” box, which will allow you to modify the newly added line.
Use the numerous choices available in this box to adjust the style of your line, such as changing its colour. After that, you may save your changes by clicking the “OK” button.
And that concludes the tutorial on how to create lines that may be customised in your Word documents. Extremely practical!
FAQ’s
In Microsoft Word, what is the keyboard shortcut for inserting a horizontal line?
Additionally, you may insert a horizontal line by utilising shortcuts on the keyboard (which insert border lines as AutoCorrect entries). In order to insert lines, type the following characters, then hit Enter or Return on your keyboard: Simply typing three hyphens (—) will insert a simple line by itself. Simply typing three equal signs (===) will result in the addition of a simple double line.
How can you insert a vertical line that is perfectly straight in Microsoft Word?
After moving the cursor into a column, choose the Layout tab from the ribbon. Click the down arrow next to Columns, then pick “More Columns” from the menu that appears. When the new window opens, make sure the option for Line Between is checked. To apply the vertical line, and to dismiss the window, click the “OK” button.
How do you create a continuous line in Microsoft Word?
If you want to produce a thin solid line, type three hyphens in a row on an otherwise blank line, then press “Enter.” If you want to create a thicker solid line, instead of three hyphens you should use three underscores, and if you want to create a double line, use three equal signs.

Vampire Crawlers Coin Farming Guide

Forza Horizon 6 Performance: Why 60 FPS Is Still the Console Standard

Yoshi and the Mysterious Book (2026) – Full Completion Guide, Rewards & Secret Ending

How to Get Free Pets in Adopt Me: A Guide for Players

Roblox Username Generator – Create a Cool & Unique Username in Seconds
How to Get Free Pets in Adopt Me: A Guide for Players
Yoshi and the Mysterious Book (2026) – Full Completion Guide, Rewards & Secret Ending
Forza Horizon 6 Performance: Why 60 FPS Is Still the Console Standard


