Guide
How to Record in PlayStation 4 Gameplay with Voice Commentary
In this guide, we’re going to expose you a way to file and percentage gameplay at the PlayStation 4, from adjusting your video settings to saving the very last product. We’ll additionally display you a way to edit and add your clip without delay to social media or, if you’re seeking out a bit better manufacturing quality, a way to export the record on your computer.
Adjust your video settings
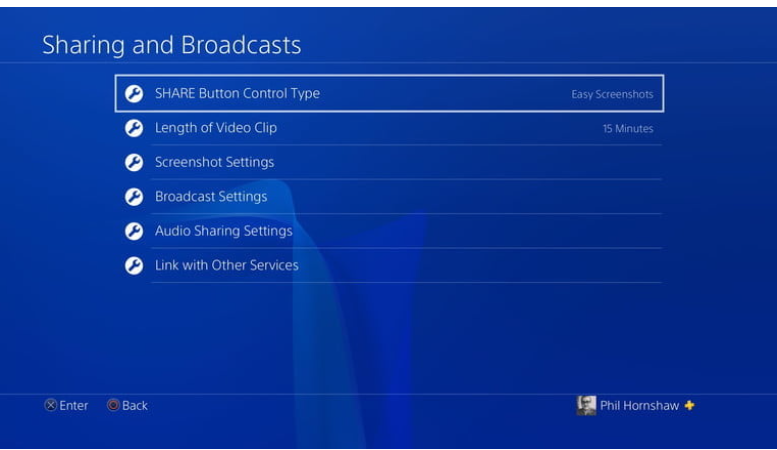
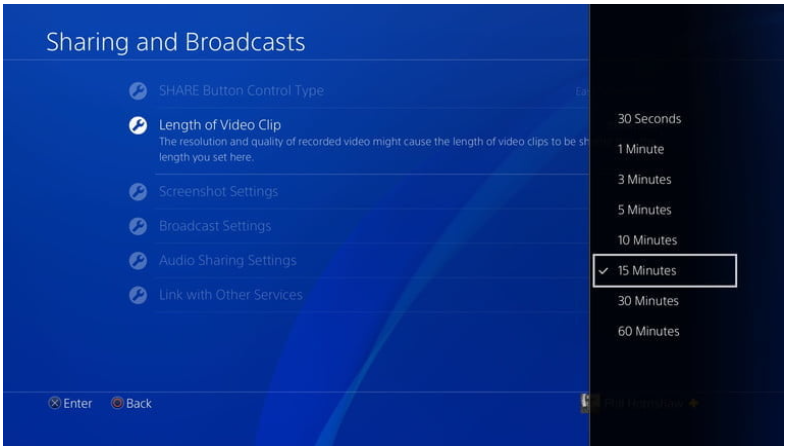
Step 1: From here, you’ll be capable of extrade a gaggle of various settings for a way you proportion content material you create to your PS4, which include video. You’ll want to apply those settings later to add your video, however for now, you need to prep the PS4 to document the precise period of your clips.
Step 2: To do this, visit the Set Video Length menu.
Here, you may decide how lengthy the PlayStation four will document while you press the percentage button. The PS4 can mechanically document for so long as an hour or as brief as 30 seconds, however the default time is 15 minutes.
Fire up your game
The real recording element may be very simple. Start gambling a recreation and you’ll have options. First, you may begin a brand new recording with the aid of using the use of the Share button, with a view to document for the duration you certain with inside the settings, or till you hit the Share button again.
The 2d alternative is to seize a video of some thing that simply happened. Your PlayStation four robotically saves the remaining 15 mins of gameplay out of your modern-day play session. If you come across an splendid gameplay second which you didn’t see coming, you may nonetheless seize it on video even in case you didn’t assume to hit the Share button. We’ll give an explanation for the way to do each sorts of recording — the controls are comparable however range barely in every case.
Start a new recording
Step 1: If you need to document a video with the aid of using essentially urgent Record in your PS4 earlier than you begin playing, press the Share button twice, similar to you’re double-clicking a mouse, to begin rolling.
Step 2: The PS4 will file for the period of time you’ve set beginning while you double-press the Share button, and you may prevent the recording at any time with the aid of using double-urgent the Share button again.
Step 3: When the recording is complete, your clip can be stored with inside the Capture Gallery folder for your PlayStation 4’s domestic screen.
Make positive that the sport you’re recording doesn’t routinely disable recording capabilities. Certain titles — Metal Gear Solid V: The Phantom Pain is an notorious example, in addition to the Ratchet & Clank reboot — will quickly prevent the seize function from operating so as to keep tale spoilers. To get round this, you’ll ought to use a seize card in preference to the integrated proportion capabilities at the console, however only a few video games employ it a number of times.
Save the closing 15 mins of video
When some thing awesome occurs in a recreation and also you need to file it, however you didn’t formerly hit the Share button to begin a video, you aren’t out of luck. Your PS4 is constantly recording video — it simply doesn’t shop that video until you inform it to. The closing 15 mins of your gameplay consultation is constantly stored with inside the PS4’s video cache. So in case you simply were given via a hard boss combat or pulled off a candy headshot, you may nevertheless shop the video from the cache.
Here’s the thing: If you need to shop the closing 15 mins of your gameplay, do now no longer double-press the Share button! That’ll begin a brand new video recording from the instant you push the button onward. Starting a brand new recording will delete the cached video.
Step 1: To store the final 15 mins of gameplay footage, clearly press the Share button as soon as to get entry to the Share menu
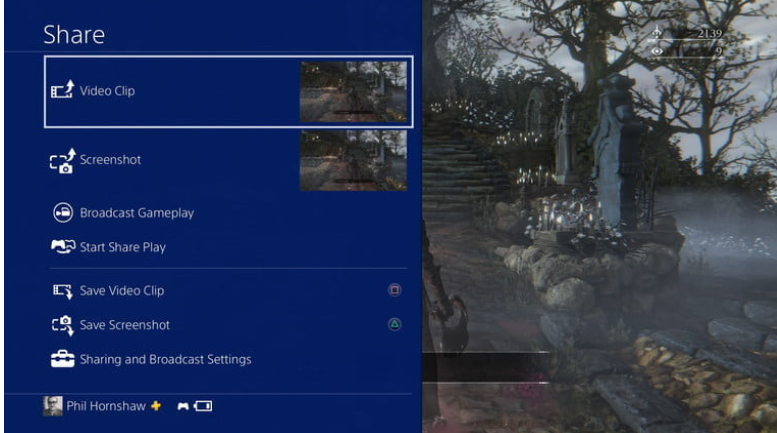
Step 2: From there, choose Save Video Clip, or hit the Square button. That will keep the video to the Capture Gallery, in which you could mess with it at your enjoyment or proportion it.
Step 3: You also can use the Share menu to right now proportion the video clip on social media, so that you can additionally keep it to the Capture Gallery, however will take you to the social media interface next.
Trim your clip
Now you’re prepared to edit your video clip and get it into shareable shape. In maximum cases, you’ll need to trim your video to get it prepared for public consumption. Some social systems require films to be short — Twitter clips, for example, have to be much less than minutes. Even in case you don’t want to shorten your clip, you may need to put off the dull stuff at the start and/or stop of your video and get to the coolest part.
Step 1: The Trim alternative is to be had in places. In the Capture Gallery, spotlight your video, and push the Options button to your controller to drag up a menu that consists of the Trim alternative.
Step 2: You also can select Share Video Clip from the Share menu, and you’ll get entry to a display screen with a listing of social networks and video services.
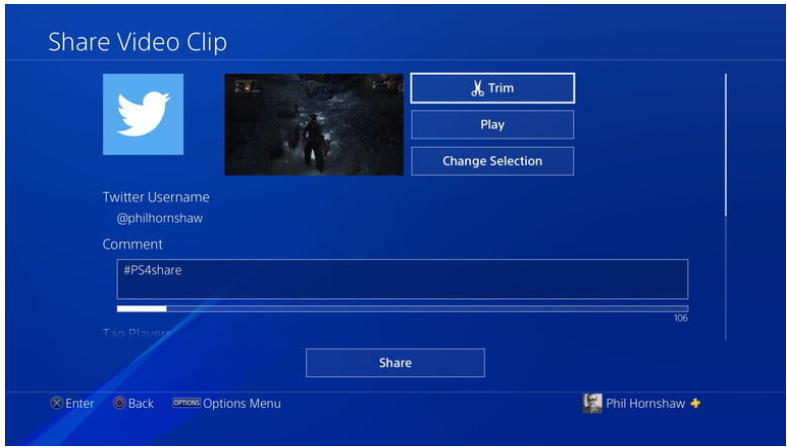
Step 3: Pick the only you need to apply to proportion your video, and you’ll be taken to the Share screen, wherein you could write a Facebook replace or a Tweet, upload an outline of your video, and so on. You’ll locate the Trim button on the pinnacle of the screen.
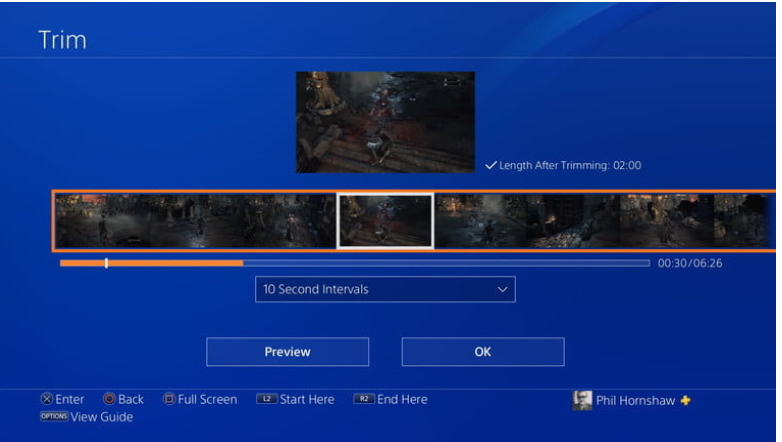
Step 4: Selecting Trim lets in you to do away with a number of the photos out of your video report to shorten it.
Step 5: First, discover the spot with inside the video in which you need it to begin with the aid of using the usage of the Directional Pad in your controller to scroll thru a macro view of the video’s timeline.
The timeline indicates screencaps that constitute small snippets of the video: You can boom or lower the dimensions of those snippets, converting how a good deal of the video you bypass over every time you hit the D-Pad.
Step 6: To extrade the period of the timeline, choose the dropdown menu that reads “10 Second Intervals.” As you may have guessed, the default timeline will purpose each press of the D-Pad to pass 10 seconds of video, however you could boom that to 60 seconds, or carry it right all the way down to one 2nd to be greater precise.

Step 7: When you locate the spot in which you need your new, shortened video to begin, hit L2 to set the begin point.
Step 8: From there, scroll ahead alongside the timeline to locate your endpoint and hit R2. An orange field will spotlight the part of the timeline that becomes your new video. The different sections might be deleted whilst you finalize the edit.
Step 9: For greater specific edits, you could watch the video to locate the proper spot to begin or forestall with the aid of using urgent the Preview button beneath the video timeline. As the video plays, you’ll see a timer strolling at the proper aspect of the display screen and a cursor transferring over the timeline, each of which assist you to pinpoint whilst to begin and forestall your clip.
Step 10: Complete the trim, and your video might be stored to the Capture Gallery with the relaxation of your videos.
FEATURED Video
RELATED: How Can You Play It Fallout New Vegas PS4
Conclusion
Recording in PlayStation 4 Gameplay with Voice Commentary. Video content is an important part of your online strategy, and it’s important to get it right. Video is one of the best ways to engage an audience and keep them interested in your brand. It’s also a great way to show how your product or service works.
Whether you’re a freelancer or just someone who wants to show off their skills, recording in PlayStation 4 Gameplay with Voice Commentary is a great way to produce high-quality video content. The good news is that it’s not as difficult as you might think.
In this post, we will show you how to record in PlayStation 4 Gameplay with Voice Commentary. We’ll walk you through what you’ll need, how to set up and configure your PS4 and camera, and then we’ll share the final settings that will help you get the best video and audio quality for your video.

Vampire Crawlers Coin Farming Guide

Forza Horizon 6 Performance: Why 60 FPS Is Still the Console Standard

Yoshi and the Mysterious Book (2026) – Full Completion Guide, Rewards & Secret Ending

How to Get Free Pets in Adopt Me: A Guide for Players

Roblox Username Generator – Create a Cool & Unique Username in Seconds
How to Get Free Pets in Adopt Me: A Guide for Players

Grow a Garden Recipes in Roblox: Guide to Cook (Donuts, Sushi, Pie, Pizza & More!)
Roblox Username Generator – Create a Cool & Unique Username in Seconds
Yoshi and the Mysterious Book (2026) – Full Completion Guide, Rewards & Secret Ending


