Guide
How to Remove the Lock Screen on Windows 10
Before you are able to log in to Windows 10, as well as Windows 11, there is a “lock screen” that needs to be eliminated. During the sign-in procedure, this screen frequently comes across as an annoyance. We will walk you through the process of removing it. On a tablet, a lock screen might make some sense; however, if you have a classic desktop PC, having one feels absolutely vital. Why do you feel the need to have a sign-in screen in addition to a lock screen? Let’s get rid of it.
It is not possible to disable the lock screen through the primary interface for configuring Windows settings; nevertheless, doing so is not particularly difficult. Before proceeding with one of the methods below, you will need to determine if you are running Windows 10 Home or Windows 10 Pro on your computer.
Read Also: How to Turn Off Notifications on Windows 10
How to Remove the Lock Screen on Windows 10
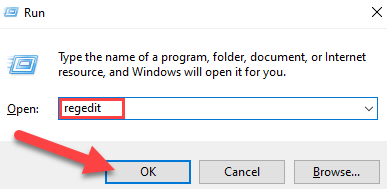
The Windows Registry is where you’ll find the option to modify this setting. To launch the Registry Editor, you must first open the Run window by pressing the Windows key and the letter R simultaneously. In the box that appears, type “regedit,” and then click the “OK” button.
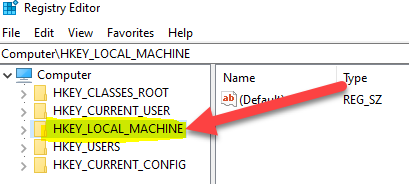
Next, double-click “HKEY LOCAL MACHINE.”
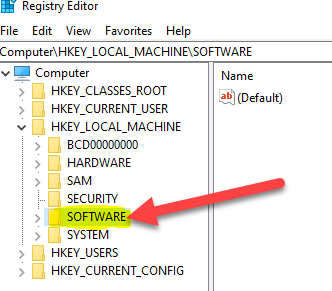
Next, do a double-click on the word “SOFTWARE.”
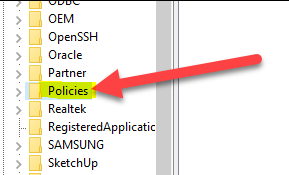
Double-clicking the word “Policies” will bring up an extensive list.
After that, right-click the “Windows” folder after you’ve double-clicked the “Microsoft” folder. From the menu, select the New > Key option.
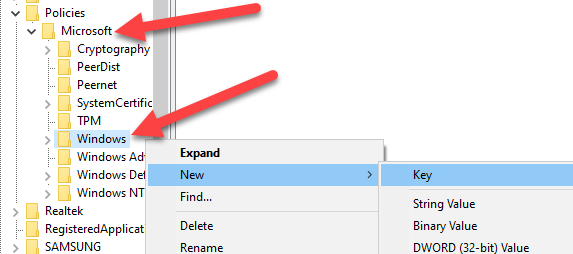
Personalization should be the new name for the folder that you just created; its current name is “New Key #1.”
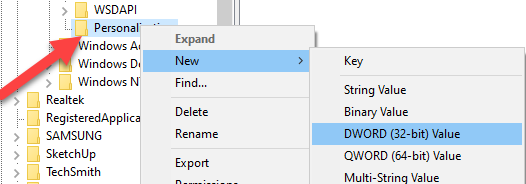
Now, give the folder that we just made called “Personalization” a right-click. From the menu, select the “New” option, then “DWORD (32-bit) Value.”
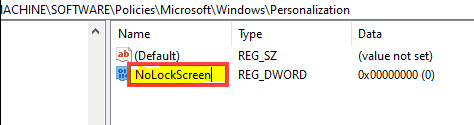
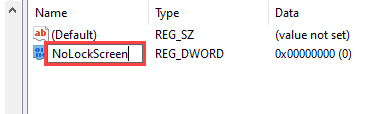
Change the name of the newly created DWORD to “NoLockScreen.”
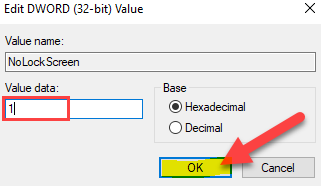
Now, double-click the “NoLockScreen” icon, and in the field labelled “Value Data,” input the number 1. When you are finished, select “OK” from the menu.
That wraps everything up! You won’t be able to see the lock screen the next time you start up your Windows 10 computer (or when you lock your screen).
FAQs
Why can’t I remove my screen lock?
Encryption of Equipment
Check to see that the handset has not been encrypted in case you are unable to delete the PIN code from the phone you are using. You can find this option in the menu’s settings section, where it’s categorised as “encryption.”
Why does my screen keep locking Windows 10?
If you find that your computer is locking itself without your intervention, you will need to stop the lock screen from showing automatically by following the steps outlined in the following guide for Windows 11/10: Disable the Lock Screen or change the settings for the timeout. To disable Dynamic Lock, click here. Disable Blank Screensaver.
Why is my lock screen disabled by administrator?
There are some Android phones that restrict the user’s ability to remove certain kinds of locks. Certain applications on your Android have the ability to perform administrative tasks. These applications can prohibit you from modifying the lock settings, in addition to obstructing a variety of other functions. If you have encrypted data on your device, the option to deactivate the screen lock might no longer be available to you.
How do I get rid of home screen layout lock?
You can access the settings for your home screen either by pulling down the notification shade on your device and selecting Settings > Home screen or by long-pressing the home screen and selecting Settings. After reaching that location, tap the toggle that is labelled Lock Home screen layout to turn off the feature.
How do I fix disabled administrator?
Start by clicking the Start button, then right-click My Computer, and then click the Manage button. Click Users, then expand Local Users and Groups, right-click Administrator in the right pane, and then click Properties to access the administrator’s settings. After you have unchecked the box labelled “Account is disabled,” click the “OK” button.

Vampire Crawlers Coin Farming Guide

Forza Horizon 6 Performance: Why 60 FPS Is Still the Console Standard

Yoshi and the Mysterious Book (2026) – Full Completion Guide, Rewards & Secret Ending

How to Get Free Pets in Adopt Me: A Guide for Players

Roblox Username Generator – Create a Cool & Unique Username in Seconds
How to Get Free Pets in Adopt Me: A Guide for Players
Yoshi and the Mysterious Book (2026) – Full Completion Guide, Rewards & Secret Ending
Forza Horizon 6 Performance: Why 60 FPS Is Still the Console Standard


