Apple
How to Backup Your Mac Computer
It’s likely that backing up your computer is not something that crosses your mind on a daily basis. But despite the fact that it hasn’t been at the forefront of your consciousness recently, it will undoubtedly become significant in the near future. Just take a moment to consider how your computer will function in two, three, or even five years from now. What will happen to all of your information if, for some reason, your Mac suddenly stops working?
Even while the vast majority of people are aware that they should back up their information, the incentive to actually do so isn’t always sufficient for them to do so. The good news is that backing up Macs is fairly simple. In point of fact, they are intended to do this function; all that is required of you is to choose a backup method and configure it.
A couple of solid methods for backing up your Mac are:
- Time Machine: A program that works with an external storage device to make digital copies of your Mac, including everything from information to look and feel.
- iCloud: Wireless syncing for all of your Mac’s apps that can be accessed from any of your Apple devices.
Here’s how to set up and use either backup system.
Read Also: How to Use a Multi-Button Mouse With Your Mac
How to Back Up Mac with Time Machine
Your Mac comes equipped with its own backup system called Time Machine. It will automatically create backup copies of your computer every hour, covering the previous 24 hours. Additionally, it will create backup versions of your computer every day and every week, covering the previous month and all months prior to that.
You won’t have to waste time trying to recreate the appearance of your belongings as they were when you first set them up because everything will keep the same appearance it had when it was initially made by you.
But in order to use Time Machine to create actual backups, you will need an external storage device in addition to, of course, a way to connect it to your computer. This could be accomplished through the use of a physical cord that connects to an external hard drive or through the use of an AirPort Time Capsule.
Now, please proceed by following the procedures below:
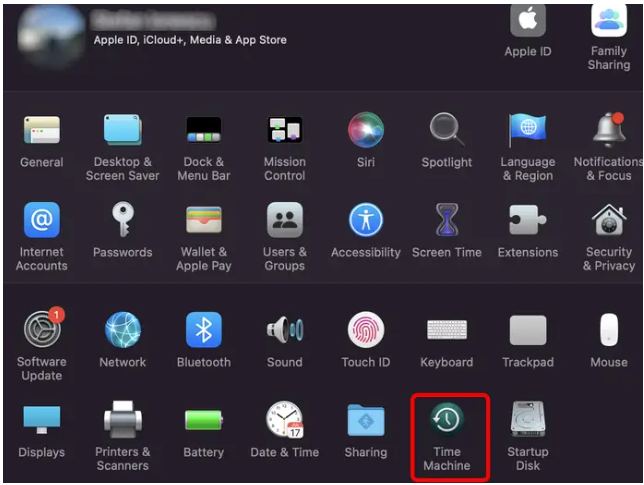
1. Attach the data storage device to your Apple computer. Click the Apple menu in the upper left corner of your screen, and then select System Preferences from the drop-down menu that appears. Your computer will then acknowledge that you have completed the task.

2. Select Time Machine from the menu.
3. When Time Machine has finished opening, you will have the option to check the box to Show Time Machine in the Menu Bar. This will cause the Time Machine icon to be added to the top toolbar. After that, select the backup disc by clicking on it.
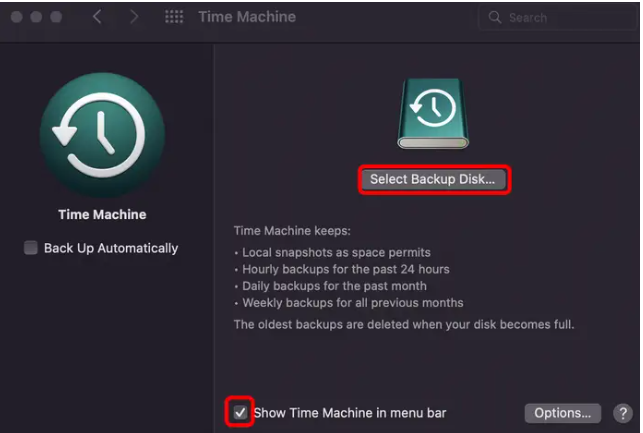
4. A new, smaller window will appear, and all you need to do to proceed is to choose the external storage device. You have the option to encrypt your backup by selecting the checkbox labelled Encrypt backups, which is located on the far left of the screen. After that, you will need to select Use Disk in order to initiate the process of backing up.
After you have chosen your backup strategy and configured Time Machine, it will start producing those periodic copies of your Mac on its own after a certain amount of time has passed. Keep in mind that the first synchronization could take quite some time, depending on the number of files you have.
You also have the option to generate a backup manually by going to the top toolbar, clicking on the Time Machine icon, and selecting the Back Up Now option.
How to Back up Mac on iCloud
Using iCloud to back up your data and documents on your Mac is an additional solution to the problem of data loss. To get things rolling, you’ll need to get everything set up:
1. The first thing you need to do is check that your Mac is running the most recent version of macOS, which you can do by going to apple.com.
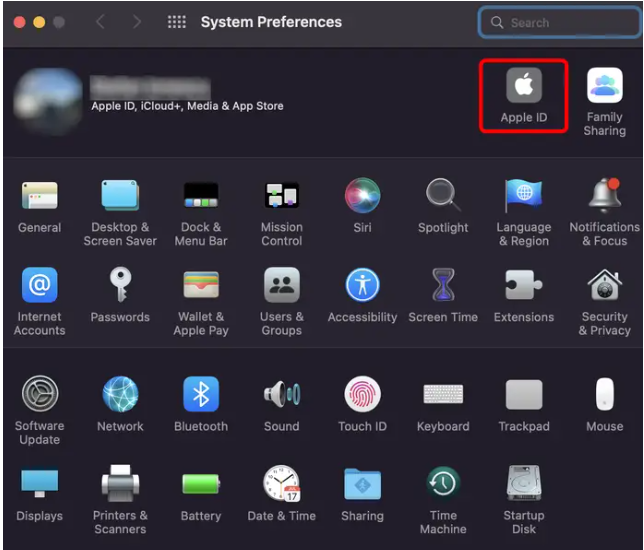
2. When your version of macOS is up to date, pick System Preferences from the Apple menu by clicking on it.
3. If you are already logged in, go to the System Preferences menu and select Apple ID just once.
4. Navigate to the top right of the page and select the Sign In button if you have not previously done so.
5. Click on the Next button after entering your Apple ID and password.
6. You will see a prompt that will ask you if you wish to combine your iCloud Contacts, Calendar, and Safari bookmarks. Depending on what you want to accomplish, you can either click the Merge button or the Don’t Merge button.
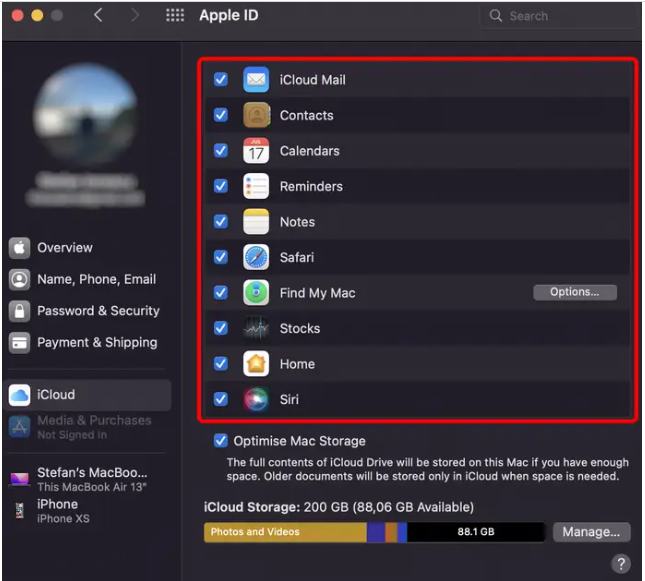
7. After that, you will be able to view which applications you can add to or remove from your iCloud account, as well as how much of your allotted 5 GB of free storage space is presently being used by your information. In the event that it becomes essential, you have the option of upgrading to a more robust iCloud account, which comes with a variety of associated monthly costs.
After that point, the information you dictate will be automatically updated to reflect the changing and expanding nature of your papers. As long as you continue to use the same Apple ID, you will also be able to access the data that you have stored on any other device.
How to Restore a mac from a backup
Imagine that the worst possible thing has happened, and you need to restore your Mac. You need not worry about anything because you have been using Time Machine to back everything up. Simply obtain the backups from an external storage device, and then read our guide titled “How to Restore Your Mac Using Time Machine and an External Hard Drive.”
If you have a lot of data stored on your Mac, you should make sure that you have an afternoon free because the process of restoring everything can take some time.
Video

Roblox Username Generator – Create a Cool & Unique Username in Seconds

Grow a Garden Recipes in Roblox: Guide to Cook (Donuts, Sushi, Pie, Pizza & More!)

Job Opportunities in Dubai – 2026

Mr Bit at the SBC Awards Europe 2025: The Bulgarian Brand Setting New Standards in the European Gaming Industry

Dennis Rodman Net Worth 2026 – Everything You Need to Know

Bloxburg Neighborhood Codes 2026
Grow a Garden Recipes in Roblox: Guide to Cook (Donuts, Sushi, Pie, Pizza & More!)
Job Opportunities in Dubai – 2026
Dennis Rodman Net Worth 2026 – Everything You Need to Know


