Apple
How to Use a Multi-Button Mouse With Your Mac

This article will instruct you on how to programme a function into the secondary button found on an Apple Magic Mouse and provide you with step-by-step instructions. In addition to that, it explains how to activate the secondary button capabilities on older models of the Mighty Mouse or any other type of mouse. This information is applicable to any mouse. These instructions belong to the computer operating system known as macOS Big Sur (11). Despite this, older versions of macOS and OS X both follow a procedure that is either the same as the current one or one that is extremely similar to it.
Read Also: How to Change Your Mouse Cursor in Windows
How to Enable Multi-Button Support on a Magic Mouse
To function properly with a Mac, an Apple Magic Mouse needs to be running OS X 10.6.2 or a later version, and a Magic Mouse 2 needs to be running OS X El Capitan (10.11) or a later version. Check your mouse’s system requirements to see whether it requires a certain minimum version of the Mac operating system. Other gesture-based mice may have similar needs.
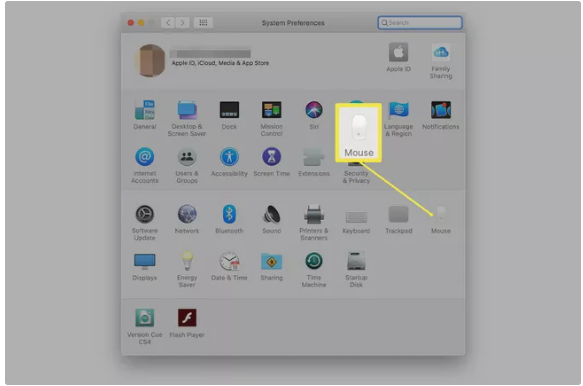
1. You can open the System Preferences by either clicking the icon for System Preferences that is located in the Dock or by selecting the System Preferences item that is located in the Apple menu.
2. Clicking the Mouse icon in the System Preferences window will open the Mouse preference pane for you to configure.
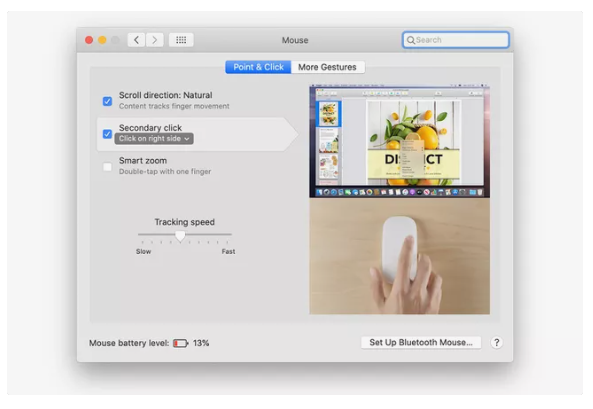
3. Navigate to the Point & Click tab in the menu.
4. Make sure the check box for Secondary click is selected.

5. Make your selection from the list that appears under Secondary. Simply click on the side of the mouse surface that you wish to utilize for the secondary click, and the side will be selected for you. Pick either the right or the left option.
6. When you are finished making changes, close the System Preferences window.
How to Enable the Second Button on a Mighty Mouse
Before there was a Magic Mouse, there was a Mighty Mouse. It was available for purchase from Apple from 2005 to 2009, after which the company rebranded it as the Apple Mouse and began selling a Bluetooth version of the product up until 2017.
1. You may access System Preferences by either clicking the icon that is located in the Dock or by selecting System Preferences from the Apple menu.
2. To access the preference pane in the System Preferences window, you will need to either click the Mouse icon or the Keyboard & Mouse icon, depending on the version of the Mac operating system that you are using.
3. Simply clicking on the Mouse will bring up a graphical illustration of your Mighty Mouse.
4. You can customise the function of each button on the Mighty Mouse by using the drop-down menus that are located next to each button. Primary Click duties are distributed evenly between the left and right mouse buttons in the configuration that is used by default.
5. Select Secondary Click from the context-sensitive drop-down menu that corresponds to the button whose behaviour you wish to modify.
6. When you are finished making changes, close the System Preferences window.
Video

Roblox Username Generator – Create a Cool & Unique Username in Seconds

Grow a Garden Recipes in Roblox: Guide to Cook (Donuts, Sushi, Pie, Pizza & More!)

Job Opportunities in Dubai – 2026

Mr Bit at the SBC Awards Europe 2025: The Bulgarian Brand Setting New Standards in the European Gaming Industry

Dennis Rodman Net Worth 2026 – Everything You Need to Know

Bloxburg Neighborhood Codes 2026
Grow a Garden Recipes in Roblox: Guide to Cook (Donuts, Sushi, Pie, Pizza & More!)
Job Opportunities in Dubai – 2026
Dennis Rodman Net Worth 2026 – Everything You Need to Know


