Guide
How to Clear a Scratch Disk in Photoshop

Because Photoshop is widely regarded as one of the most sophisticated image editors available, it should come as no surprise that it may place a significant strain on your computer’s hard disc.
Addition of text and brightness adjustment are only the beginning of what image editing can accomplish. When you utilize Photoshop’s more demanding features, your system’s RAM will be used to store temporary files, which will consume system resources. A substantial portion of this aspect is controlled by the scratch disc feature. Photoshop can become overburdened with data if it is not correctly managed, which can result in the programme failing to work. Consider the following procedure for clearing a scratch disc in Photoshop.
Read Also: How to Make a Logo in Photoshop
Scratch disk error
To save data linked to images, such as modifications, a scratch disc is used instead of your system’s RAM. A scratch disc is created by Photoshop and uses the hard drive and solid-state drive of your computer to do this.
Using the Purge tool
The Purge tool removes all of the cache files associated with a certain Photoshop file. If you no longer require access to certain files, you can delete them using this method.
Step 1: Select the Purge field from the Edit drop-down menu.
Step 2: Using the drop-down option that displays, you can clear the clipboard, history, all of your data, and the video cache. Select the All option from the drop-down menu.
![]()
Deleting Temporary Photoshop files
The possibility that your hard disc contains several GBs of unneeded Photoshop temporary files is not an exaggeration; it is perfectly feasible that your hard drive contains many GBs of unneeded Photoshop temporary files. In rare instances, it may even exceed 100GB in storage capacity. Consequently, if you’ve been using Photoshop for many years without deleting the data associated with it, it will inevitably take up a significant amount of storage space.
Not only will deleting them promptly free a scratch drive, but it will also make Photoshop function more effectively as a result of the deletion.
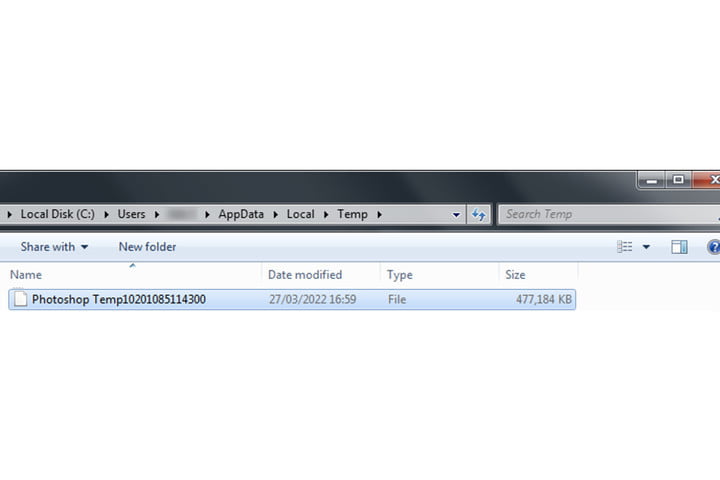
Step 1: Navigate to your computer’s Temporary Internet Files folder. Open AppData > Local > Temp in your user folder to find the temporary files. You can also go to this location by typing percent temp percent into the search box on your start menu’s start screen.
Step 2: Look for any files with the extension PST.tmp or Photoshop Temp in the PST.tmp or Photoshop Temp folder. All of these files will have some variation in the amount of files.
Select the files that need to be deleted and press Delete. Make careful to empty your trash to ensure that they have been completely removed from your system. As shown in the figure below, a single Photoshop temporary file I discovered is consuming approximately 500MB of available disc space.
How to Prevent a Scratch Disk from Getting full
As a follow-up to our discussion of the many methods for clearing a scratch disc in Photoshop, let’s have a look at how to avoid the problem (a scratch disc becoming fully utilized) in the first place.
When you start your computer, a scratch disc is automatically created in your main hard drive, which is often the C: drive for most people. Photoshop offers the option of moving the temporary files and data to a different location, such as another internal or external hard disc with sufficient space to store Photoshop’s temporary files and data. You can also link a scratch disc to a group of hard drives or solid state drives (HDDs/SSDs).
Step 1: Select Edit > Preferences > Scratch drives from the menu bar. If you’re using an earlier version of Photoshop, the Scratch discs component will be located in the Performance section.
![]()
Step 2: Alternatively, deselect the C: drive and select another drive that has been installed on your computer, or select the drives of your choosing. As you can see in the image below, I’ve chosen my 4TB solid-state drive.
![]()
According to the information provided in the description part of the Scratch discs section, Adobe itself suggests that you utilize trustworthy, fast external or internal drives rather than your boot drive in order to achieve the best possible performance. If your system is equipped with a hard drive(s) that meets these requirements, choose the C: drive and, using your arrow keys, move the newly selected drive to the top of the disc order.
To confirm the switch, click OK and then restart the programme once more.
Video

Vampire Crawlers Coin Farming Guide

Forza Horizon 6 Performance: Why 60 FPS Is Still the Console Standard

Yoshi and the Mysterious Book (2026) – Full Completion Guide, Rewards & Secret Ending

How to Get Free Pets in Adopt Me: A Guide for Players

Roblox Username Generator – Create a Cool & Unique Username in Seconds
How to Get Free Pets in Adopt Me: A Guide for Players
Yoshi and the Mysterious Book (2026) – Full Completion Guide, Rewards & Secret Ending
Forza Horizon 6 Performance: Why 60 FPS Is Still the Console Standard


