Guide
How to Disable UAC on Windows 10 or 11
The acronym “UAC” stands for “User Account Control,” it refers to a built-in security feature of Windows that prevents programs from accessing protected folders unless the user has specifically authorized them. It adds another layer of protection between your system and software that could be harmful. User Account Control is present in all recent versions of Windows, including Windows 11, Windows 10, Windows 8, Windows 7, and Windows Vista, and it is turned on by default in all of these operating systems. If you turn off UAC, any application running will automatically be granted Administrator privileges without asking. You will learn how to disable UAC on Windows 10 or 11 by reading the following article:
Read Also: How to Change a Drive Letter on Windows 11
How to Disable UAC on Windows 10 or 11
Disable UAC on Windows 10:
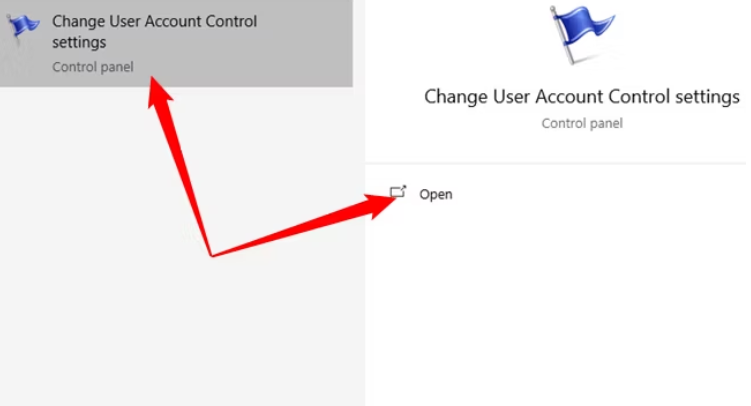
1. To begin, open the window for configuring UAC settings. Start by bringing up the Start menu on your computer (you can do this by pressing the Windows key or selecting the Start button). Enter “UAC” or “User Account Control” into the search box under the Start menu.
2. Choose “Open” or “Change User Account Control Settings” from the drop-down menu in your search results.
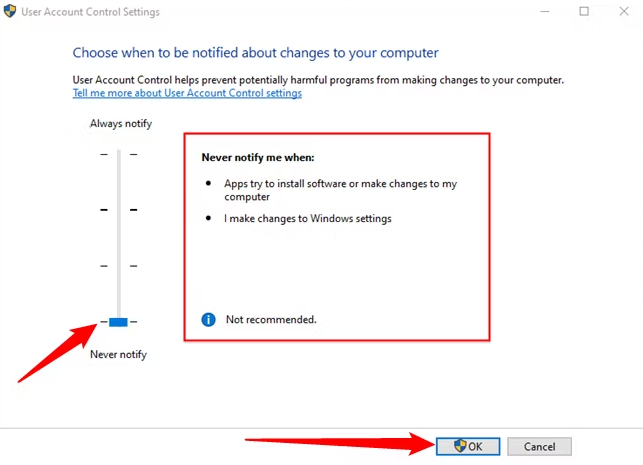
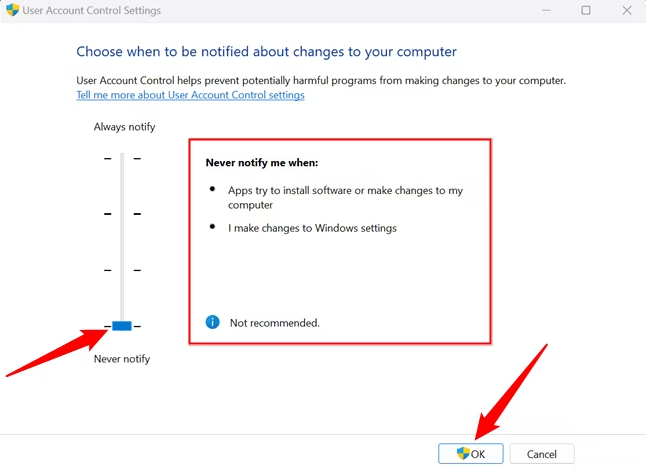
3. In the window for configuring User Account Control, click and drag the slider until it is positioned at the bottom, where it says “Never Notify.” With this setting, programs will be allowed to request Administrator access to your system, and if they are granted it, you won’t be prompted to ask them for permission beforehand.
4. Simply selecting “OK” will store your preference. For the adjustment to take effect, you must respond affirmatively to one more UAC question. The moment you do that, it will go into effect immediately.
Disable UAC on Windows 11:
The steps necessary to disable UAC are still the same in Windows 11, despite the update.
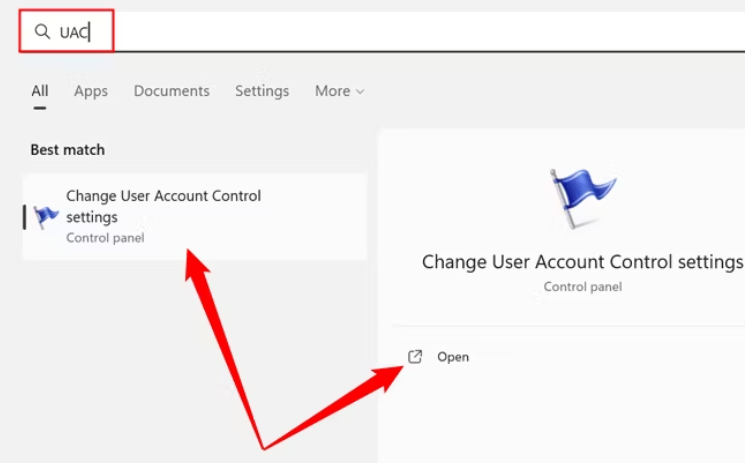
1. Look for “UAC” in the Start Menu’s search bar. Choose “Change User Account Control” from the results list that appear after your search, or click “Open.”
2. Move the slider to the bottom of the list, where it says “Never Notify,” and then click the “OK” button to confirm your choice. Any action that would ordinarily set off the User Account Control would, instead, be given the green light automatically.
FAQs
What will happen if I disable UAC?
When UAC is turned off, the program that is started runs with the full token of the person who turned it off. If User Account Control is turned on, local accounts that are subject to token filtering cannot be used for remote administration across network interfaces other than Remote Desktop. This applies only to accounts that are susceptible to token filtering. For instance, one may do so using NET USE or WinRM.
Is UAC really necessary?
Every user is able to login in to their own devices using a conventional user account thanks to UAC. It is possible for actions to be carried out by processes that were started with a standard user token by using the access privileges that were granted to a standard user. For example, Windows Explorer will automatically inherit standard user level capabilities when you install it.
Does UAC prevent malware?
The User Account Control (UAC) is an essential component of the security offered by Windows. The User Account Control feature (UAC) helps lower the likelihood of malware infection by restricting the ability of harmful programs to run with administrative capabilities.
What are the benefits of UAC?
Windows is made more secure by the User Account Control (UAC), which restricts application software to the regular user privileges until an administrator gives permission to extend or elevate those privileges.

Vampire Crawlers Coin Farming Guide

Forza Horizon 6 Performance: Why 60 FPS Is Still the Console Standard

Yoshi and the Mysterious Book (2026) – Full Completion Guide, Rewards & Secret Ending

How to Get Free Pets in Adopt Me: A Guide for Players

Roblox Username Generator – Create a Cool & Unique Username in Seconds
How to Get Free Pets in Adopt Me: A Guide for Players
Roblox Username Generator – Create a Cool & Unique Username in Seconds
Yoshi and the Mysterious Book (2026) – Full Completion Guide, Rewards & Secret Ending
Forza Horizon 6 Performance: Why 60 FPS Is Still the Console Standard


