Guide
How to Make a Facebook Avatar
Your Facebook feed is undoubtedly full of people sharing avatars that are extremely similar to those supplied by Bitmoji and Memoji. If this is the case, you probably have a lot of competition. It’s possible that you’ve already encountered a few of these avatars in person. If you are unable to figure out how to get your own, you shouldn’t waste your time trying to figure it out. Despite the fact that the process does not come across as particularly obvious, it is not difficult to configure your avatar so long as you know what to look for. You will learn how to make an avatar on Facebook as well as how to make use of your unique “mini-me” if you continue reading this post.
Read Also: How to Fix Facebook 365 Error
How to Find the Avatar Option
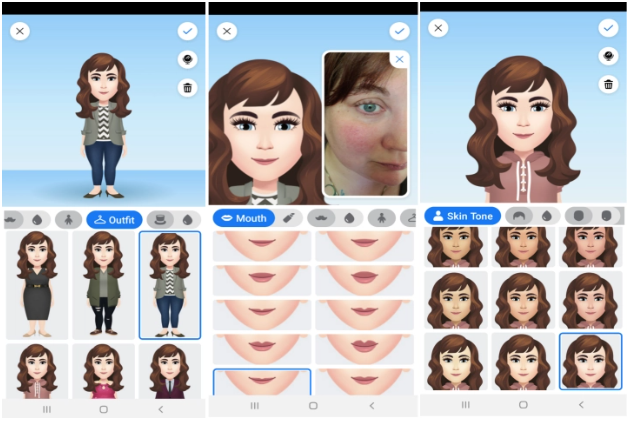
Launch the Facebook app, and then touch on the menu button to go to the setup. After that, select the See More and Avatars options. You should be staring at the screen to create your avatar at this point. You are now in the section where you may customise your avatar by selecting their skin tone, face shape, haircut, facial features, body form, and apparel.
Simply tap on the mirror icon located in the top right corner of the screen if you find yourself unable to recall the specific appearance of your own facial characteristics when you are configuring your avatar. Your camera will open, and you will be able to see yourself in a small rectangle as you select facial features to apply to your character. When you are finished, you may save your avatar by clicking the button that looks like a checkmark. It can be utilized at this point.
How to Use your Facebook Avatar

You may also find the stickers if you navigate to the part of the app titled “avatar.” After you have completed the process of customizing your avatar, you will notice three icons in the top right corner of the screen. If you select the Sticker icon, you will be presented with a list of all of the personalized avatar stickers that you have available to use. Once you have made your selection, you can send the sticker to a friend in Messenger by tapping the sticker and selecting one of the “Send in Messenger” or “More Options” buttons. If you select More Options, a new screen will load, and on this new screen, you will see a variety of convenient sharing options, such as sending the link to your email or posting it on your Facebook feed. If you opt to send the sticker via Messenger, for instance, you will be able to select the recipient from among the people in your contact list.
You also have the option of using your new avatar as the picture that represents you on Facebook, if that is something you would like to do. To accomplish this, simply return to the avatar section of Facebook by going to the menu, hitting the “See More” button, and finally tapping “Avatars.” Your brand new avatar will be waiting for you there, all geared up and ready to go.
You should notice three icons in the top right-hand corner of your computer screen. When you tap the arrow icon, a menu will come up for you to choose from. From this menu, select “Set as Profile Picture,” then choose a pose from the list that corresponds to who you are and a background that complements it. Tap the “Next” button when you are ready to see your available choices.
You have the option to make the switch from your profile image to your avatar either temporarily or permanently. If you choose the “save” option as you normally would, it will be saved permanently, just like any other profile image. If you select “7 days,” the modification you made will only be temporary; after a week, your profile image will revert to the way it was before you made the alteration.
How to Edit your Facebook Avatar
People who are often trying new things with their appearance could also like modifying their avatar so that it more closely resembles their present appearance. If it has been a while since you last updated your avatar, you should should do it even if your personal style hasn’t changed significantly. To access the screen where you can design your avatar, navigate to the top right corner of your screen and hit the pencil icon. This will bring up the screen where you can design your avatar. From that point on, you can begin putting any modifications that you wish into action.
You can utilize the tool to make significant alterations to your avatar, or you can simply change the clothes that your avatar is wearing to match your current state of mind.
Video

Vampire Crawlers Coin Farming Guide

Forza Horizon 6 Performance: Why 60 FPS Is Still the Console Standard

Yoshi and the Mysterious Book (2026) – Full Completion Guide, Rewards & Secret Ending

How to Get Free Pets in Adopt Me: A Guide for Players

Roblox Username Generator – Create a Cool & Unique Username in Seconds
How to Get Free Pets in Adopt Me: A Guide for Players
Yoshi and the Mysterious Book (2026) – Full Completion Guide, Rewards & Secret Ending
Vampire Crawlers Coin Farming Guide


