Gaming
How to Make a Shirt in Roblox

Roblox gives its players the ability to freely customise the clothing items they wear, which enables them to express themselves and differentiate themselves from other players. Due to the fact that there are millions of users and the game’s popularity is only increasing, there are a lot of avatars that look really similar to one another. Not only is there a shop stocked with both new and vintage stuff that can be used to customise the character, but players also have the option of creating their own clothing.
Before beginning their games, players are required to check that certain conditions have been satisfied. For them to be able to upload the project to the platform and send it in for evaluation, they need to make sure that they have Roblox Studio downloaded and that they have a Premium membership.
Read Also: How to Get Drone in Roblox Bedwars
How to Make a Shirt in Roblox
A T-shirt is the article of clothing with the fewest design requirements; all that is needed is a picture to be placed on the front of an avatar’s torso for it to be worn. T-shirt designs can be submitted for no charge. Making a T-shirt is a great project for novices to begin with because it teaches them both the technical needs and the process involved.
It is important that you keep in mind that the image that you produce for the T-shirt will only be displayed on the front of the avatar. The ideal resolution for an image is 512 by 512 pixels.
Follow the steps below to create a T-shirt:
- Create a design of your choosing by using the image editor of your choice. There is no requirement for a template. Players are free to use any image editor of their choosing to craft the design. Pixlr is highly recommended because it makes the development of designs simple. Roblox supports the uploading of images in the.png,.jpg,.tga, and.bmp file formats.
- The file must then be uploaded to the platform as the next step. To access the Asset Manager, navigate to the Roblox Studio and choose the View tab to make your selection.

- After the window has opened, go to the File menu and select Import to import one or more photographs. Simply save the document, and the T-shirt will be uploaded automatically.

- The very last thing you need to do is select the Configure option. A description can be entered into the space designated for General, and users have the option of moving on to the comment area.

- Users are obligated to choose a price that is reasonable in order to maximize their chances of making a transaction while using the Sales option. Please give it twenty minutes for approval, and then we will move on. There will be an edition of the T-shirt published.
Downloading template
- You need a valid membership in order to obtain the template for the shirt.
- After that, you need to log in to the account.
- After selecting Create from the main menu, select Shirts from the submenu that appears.
- Click the Download It Here button.

- In the pop-up box, right-click the image you want to save and select “Save image as.”
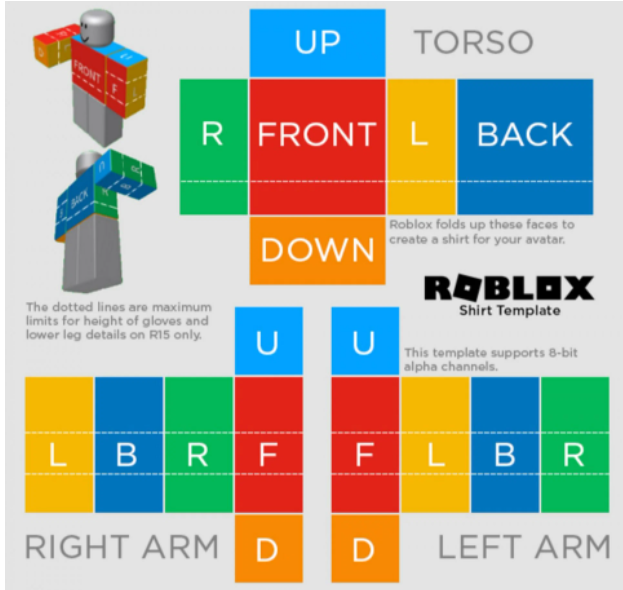
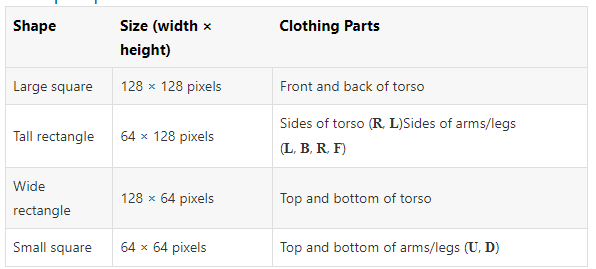
- Take note of the manner in which the parts are “folded up” and wrapped around the body, limbs, and legs of the character on each template. Use the sizing guidance provided by Roblox for each part of the template.

- It is time to design a pattern for the shirt at this point. Launch any image editor of your choosing and open the template there. Free image editors GIMP and Paint.NET come highly recommended by the designers.
Upload designed shirt
- Head on over to the Create page to get things rolling.
- Choose from the left column either T-Shirts, Pants, or Shirts depending on the design you want to use.
- Click the Choose File button, then go to the file you want to upload.
- Create a distinctive moniker for the object.
- Simply clicking the Upload button will award you with 10 Robux. After it has been reviewed by Roblox, the item will be added to your collection of creations, at which point it can be worn by an avatar or offered for sale to other players.
Users are able to visualize a pattern, design, or logo in three dimensions and think about how it will look when they use it. This is helpful for users who plan to use such elements. Although it will take some time to perfect, this strategy will prove to be fruitful in the long run.


