Guide
How to Move Windows 10 From HDD to SSD
Solid-state drives (SSD) are the best choice if you want a storage drive that is both speedier and more energy-efficient than your current storage drive setup. You aren’t required to start from the beginning, either. It is possible to have the best of both worlds by moving Windows 10 to an SSD. We will demonstrate how to do so.
You’ll need to transfer your operating system (along with all of the data it contains) to the new disc if you want to maintain your existing data but benefit from the SSD’s faster performance. The procedures below make cloning and shifting your Windows 10 installation to a new hard drive as straightforward as possible despite the fact that Windows 10 does not make this simple.
Read Also: How to Disable a Laptop Keyboard in Windows 10
How to Move Windows 10 to an SSD
Make sure you clear all your files before copying and transferring anything so that the process goes as smoothly as possible. The good news is that Windows has a built-in cleaning tool that you should use before moving on.
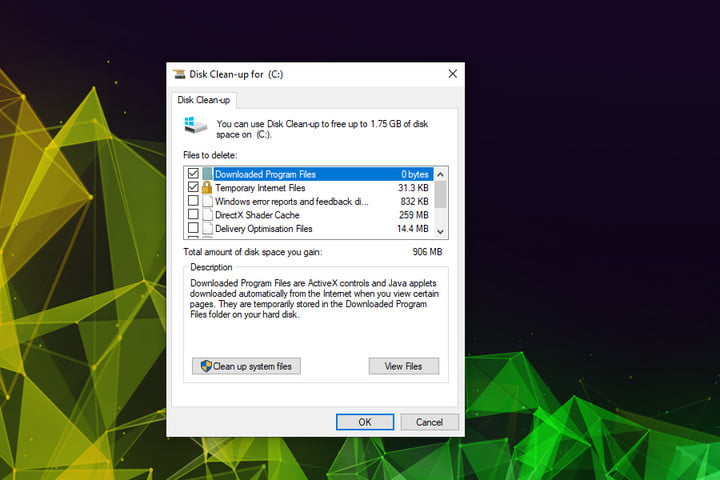
Step 1: Use the Windows search box to look up “disc cleanup” and then click the corresponding link that comes up.
Upon opening, you’ll find a window with a list of file kinds in which you may select the files you wish to remove. There are numerous forms of data that you don’t need in this section, so be sure to evaluate the file types carefully (temp files, recycle bin data, etc.). Double-checking the alternatives is always a good idea, just in case there is something you want to preserve.
Near the bottom of the window, you’ll see a Clean Up System Files button. Additionally, you’ll be able to erase previously installed versions of Windows, which might be rather large if you’re an early adopter of Windows 10 and part of the Windows Insider programme. The Disk Cleanup programme resets any modifications you made to the file type list in step 2 when it switches to include system file types.
Step 2: A cloning option is not available in Windows 10, thus you must install the operating system on a new hard drive. There are many of apps that allow you to accomplish this, which is a welcome development. Windows 10 may be transferred from an old hard drive to a new SSD with the help of specialized backup apps (or similar migrations). However, we’ve listed some of our favourite free picks in the section below.
In spite of its lengthy name, EaseUS Todo Backup Free is really a well-maintained free backup software that is easy to use for both power users and newbies to Windows 10.
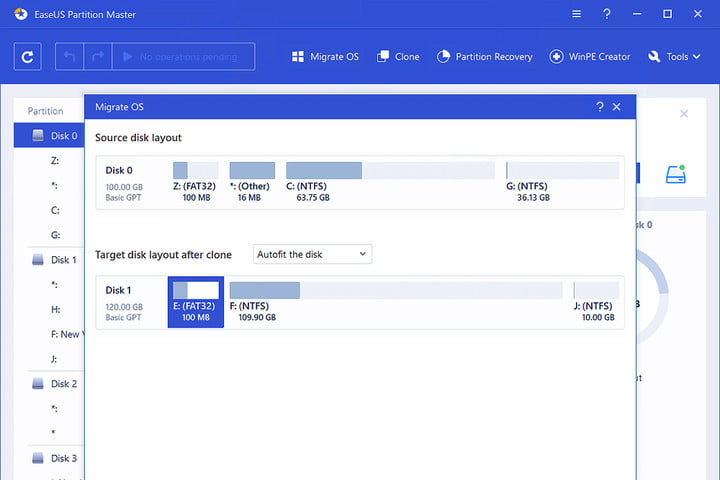
Professional version of EaseUS Partition Master If you want greater control over the migration process and a more professional solution with superior data management features, check out Partition Master. Even if you select for the free trial, it should suffice to finish your relocation.
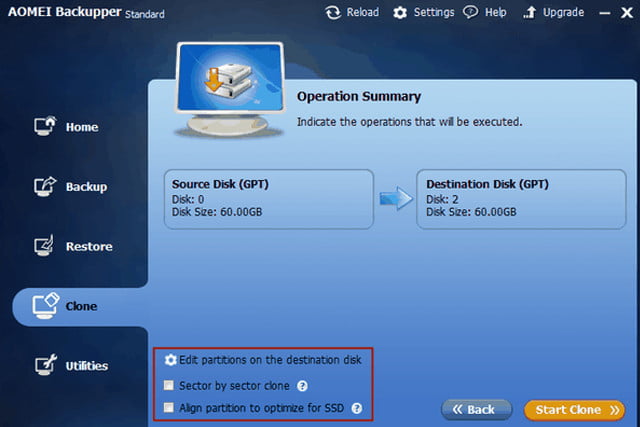
Long-term backup solution with a fun interface: AOMEI Backupper Standard. Using backup and cloning tools for future projects is a great concept, but you may not now have a solution.
This is a good time to back up your data once you’ve downloaded your backup tool in case something goes wrong. Look at the main menu of your tool once it has been opened. These tools all include a sidebar or top menu that includes options for backup or backup tool. Make sure you choose the correct choice (the wording may differ again) and choose where you want to save your files. Then, before beginning the migration process, give yourself plenty of time to finish the previous step. The hard disc or SSD you’re migrating from or to should not be used as a backup location for your data. Backup your data to an external hard drive or a cloud storage provider.

Step 3: Depending on how you’re migrating, you can either connect your new hard drive or your old hard drive at this point. The motherboard and power supply both require a SATA cable and corresponding SATA power connection for a SATA SSD. To use an NVMe or M.2 drive, locate the appropriate slot on your motherboard and insert the drive into it. To learn more about how to accomplish this on your specific system, consult the handbook that came with your motherboard or computer.
You may check if the drive is detected by restarting your PC. When the time comes, launch the backup programme you’ve chosen. Look for the option that reads Clone or Migrate in the main menu. What you’re looking for is here.
A new window will pop up, and the application will ask you to select a destination drive among the ones on your computer. Choose your new SSD or another drive as the destination, then make sure the destination disc has adequate space for the new data. EaseUS Partition Master provides an example of what this window should look like for each drive.
Step 4: Partitioning options are commonly included in these backup programmes. A partition on the destination drive that was set up to function with another device can be deleted. You may want to erase the partitions if you’re not sure what you’re doing.
There is a choice of partition sizes as well when they relocate. In most cases, it is better to use the tool to its full potential by enlarging the partitions before making a transfer. Pick the option to fit and optimize partitions for the brand-new drive. Optimize, Resize, and similar commands should be used.
It’s now up to the cloning wizard in the programme to take control. The first step in migrating your data is to have a look at your hard discs. The software will let you know when it’s done if you confirm that you wish to proceed. Make sure your SATA and power connections are connected and that the older hard drives have enough area to “breathe” so they don’t overheat during the cloning process, if you have any issues.
Restart your PC and see whether everything works after the transfer. After the migration is complete, you should be prompted to restart your PC by your tool or you may select to do it automatically. After that, you have the option of deleting the backup tool or keeping it for future data management.
Video

Vampire Crawlers Coin Farming Guide

Forza Horizon 6 Performance: Why 60 FPS Is Still the Console Standard

Yoshi and the Mysterious Book (2026) – Full Completion Guide, Rewards & Secret Ending

How to Get Free Pets in Adopt Me: A Guide for Players

Roblox Username Generator – Create a Cool & Unique Username in Seconds
How to Get Free Pets in Adopt Me: A Guide for Players
Yoshi and the Mysterious Book (2026) – Full Completion Guide, Rewards & Secret Ending
Forza Horizon 6 Performance: Why 60 FPS Is Still the Console Standard


