How To
How to Record Your Computer Screen

Do you have to put together a how-to presentation for work? Do you want to have a good time with your pals while playing video games? Making a screen recording is a convenient technique to fulfil both goals.
The work is less difficult than you may imagine, since built-in tools in Windows 10/11, MacOS, and even Chrome OS make it possible to complete the operation. In this post, we’ll show you how to do it using native, open-source, and third-party technologies, all of which are free.
Read Also: How To Screen Record On Samsung
How to Record your screen on Windows using Xbox Game Bar
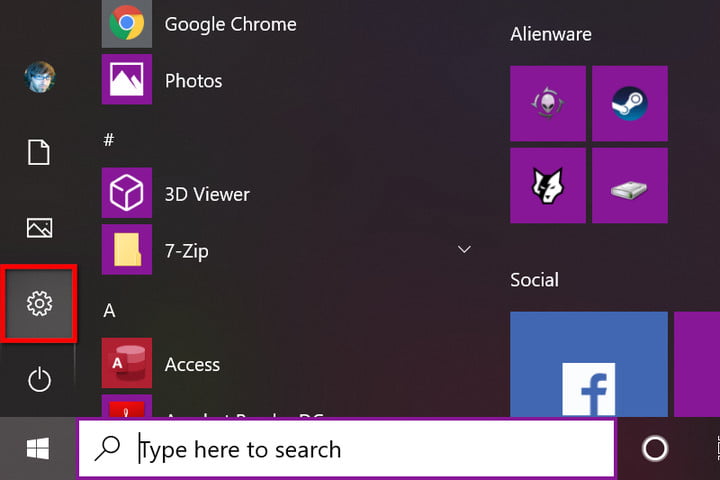
Step 1: To begin, click the Start button, followed by the gear symbol, which can be found inside the Start Menu. Alternatively, you may choose the All Settings tile in the Action Center by clicking the notifications icon on the taskbar and then selecting it from the notifications menu. Using one of these techniques will launch the Settings application.
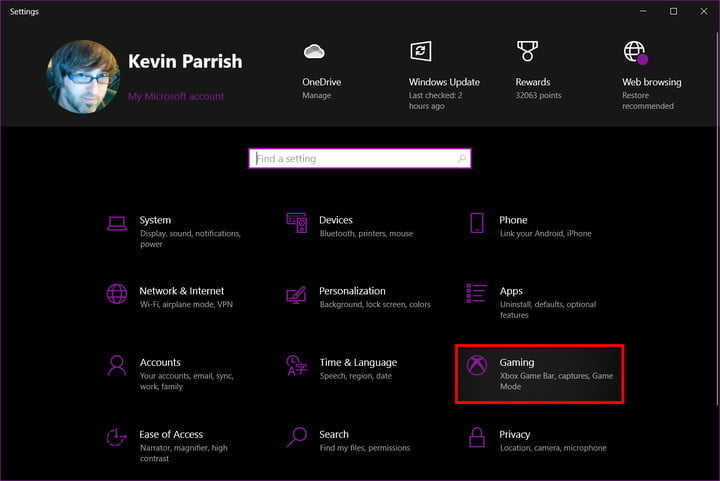
Step 2: In the Settings app, go to the Gaming tab.
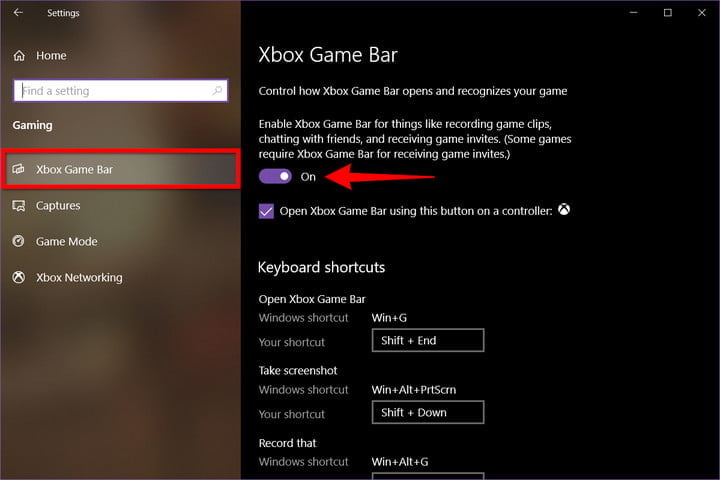
Step 3: By default, the Xbox Game Bar area should be shown. As indicated in the screenshot below, there is a toggle under the first paragraph that should be turned on. If it says “Off,” then you should click on the toggle switch.
Step 4: Select Captures from the drop-down menu on the left to examine and alter further customization options as needed.
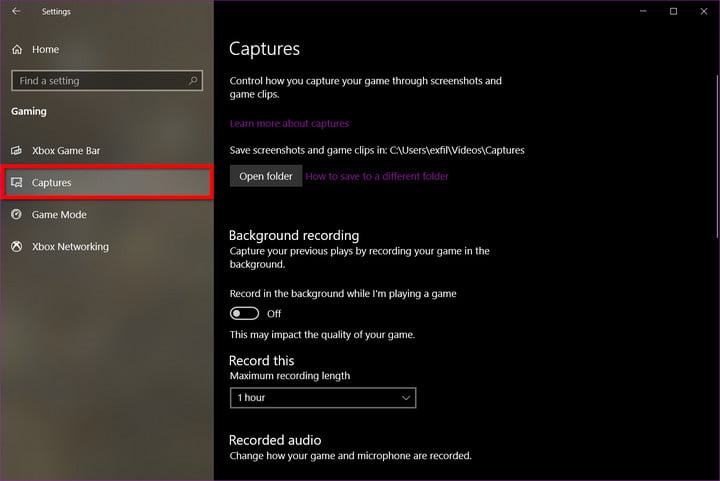
It is possible to alter the place where your recordings and screenshots are saved, enable background recording, and enable recordings even when your laptop is not plugged in under Captures. There are additional options to enable recording while projecting your screen, set a maximum recording time, alter your audio settings, and adjust the video quality of your video recording session.
Step 5: When you’re through customizing your Xbox settings, press the Win + G keyboard shortcut to bring up the Xbox Game Bar.
Step 6: The Xbox Game Bar appears near your screen’s top-center edge. It provides buttons to access these overlays and settings:
- Widget Menu
- Audio
- Capture
- Performance
- Xbox Social
- Gallery
- Looking for Group
- Settings
The Game Bar’s Capture overlay should appear by default. If not, click the webcam icon on the Xbox Game Bar, as shown below.
Note: If your PC has more than one connected display, like a three-monitor setup, the Xbox Game Bar interface will appear on the screen where you last clicked.
Step 7: To begin, click the round Start Recording button on the Capture overlay. To stop the recording, click the purple Stop Recording button. Alternatively, you can type the Win + Alt + R key combination to start and stop recording with Xbox Game Bar enabled.

How to Record your screen on Windows using PowerPoint
Making a screen recording in PowerPoint is a reasonably simple process. The disadvantage is that you must have Microsoft’s desktop software installed in order for this to operate — as well as a Microsoft 365 subscription. This does not function with the online-only version of the application.
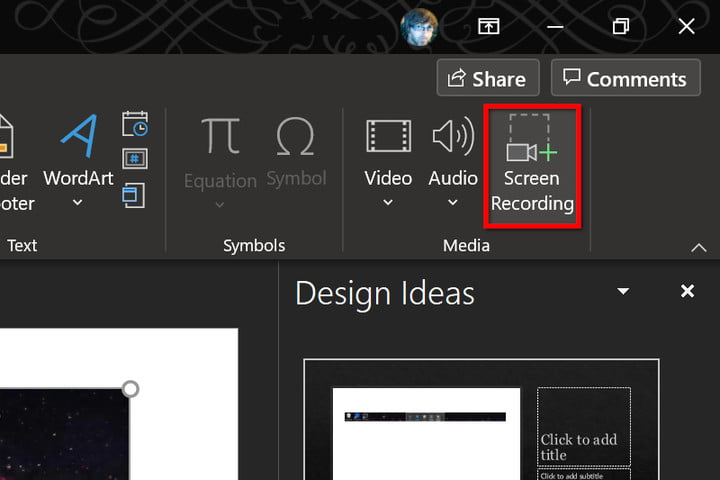
Step 1: The first step is to launch a PowerPoint presentation and then choose Insert on the menu bar, followed by the Screen Recording icon situated on the Media panel to the far right.
Step 2: The screen becomes white and a toolbar appears along the top-center edge of your screen, as shown in the image below. Use your mouse to create a box around the area you wish to record by clicking on the Select Area button and then clicking again. This is followed by a red dashed line around the target region, which is subsequently devoid of any white transparency. Alternatively, you may record the full screen by pressing the Windows + Shift + F keys together at the same time.
Step 3: Press the Record button or the Windows + Shift + R keys at the same time to start recording.
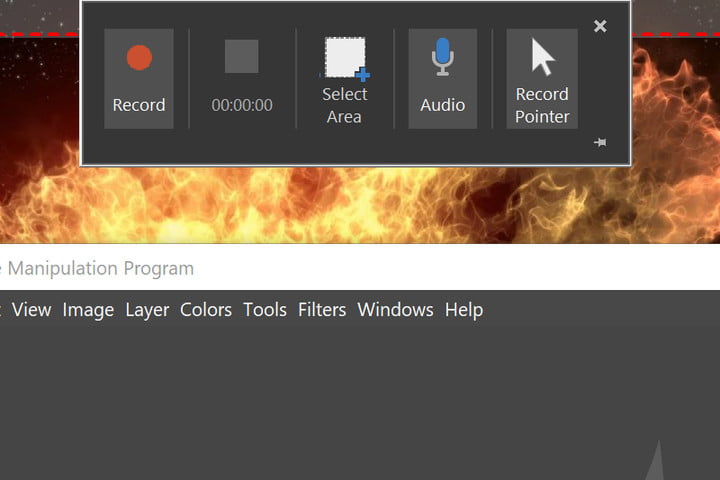
Step 4: You may pause the recording at any time by pressing the Pause button, which replaces the Record button in the previous step. To bring the capture to a close, click the square Stop button.
Step 5: To save the recording, right-click on the video that is now showing within PowerPoint and pick the Save Media As option from the pop-up menu that appears. Alternatively, you may use the Save Media As option on the File menu. To save your recording, simply follow the on-screen directions.
When you’re finished, you may save the movie as a separate file so that you can view it or embed it wherever you like. After that, your editing and control choices are severely restricted, but PowerPoint is a terrific tool for quick-and-dirty recording — especially if you’re preparing for a presentation that’s just around the corner.

Video

Vampire Crawlers Coin Farming Guide

Forza Horizon 6 Performance: Why 60 FPS Is Still the Console Standard

Yoshi and the Mysterious Book (2026) – Full Completion Guide, Rewards & Secret Ending

How to Get Free Pets in Adopt Me: A Guide for Players

Roblox Username Generator – Create a Cool & Unique Username in Seconds
How to Get Free Pets in Adopt Me: A Guide for Players
Yoshi and the Mysterious Book (2026) – Full Completion Guide, Rewards & Secret Ending
Vampire Crawlers Coin Farming Guide


