Guide
How To Remove A Graphics Card From Your PC

Graphics cards are available in a variety of forms and sizes; some are obnoxiously big, while others are adorably little (I’m looking at you, 1070 ITX, for example). The PCIe standard, however, is used by virtually all of them to connect to your motherboard and provide power to your gaming system.
Removing a video card appears to be a basic procedure, and to be honest, it is if you know what you’re doing. There are certain critical considerations, as well as safeguards, that must be taken into consideration before just removing the graphics card from the motherboard.
The information in this article will help you whether you are upgrading from an older chip to a fresh new one or you simply want to know how to remove the stupid thing out of your computer for cleaning purposes.
Read Also: How to Check Your GPU Temperature
What is a Graphics Card?
A graphics card is a piece of hardware that is present in most computers that assists in the display of graphical data while ensuring that the appropriate colour, angle, clarity, definition, and look are displayed.
Using powerful graphical capabilities, methods, and features, this card can provide you with an extremely high-quality visual display by processing and executing graphical data in real time. It’s important to note that the graphics card might alternatively be referred to as the graphics controller, graphics board, graphics adapter, or graphics accelerator.
How To Remove A Graphics Card
There are four unique stages that must be completed in order to correctly remove a graphic card from a computer. To begin, you must remove all of the power cords that are attached to it, unscrew it from the casing, separate it from the PCIe slot, and lastly store it in an anti-static bag until you are ready to use it again. Let’s get this party started.
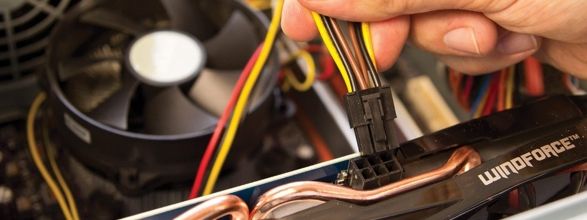
Step 1: Disconnect The Power Cables From The GPU
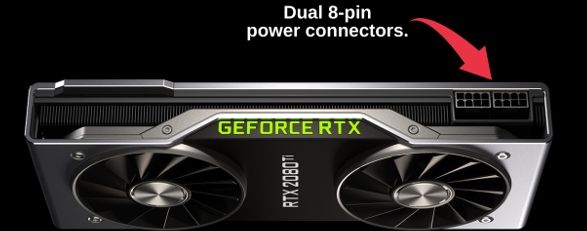
In today’s current video cards, and even some of the more recent models, the PCIe x16 connector is built in. This connector connects to the PCIe x16 slot on your motherboard and allows you to connect to the internet. However, that single PCIe slot is only capable of delivering up to 75 watts of power.
While at the same time, most cards these days demand (much) more power than that to supply more energy in; GPUs employ PCIe power cords to draw additional watts straight from the PSU utilizing 6-pin or 8-pin power connectors, or a mix of the two in certain situations.
As a result, if you have wires connecting your GPU to your power source, you will need to disconnect them before continuing. Remove the power cables by carefully pulling the connectors out of their connection tips using the little plastic clamp that was placed on the connector tips. Tuck the cords to the side so that they don’t get in your way while you’re doing your job.
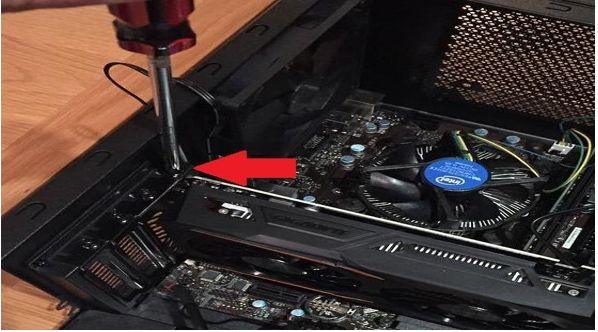
Step 2: Unscrew Your Graphics Card From Your Case
Most video cards are screwed into place on the side of the casing to prevent them from drooping, since they can become inconvenient over time. Typically, the GPU is attached to the PCIe bracket using a single screw, which holds the bracket in place (or up to 3).
Remove it from the casing by unscrewing it with the right screwdriver, and you’ll be all set. Do not, however, just put it off; there is one more item you must complete before you may do so.
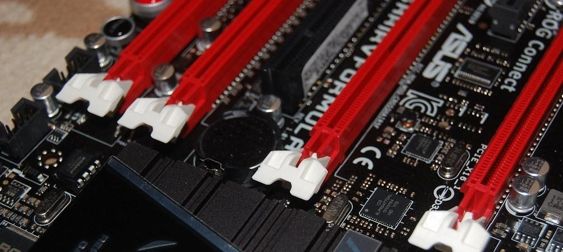
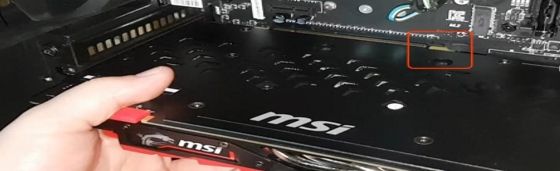
Step 3: Release The Graphics Card From The PCIe Slot
You’ll see a little locking mechanism to the right of where your graphics card is connected in; it might be a simple tab, switch, slider, or button, but it could also be anything more. Its purpose is to secure the graphics card in its position within the PCIe slot.
Finding the tab and pressing or sliding or pulling it out (depending on the manufacturer of your motherboard) will result in an audible click, indicating that the tab has been released from the PCIe slot and is ready to be pulled out completely.
Step 4: Pulling The Graphics Card Out
At long last, everything is ready and completed, and the only thing left to do is to remove the graphics unit from its mounting bracket on the motherboard. Grab it with one hand (or both if it’s a thicc boi) from the centre of the side, making sure not to contact any naked PCB in the process.
And slowly take it out, taking care not to bang it up against the inside of your case while doing so. Congratulations, you have successfully uninstalled your graphics processing unit (GPU)!
Video

Vampire Crawlers Coin Farming Guide

Forza Horizon 6 Performance: Why 60 FPS Is Still the Console Standard

Yoshi and the Mysterious Book (2026) – Full Completion Guide, Rewards & Secret Ending

How to Get Free Pets in Adopt Me: A Guide for Players

Roblox Username Generator – Create a Cool & Unique Username in Seconds
How to Get Free Pets in Adopt Me: A Guide for Players

Grow a Garden Recipes in Roblox: Guide to Cook (Donuts, Sushi, Pie, Pizza & More!)
Roblox Username Generator – Create a Cool & Unique Username in Seconds
Yoshi and the Mysterious Book (2026) – Full Completion Guide, Rewards & Secret Ending


