Guide
How to Remove Write Protection on Windows 10, 8, and 7

It is explained in this article how to remove write protection from a USB device, SD card, or specific files. The following instructions are for Windows 10, Windows 8, and Windows 7 computers.
Read Also: How to Turn off Sticky keys in Windows
How to Remove Write Protection Using Lock Switch
You should check for a write protection switch (also known as a lock switch) on the USB or SD card if your computer informs you that the media is write protected. If the medium contains a switch, be certain that the switch is set to write mode rather than read-only mode.
How to Remove Write Protection From a Single File
The file may be write-protected if you have a single file that you would like to make changes to but are unable to do so. Here’s how you give someone permission to write something.
1. Insert the USB drive or SD card into the computer’s USB port or into the SD card reader.
2. Open the Windows File Explorer programme.
3. Identify and go to the device and folder where the file is stored.
4. Choose the appropriate file.
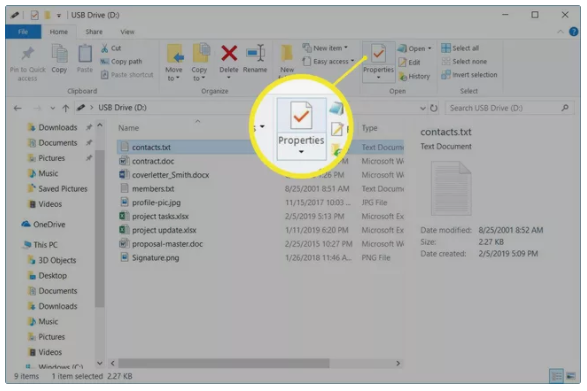
5. Select the Home tab, then Properties > Properties from the drop-down menu.
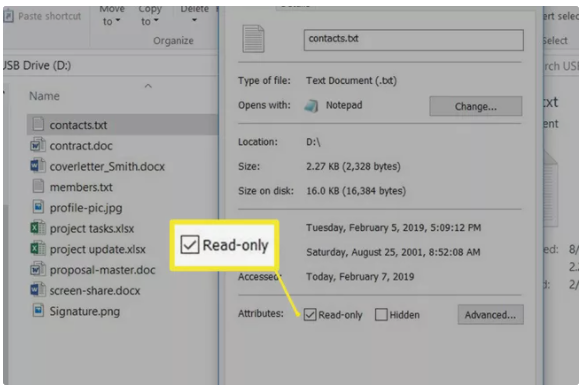
6. In the Properties dialog box, select Read-only to remove the check mark.
7. Select OK.
Use Diskpart to Remove Write Protection From USB Drives
There are a variety of methods for removing write protection on USB devices on Windows systems. One typical technique is to make a modification to a Registry key, which might be intimidating for some users. Diskpart is a less daunting way that may be used.
1. To use a USB drive, insert it into a USB port on your computer.
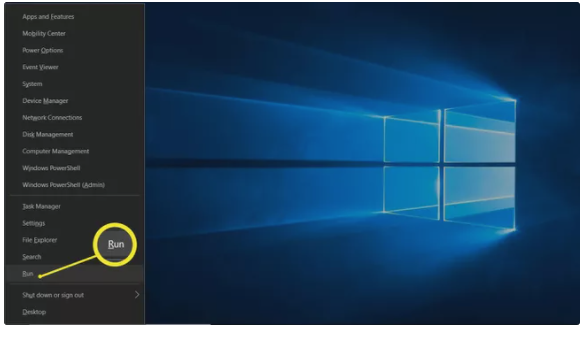
2. Press the Windows key plus the X key.
3. Select the Run option.
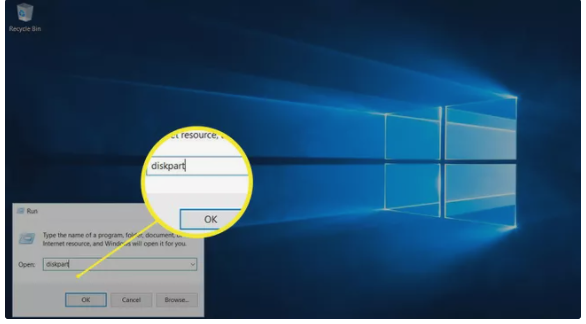
4. Enter diskpart and then select OK.
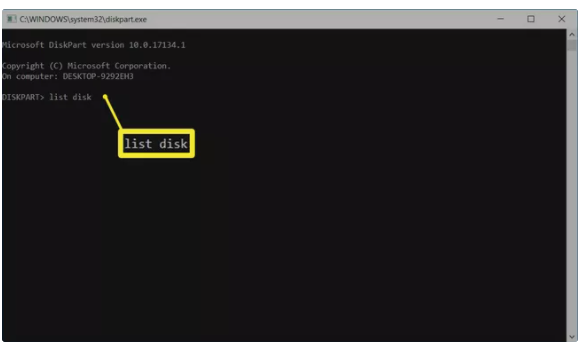
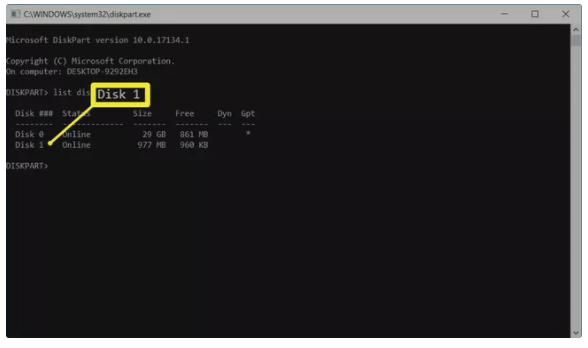
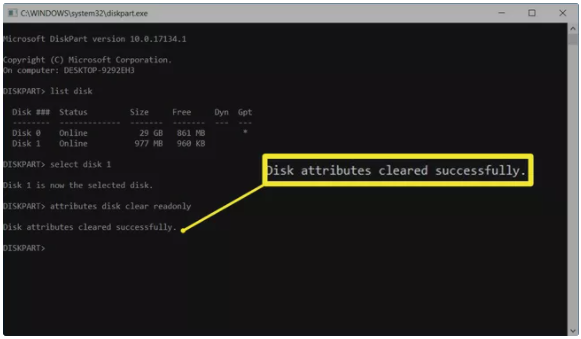
5. Next to DISKPART>, enter list disk and press Enter.
6. Locate your USB drive in the list of mounted discs and make a note of the disc number it has.
7. Enter the command choose disc disk number and then hit the Enter key to complete the process. If your drive number is 1, for example, enter choose disc 1 in the drive number field.
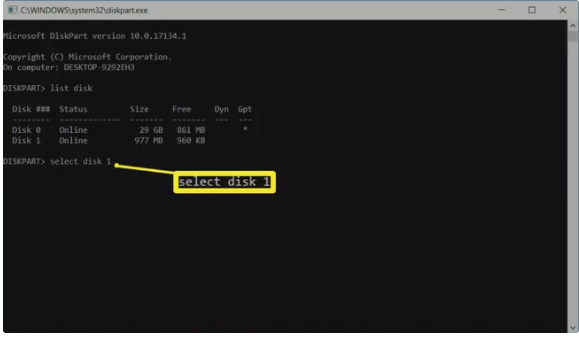
8. A notification appears on screen indicating that the disc has been picked by diskpart once it has been identified.
9. Enter the command attributes disc clear read only and then hit the Enter key to complete the process.
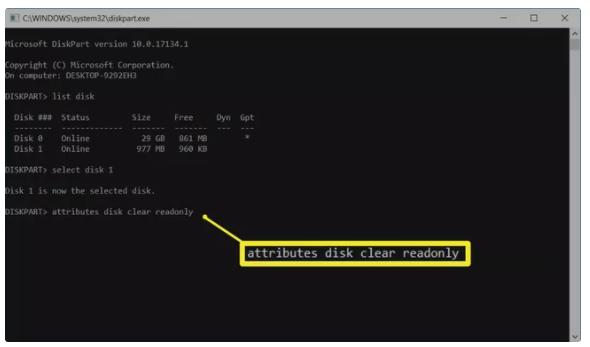
10. When write protection has been removed from the disk, diskpart displays a message stating the attributes were cleared successfully and the disk is no longer write protected.
11. To close the diskpart window when you’re finished, type exit and press Enter.
Remove Write Protection From USB Drives With ‘regedit’ in Windows 10 and Windows 8
If you want to make the change using the Windows Registry, you may do so by running regedit on the USB device or SD card in question.
1. To use a USB drive, insert it into a USB port on your computer.
2. Press the Windows key plus the X key.
3. Select the Run option.
4. Enter regedit and hit the Enter key.
5. Navigate to the following locations in the Registry Editor: HKEY LOCAL MACHINE > SYSTEM > CurrentControlSet > Control > StorageDevicePolicies.
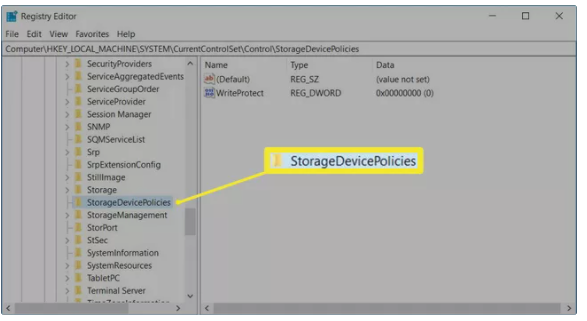
6. Double-click Write Protect to open the Edit DWORD dialog box.
7. In the Value data text box, replace the number with a 0 (zero).
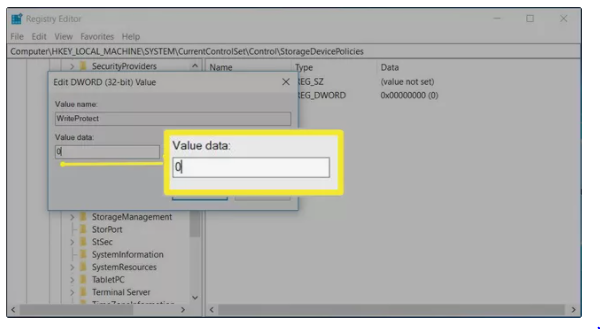
8. Select OK.
9. Close regedit.
10. Restart your computer.
What Does Write-Protected Mean?
Write-protected storage media, such as a USB drive or SD card, prevents you from making any changes to the contents stored on the media; you can only read them. You can read and copy files from write-protected media, but you cannot write to or remove files from write-protected media. It is possible for your USB drive and SD cards to become write protected as a result of a virus or as a result of the lock switch on the media being enabled.
Video

Vampire Crawlers Coin Farming Guide

Forza Horizon 6 Performance: Why 60 FPS Is Still the Console Standard

Yoshi and the Mysterious Book (2026) – Full Completion Guide, Rewards & Secret Ending

How to Get Free Pets in Adopt Me: A Guide for Players

Roblox Username Generator – Create a Cool & Unique Username in Seconds
How to Get Free Pets in Adopt Me: A Guide for Players
Yoshi and the Mysterious Book (2026) – Full Completion Guide, Rewards & Secret Ending
Vampire Crawlers Coin Farming Guide


