Guide
How to Solve SSD not Erasing/Mounting on Mac?

Mostly when you connect a Solid State Drive (SSD) to your Mac device, it may mount automatically and appears on Desktop, Finder, and Disk Utility.
Sometimes the SSD doesn’t mount on any of these places on your Mac. This in result makes the data (stored in unmounted SSD) inaccessible. In some cases, rebooting the system can fix the issue but when an external hard drive doesn’t won’t mount on a Mac, you need to apply some methods to resolve the problem. This post will help you to know how to solve SSD not erasing/mounting on Mac.
Why is SSD Not Mounting on Mac?
There are several reasons why SSD may not mount or erase on your Mac. Whether you have a new or used SSD, it is important to know the exact reasons why you are facing such an issue. Given below are some common reasons why issues like SSD not erasing/mounting may occur on your Mac:
- MacOS Issues: There may be some issues with the version of macOS installed on your device. It is important to check macOS problems at your end.
- Connection Issues: The most common reason why SSD may not mount on your Mac is improper connections. The connecting cables of your SSD may be loose or not properly done. Check the connections carefully and solve if any issue is found.
- SSD Issues: Make sure your SSD is not corrupted or damaged. It is one of the main reasons why SSD may not mount on your Mac.
- USB Port Problem: The USB Port of your system can be damaged or faulty. If your SSD is not erasing or mounting, check if the USB Port is not working.
Quick Fixes for SSD Not Erasing/Mounting on Mac
Most of the time, you can fix the SSD not erasing or mounting problems on your own. In this part of the blog, we have provided some effective methods to fix the SSD mounting issues on your device. Not all of them will work, but these methods will definitely help you to troubleshoot the issue. Just go through these methods one by one to fix the ‘SSD not erasing or mounting’ issue:
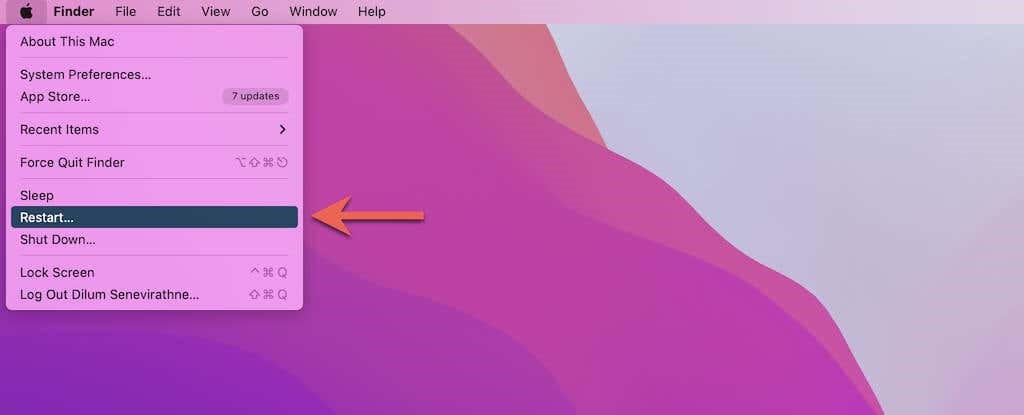
Method 01: Restart Your Mac
Many users found that this issue could be resolved by restarting the Mac device only. This method basically refreshes Mac OS memory and resolves many minor system-related glitches. Before you restart your Mac device, disconnect the external SSD from it. Now, from the Apple menu, hit the restart button.
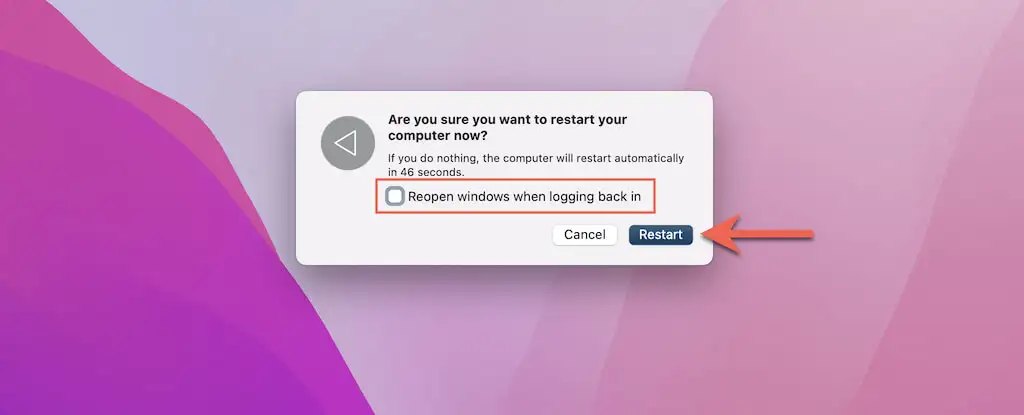
From the pop-up asking for “Are you sure you want to restart your computer now?”, uncheck the box next to Reopen windows when logging back in option. Then, hit the Restart button to conclude the process.
Method 02: Force Mount SSD in Disk Utility
If restarting the Mac device fails to mount the SSD on Mac, you can force mount it in Disk Utility. For this:
- Launch Applications and go to Utilities > Disk Utility.
- From the list of all the connected disks, right-click on the partition that you have to mount and choose the Mount option.
Repair SSD Using Disk Utility
If you are still facing problems while mounting the SSD on your Mac, then there may be problems due to disk errors or corruption. You can use the First Aid feature to repair the disk. All you have to do is:
- Launch Disk Utility and click the Continue button.
- Now, select the SSD that is not recognized from the sidebar.
- Hit the First Aid button and then tap Run.
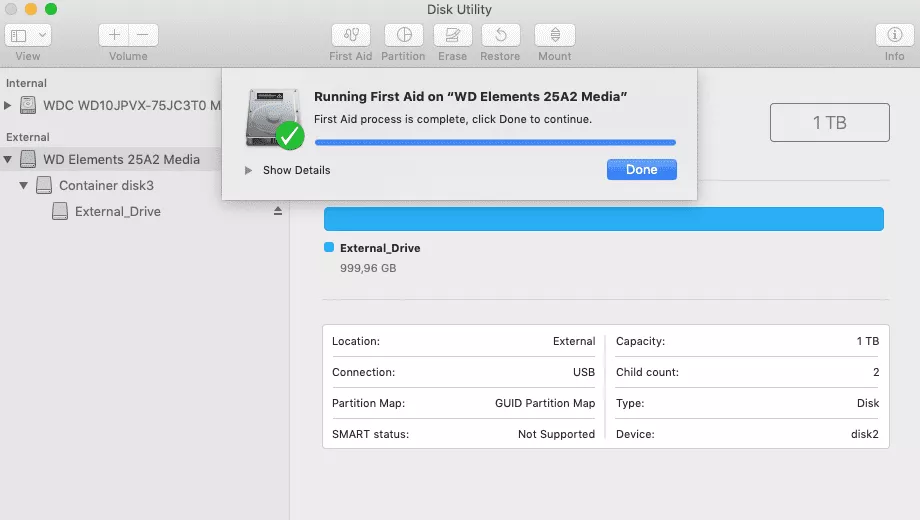
If you get any message indicating that the disk is about to fail, take back up of yours important files and folder and then replace the disk.
Method 03: Check the System Information App
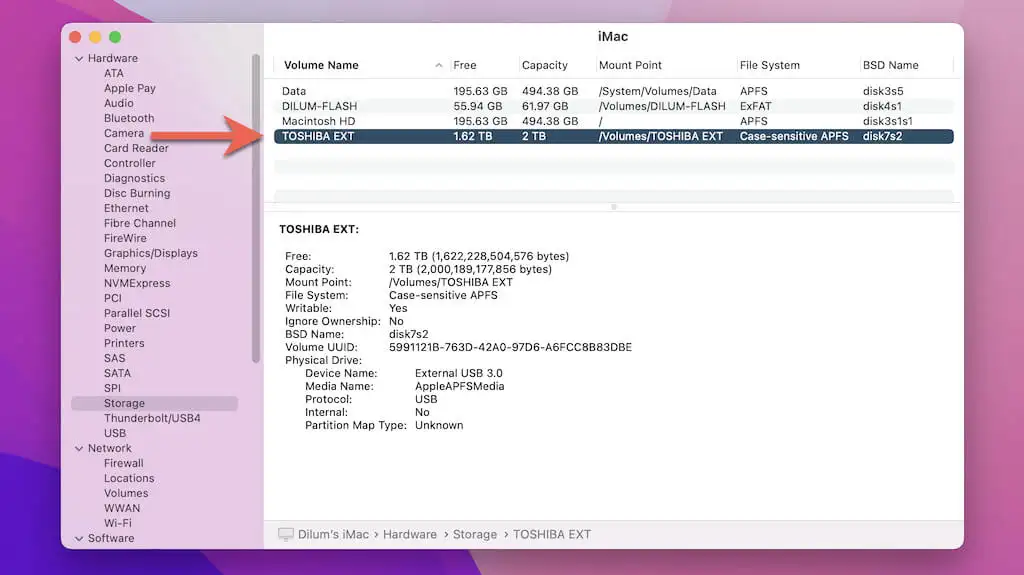
Instances may occur when the external drive you are looking for may appear in the System information app of your Mac device. You can check the same by applying the below-given steps:
- Firstly, open Launchpad on your Mac and go to Other > System Information.
- From the sidebar, choose Storage.
- Now, check if your SSD is available under the Volume Name column appearing on the screen.
If this method fails, continue with other fixes.
Method 04: Configure macOS Settings
Changing macOS Settings on your device can also help you to mount your SSD. Go through the following steps to change the settings on the Desktop or Finder of your Mac device:
- Launch Finder from the top Menu Bar and then select Preferences.
- Now, navigate to the General tab from the “Finder Preferences” window.
- After that, click the checkbox next to the “External disks” option located under the “Show these items on the Desktop” section. Your Desktop will then display the external hard drive icon.
- Go to Sidebar tab and select the “External disks” checkbox present under the Locations section. The Finder sidebar will then display the external hard drive on your screen.

Also, check and ensure that the “Show All Devices” option in the Disk Utility’s View menu is selected.
- Press Command and Space Bar keys simultaneously to launch Spotlight.
- Type ‘disk utility’ and press the Return button to open Disk Utility.
- At last, click the View menu located in the top-left corner of Disk Utility and choose the “Show All Devices” option.
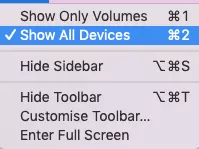
After completing the above steps successfully, your Disk Utility’s sidebar will start displaying the external hard drive/SSD.
Method 05: Reformat Your Drive
In extreme cases like corrupted file system on Mac device, you can reformat the drive entirely to mount it. You must note here that reformatting the drive will delete all the data stored on it. Follow the below-given steps to know how you can reformat the drive:
- Launch Disk Utility.
- Select the disk drive that you want to reformat from the list appearing on the screen.
- At last, click Erase button.
Once done, your drive will be erased and automatically formatted. If you need any important files afterwards, you can use tools like Stellar data recovery professional for recovery.
How do I Recover Data from Non-Mounting External Disk on Mac
If you have formatted the disk drive, you can use Mac data recovery software like Stellar Data Recovery to get deleted files back on your Mac. This works with almost all HDDs, SSDs, USBs & optical media. Even the software can help you to restore data from formatted, encrypted, or corrupted drives. The Mac version of the software can recover data from crashed or non-booting Mac devices with the latest macOS Ventura 13 and lower versions.

Why Stellar Data Recovery Professional?
You must be wondering why Stellar Data Recovery Professional software is the best among the other recovery solutions available online. Check the amazing feature given below to get your query resolved:
- The software is compatible with M1, M2 & T2 chip-enabled Macs.
- Help you to restore files lost due to USB faults, partition loss, and unrecognized drives.
- You can recover deleted files even if they are permanently removed or emptied from the Trash or Bin.
- Stellar Mac data recovery software can perform deep scan to maximize data recovery on Mac.
- The recovery software is available in multiple versions which vary in terms of their features. You can check and opt for the best that suits your requirement.
Conclusion
Hope, this blog helps you to know how to solve SSD not erasing/mounting on Mac. We have provided some simple methods that will definitely help you to mount the SSD on your Mac device. Before you proceed with these methods, try to find the exact reasons why your SSD is actually not mounting or causing such issues. However, if any data is lost from your disk drives while performing the mentioned methods, you can try Stellar Data Recovery Software.

Vampire Crawlers Coin Farming Guide

Forza Horizon 6 Performance: Why 60 FPS Is Still the Console Standard

Yoshi and the Mysterious Book (2026) – Full Completion Guide, Rewards & Secret Ending

How to Get Free Pets in Adopt Me: A Guide for Players

Roblox Username Generator – Create a Cool & Unique Username in Seconds
How to Get Free Pets in Adopt Me: A Guide for Players
Yoshi and the Mysterious Book (2026) – Full Completion Guide, Rewards & Secret Ending
Forza Horizon 6 Performance: Why 60 FPS Is Still the Console Standard


