Apple
How To Transfer Picture From iPhone To PC
There are a variety of reasons why you would wish to transfer photographs from your iPhone to a computer, including the want to have copies on your hard drive, the need to edit the images, and the desire to gift a copy to a friend. Since iPhones and PCs were not always compatible with one other, it used to be a difficult chore to transfer images from one to the other. This environment, on the other hand, has long ago altered, particularly when it comes to the sharing of photographs. The issues that existed in the past are no longer prevalent.
Read Also: How To Set Timer On IPhone Camera
Using the instructions in this article, you will learn how to swiftly and effortlessly transfer images from an iPhone to a computer. We’ll also go through how to accomplish it from a Mac or a PC in this section.
How To Transfer Pictures From iPhone To PC Using iCloud Photos
Interested in learning how to transfer photographs from your iPhone to your PC using iCloud Photos?
In order to use iCloud Photo Library on your iPhone, you must first enable it on your device. Select iCloud Photos from the Photos drop-down menu in Settings (or iCloud Photo Library, depending on your device).
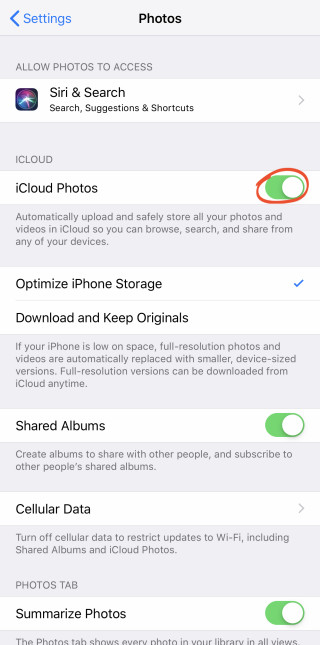
When you snap a photo, it will now be automatically posted to iCloud (as long as you have Wi-Fi).
In the second step, you must download and install the iCloud for Windows application on your computer. You may get it on the Apple website by visiting this link: Click here to get it.
Installing iCloud for Windows on your computer is a simple process. Then sign in with your Apple ID and password (this is the same Apple ID you use for your iPhone App Store account).
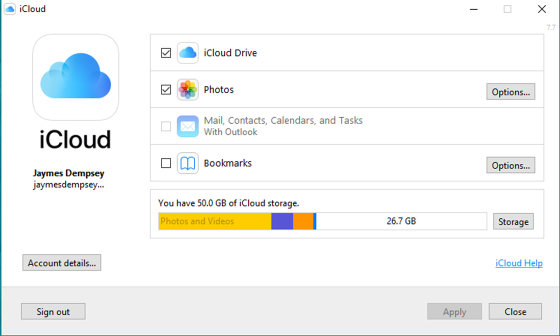
On your computer, launch the iCloud for Windows application and sign in.
Make sure you tick the box next to Photos before continuing. Then click on the Options icon that corresponds to your selection.
Select the iCloud Photo Library option from the drop-down menu. Then choose Download new photographs and videos to my computer from the drop-down menu. Upload new images and videos from my PC is selected by default if you want new photographs and videos from your PC to be automatically uploaded to your iCloud Photo Library as they are taken.
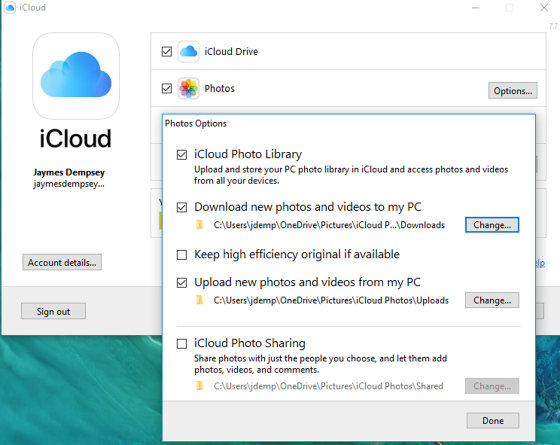
To finish, click Done. Then click on the Apply button.
With this update, any new images that you capture with your iPhone will now be downloaded to your PC anytime you are connected to the internet.
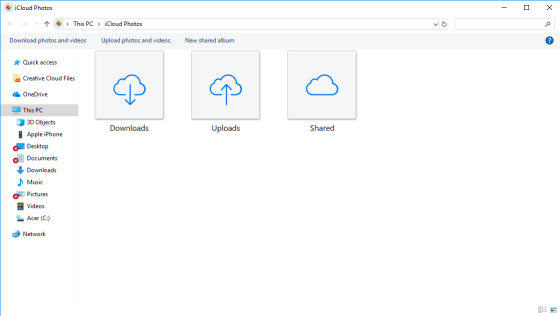
To retrieve images that have been downloaded via iCloud, launch your File Explorer programme and search for the photos (known as Windows Explorer on Windows 7 devices).
Click on This PC (or Computer on Windows 7 devices) on the left side of the screen to open the Control Panel. Double-click on iCloud Photos to open them.

Then double-click on Downloads. Here, you’ll be able to view your iCloud folders of photos.
How To Transfer Photos From iPhone To Computer Wirelessly
There are two straightforward methods for wirelessly transferring images from your iPhone to your Windows PC.
You’ll learn the following things in this section:
- What is the best way to automatically transfer photos from your iPhone to your computer using iCloud Photos
- How to download photos from your iPhone to your computer using iCloud.com
In order to transfer images using either technique, you must first create an iCloud account.
Apple provides a cloud-based storage service known as iCloud. It enables you to upload media files from your iPhone to your iCloud storage space. Afterwards, you may download images from iCloud to your computer or other devices.
When you originally purchased your iPhone, you should have created an iCloud account for storage purposes. iCloud provides you with 5GB of free storage space. For those who take a lot of images, upgrading to a 50 GB hard drive is highly recommended (and there are options to upgrade to 200 GB and 2 TB, as well).
Video For Better Understanding

Vampire Crawlers Coin Farming Guide

Forza Horizon 6 Performance: Why 60 FPS Is Still the Console Standard

Yoshi and the Mysterious Book (2026) – Full Completion Guide, Rewards & Secret Ending

How to Get Free Pets in Adopt Me: A Guide for Players

Roblox Username Generator – Create a Cool & Unique Username in Seconds
How to Get Free Pets in Adopt Me: A Guide for Players

Grow a Garden Recipes in Roblox: Guide to Cook (Donuts, Sushi, Pie, Pizza & More!)
Roblox Username Generator – Create a Cool & Unique Username in Seconds
Forza Horizon 6 Performance: Why 60 FPS Is Still the Console Standard


