Guide
How to Take a Screenshot on a Dell Laptop

No matter if you are using a Dell laptop or a desktop computer, taking and saving a screenshot is a straightforward process. This article will illustrate how to take a screenshot on a Dell laptop running Windows 10 or a newer version of the operating system by pressing the Print Screen key on the computer’s keyboard.
Read Also: How to Connect AirPods to Dell Laptop
What is a Screenshot?
A screenshot, screengrab, or screencap – whatever you choose to call it – is a photographic representation of exactly what is showing on your desktop screen. On the subject of the value of screenshots in this modern age of computers, one could practically go on for hours. We’ve all heard it before: an image is more interesting and meaningful than a long prose, and the evolution of screenshots is yet another example of this.
When reporting a problem, screenshots are also quite useful to have on hand. When you report an issue, it is common for IT or Web Support teams to request a screenshot of the problem. Providing a screenshot makes it much easier for the support team to grasp exactly what is going on and how to resolve the issue.
While this is the case, screen captures are a very useful tool for both personal and business purposes. You’re about to learn how to take a screenshot of your Dell laptop or computer screen if you’re using one of their products.
How to Use Print Screen on a Dell Laptop
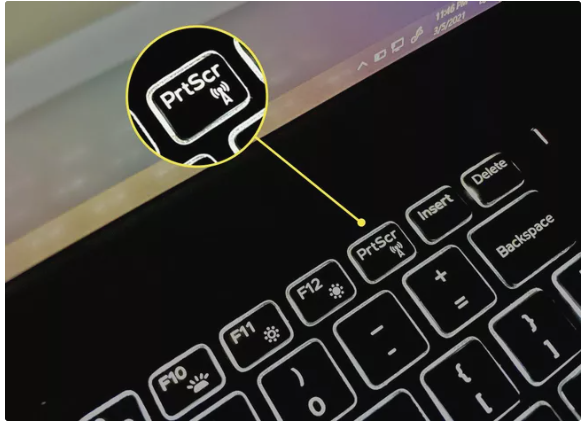
The majority of computer keyboards contain a button that allows you to print what is currently on the screen. Most Dell laptop models also contain a dedicated Print Screen key, which is positioned on the first row of their keyboards right beside their function keys as shown in the illustration below. This feature is commonly referred to as Print Screen or PrtScr in the Dell world.
Additionally, PrintScreen can be abbreviated as PrintScreen, PrintScreenn, PrintScreenr, PrtScreenn, PrtScreenr, PrintScreen, PrintScreenn, PrintScreen, or PrintScreen. For the sake of this article, the key shall be referred to as PrtScr.
1. Navigate to the screen that you wish to record using a screenshot and press the Print Screen button. Perhaps you’re looking at your desktop, a webpage, or another application that is currently active.
2. Find the print screen button on your computer and press it (usually on the upper right-hand corner of the keyboard).
3. Occasionally, a dedicated Print Screen key may not be present on a particular keyboard model. When you press and hold down the Fn and Insert keys at the same time, a Print Screen action will be done on the computer screen as a result.
4. Select whether to capture the entire screen or just the active window or conversation box that is currently open.
- To capture the entire screen: Press the PrtScr key.
- To capture only the active window: Press the Alt + PrtScr keys together.
5. Since the snapshot is saved as a PNG file, it is immediately copied to the Windows clipboard when the screenshot is taken.
6. Using your keyboard, hit the Ctrl + V keys at the same moment to copy the screenshot and paste it into another document, email, social network message, or image editor.
If you use the Windows + PrtScr keyboard shortcut to take a screenshot, Windows will create a Screenshots folder in the Pictures folder once the first screenshot is taken. If you are unable to locate the Pictures folder by searching for it in Windows, you can access it by navigating to the Pictures folder, which can be discovered by following the following path: C:\Users\[username]\OneDrive\Pictures\Screenshots.
Video

Job Opportunities in Dubai – 2026

Mr Bit at the SBC Awards Europe 2025: The Bulgarian Brand Setting New Standards in the European Gaming Industry

Dennis Rodman Net Worth 2026 – Everything You Need to Know

Katt Williams Net Worth 2026 and Everything You Need to Know

Bloxburg Neighborhood Codes 2026
Bloxburg Neighborhood Codes 2026
Job Opportunities in Dubai – 2026
Dennis Rodman Net Worth 2026 – Everything You Need to Know


