Guide
How to Recover an Unsaved Document in Microsoft Word

If you’ve ever had the misfortune of losing all of your hard work because you forgot to save your project in Microsoft Word, you know how excruciatingly painful the experience can be. Since the beginning of time, when files had to be backed up on floppy drives, Microsoft Word has made significant progress. In modern times, even if you delete a Word document without first saving it, there is still a possibility that you can retrieve it. Although there is no assurance that the procedure will be successful and it is possible that you will have to experiment with a number of different approaches before you do, continuing to attempt is preferable to quitting up entirely. Here is how to retrieve an unsaved document from Microsoft Word.
Read Also: How to Change the Display Language in Microsoft Word
How to Recover an Unsaved Document in Microsoft Word
Search for the original document
Although it is possible that you will not be able to retrieve your most recent edits, it is possible that you will still be able to access the document in its original form.
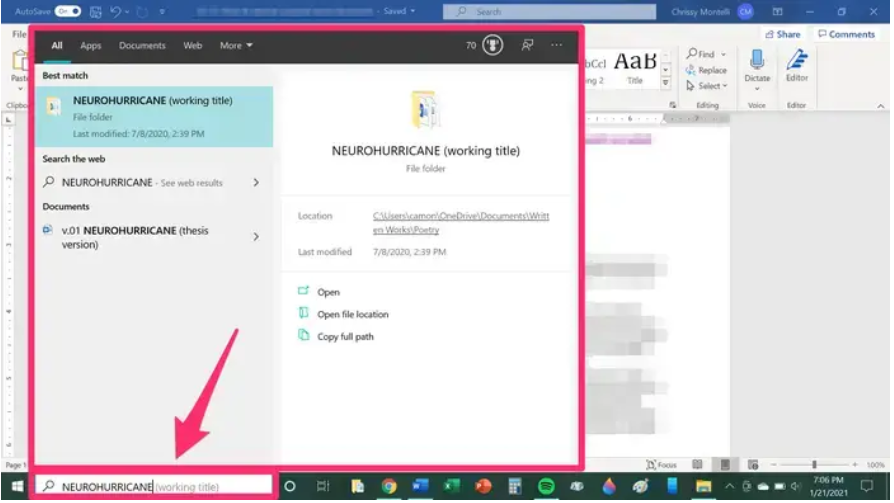
When using a personal computer, you can open the Search bar by pressing the Windows key, and then you can type the name of the document you want to find. To access the spotlight on a Mac, click the icon located in the upper right hand corner of the desktop. If your file is listed in the File list, you may open it by double-clicking on it if you want to access it.

Search for Word backup files
Sometimes, even without your intervention, Microsoft Word will save a backup copy of a file that you’ve been working on. If you have a file with the extension.wbk or WBK, open the folder in which your document was most recently saved and look for it there. This is the type of file that is used for backups of Microsoft Word documents.
Check the Recycling Bin
The Recycle Bin is the temporary storage location for deleted files before they are permanently purged from the memory of your computer. If you have a PC, the Recycle Bin will be on your desktop; if you have a Mac, it will be on your dock. To open it, just double-click on it, and then look through the contents to see if your document is there.
Use Recover Unsaved Documents in Word
1. Launch Microsoft Word and select a file to open.
2. Select the “File” option.
3. Navigate to the Info tab, then click the Manage Document button.
4. In the new dialogue box that has shown, search for the document that you believe is missing, select it by clicking on it, and then select the Open option.
5. Once the file has been opened, select File, then Save As, and then navigate to a different directory to save the file.
If you want to manually save the files, you can do so on Windows by checking any of the two directories (folders) listed below, where ‘Username’ should be substituted with your actual Windows username:
- C:\Users<UserName>\AppData\Roaming\Microsoft\Word
- C:\Users<UserName>\AppData\Local\Microsoft\Office\UnsavedFiles
Search for temporary files
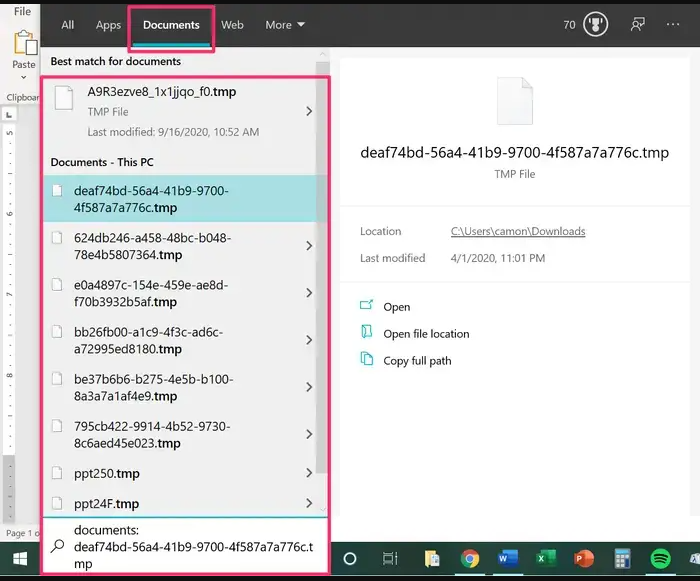
1. Select the “Start” menu item, and then in the search box that appears, type.tmp, including the period.
2. In the upper portion of the search box, select the Documents tab and click on it.
3. Navigate through the files and look for names of files that correspond to the most recent few dates and times when the document in question was changed by you.

4. At this point, launch Word and navigate to the “File” tab.
5. Choose Open, then continue by clicking on Browse.
6. Make sure that the file format is set to All Files, and then navigate to the folder in which the temporary file or files were found in step 3.
7. Launch the programme or file.
Enable AutoSave or AutoRecover
Subscribers to Microsoft 365 have access to a feature called AutoSave, which enables them to have their Word documents automatically saved to either OneDrive or SharePoint. The AutoSave toggle, which can be found at the very top of Word, must be turned on in order to activate and customise this option.
AutoRecover, on the other hand, is a feature that may be accessed even by those who do not have a paid subscription.
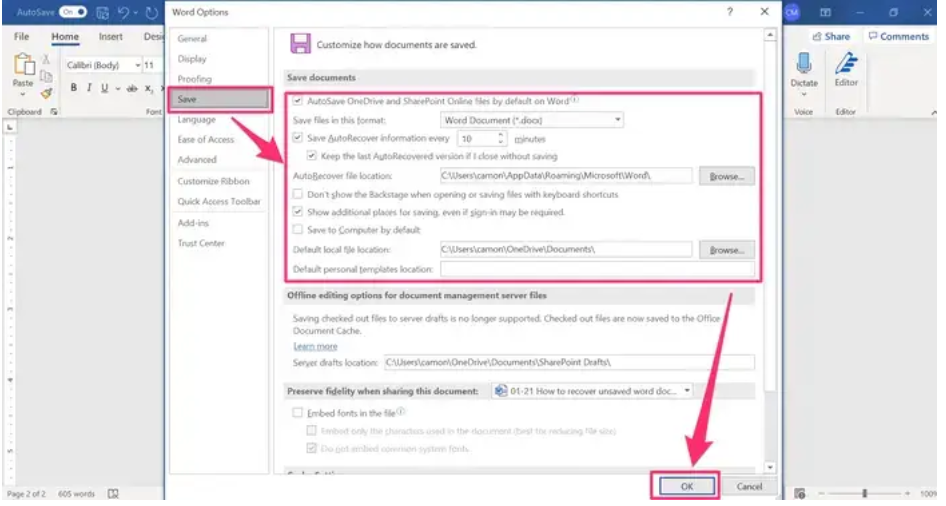
1. Navigate to the Save tab on the left side of the window that opens after selecting the File menu, followed by the Options submenu.
2. Make sure the checkbox next to the option to Save AutoRecover information every X minutes is checked by making sure the checkmark appears in the box next to the checkbox.

3. Before clicking the OK button, you should make sure that the box labelled “Keep the last AutoRecovered Version if I close without saving” is checked.
FAQs
How do I recover an unsaved Word document in 2019?
Word 2019 retains the AutoRecover function that has been present in all previous versions of Word. This feature allows users to restore unsaved Word documents in the event that their computer unexpectedly shuts down. You can activate this feature by going to the File menu, selecting Options from the Save menu, and then selecting the Save AutoRecover check box. Once you get this feature working, it will be able to save your Word document while you are editing it at regular intervals. This will allow you to recover an unsaved document in Word that you were working on.
Can I recover a word doc that I didn’t save?
You can utilise the AutoRecover feature to recover unsaved Word documents in the event that you either neglected to save the document in Word or your computer stopped without saving the document first. Launch Word, navigate to the File tab, select Info, click Manage Document, and then click the button labelled Recover Unsaved Documents. Then, locate the Word document that has not been saved, and select Open > Save As.


