Guide
How to Hide Your Cursor While Typing in Certain Apps in Windows 10, 11

Do you find it frustrating when the text field you’re typing in can’t be seen because your mouse cursor is covering it up? If this is the case, you can choose to hide your cursor while you type in certain applications on your Windows 10 or 11 computer. This option is available on computers running Windows 10 or 11. We’ll show you how to do it through a demonstration.
Read Also: How to Disable Sleep Mode in Your Windows 10
How to Hide Your Cursor While Typing in Certain Apps in Windows 10, 11
Launch the Settings programme that comes pre-installed on your personal computer and look for the “Hide Cursor” option in the drop-down menu that appears. To do this quickly, press the Windows key plus i.
Choose “Bluetooth & Devices” from the menu that appears when you open the Settings app’s sidebar on the left.

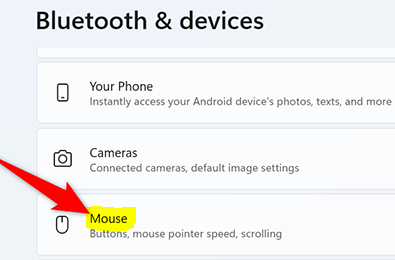
Choose “Mouse” from the drop-down menu that’s located in the box that’s labelled “Bluetooth & Devices.”

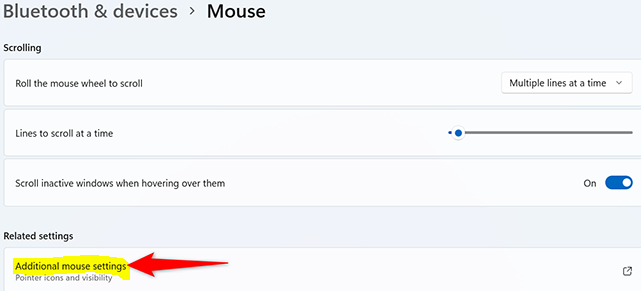
After clicking this link, you will be brought to the “Mouse” page. In this part of the “Related Settings” section, there is a drop-down menu. From that menu, select “Additional Mouse Settings.”

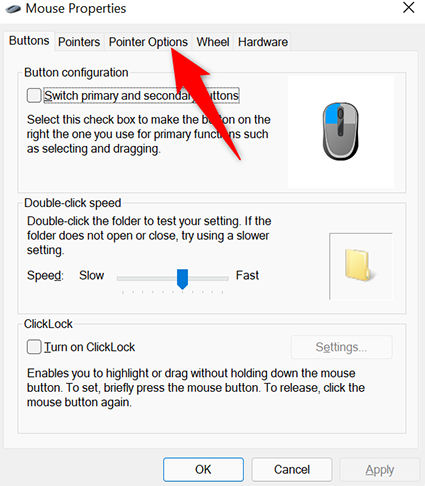
You will see a window that is labelled “Mouse Properties” when you click the button. Simply select the “Pointer Options” tab located at the very top of this window to make alterations to the way the pointer operates.

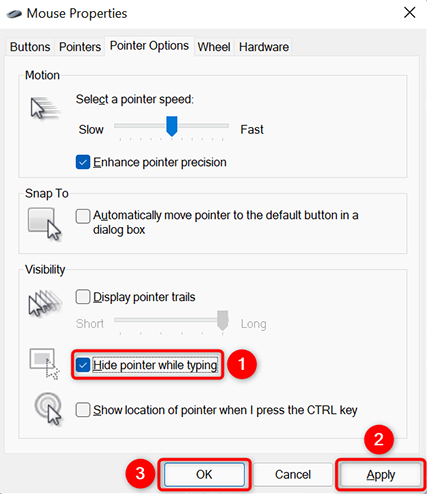
The “Pointer Options” menu gives users access to a number of different mouse settings and preferences. Enable the “Hide Pointer While Typing” option, which can be discovered in the “Visibility” section of this section’s menu. After that, choose the “Apply” option, and then click the “OK” button.

And with that, I think that wraps things up for you. The cursor will be hidden on your personal computer whenever you begin typing in an application such as Notepad from this point forward. The pointer will appear whenever there is any movement on your mouse or trackpad, whichever is active at the time. If you are using a touchpad with your computer that is running Windows 11, it is strongly advised that you disable the “tap to click” feature.
FAQs
Does custom cursor work on Windows 11?
The good news is that this is possible in Windows 11, and the instructions for doing so are provided below. Gain access to the Mouse properties menu in the same manner as was previously demonstrated, and then go to the Pointers sub-menu. In the Customize menu, choose the cursor whose appearance you wish to alter, and then click the Browse button.
What is the shortcut key to change the cursor?
You can use a keyboard shortcut to turn the Mouse Keys on and off in any version of the Windows operating system. You can bring up a dialogue box by simultaneously pressing the Left Alt key, the Left Shift key, and the Num Lock key on your keyboard.
Is custom cursor safe?
Yes. A personalized cursor is risk-free. On the other hand, the fact that a CSS cursor is secure does not guarantee that the user will be aware of this fact. It is likely that an excessive amount of originality will cause a user to become reluctant.
What are sticky keys?
Sticky Keys is a feature of Windows that enables modifier keys like Ctrl and Shift to remain active even if they are not being actively pressed by the user. Users who have physical disabilities who struggle to press two keys at the same time may benefit from this feature (like using Shift to make uppercase letters).
What is Sticky Keys in Windows 11?
Sticky Keys enables you to press a modifier key, which includes the Shift, Ctrl, and Alt keys, followed by a second key to execute commands. For instance, in order to save a document, you will need to simultaneously press the Ctrl and S keys on your keyboard. Sticky Keys allows you to press both of these keys one after the other in the event that you are unable to do that.


