Blog
How Lightroom Presets Enhances Color Blending In Your Photos
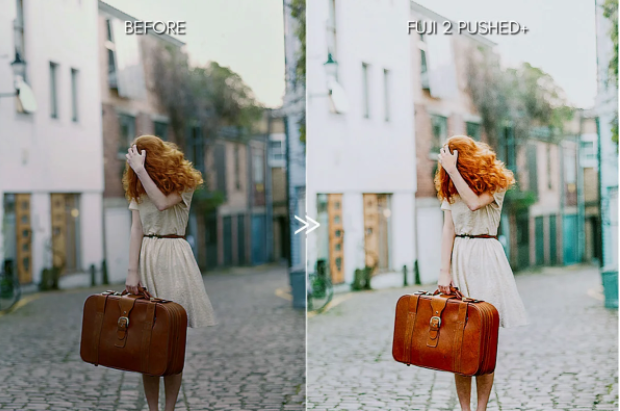
Lightroom presets are a really great way to enhance and speed up your workflow and creative process in general. There is no doubt about that. However, presets are a lot more efficient if you know some basics about how they work. In this article I am going to share my experience on how Lightroom presets actually work and what makes the guards at a presidential party or something.. You get the idea right? It lets you get from point A to B much faster since all of the guards have been clearings can get a bit complicated when it comes down to blending multiple exposures with different color tones together in post-production.
How To Get The Most Out Of Your Presets For Color Blending In Adobe Lightroom
Who doesn’t love presets, am I right? They are a time saver and it allows you to get your creative juices flowing more often. However, there is one thing that might happen, if you use the same preset over and over again for different images. It can get really boring after some time. This is why I always try to adjust each preset to fit my specific style of photographing people the best way possible. One key factor when using presets in Adobe Lightroom is color blending which will enhance your workflow quite a bit if you properly learn how it works.
Color Blending Basically color blending helps you blend multiple exposures together in post-production without losing too much detail in both shadows and highlights at the same time. Then what’s so hard about it? Well, trying to figure out how much exposure you need from each individual image can be tricky at times. I have been trying to find a solution for this issue and I think that Adobe Lightroom presets is the perfect way to get started learning color blending in different situations.
How Lightroom Presets Work
In terms of color blending, there are two ways you can work with color tones when using Adobe Lightroom presets. The first one involves using presets that enhance your shadows or highlights in order to make them fit into both shots more nicely together. This might sound a bit complicated but I will try my best to explain how it works in an easy-to-understand manner.
Creative Market offers a wide range of choices for Lightroom Presets for your editing needs. Don’t forget to check it out!
The Second Approach To Color Blending
Another approach would be using presets that lowers the exposure of both shots so they would fit together better. This technique is much more advanced, but I will try to explain it as well in this article. The main idea behind color blending is to adjust each image differently until you end up with something that looks natural. However, there are two different ways you can do this which I will show you later on in this article.
How To Use Adobe Lightroom Presets For Color Blending
In Adobe Lightroom there are many different ways to work with different presets depending on what your situation requires. There are five different ways you can use presets in Adobe Lightroom for effective color blending. The first one involves working with the preset’s exposure value by either increasing it or decreasing it depending on what your image requires.

Increasing Exposure
Another simple way to make sure the images fit together better is by adjusting the contrast of both images to fit each other which will allow you to decrease both shadows and highlights at the same time. This technique works very well but not every situation needs this many adjustments.
Decreasing Exposure
Sometimes this method will be enough, but if you want to get really picky about how your images are blended then I suggest using another approach that adjusts both shadows and highlights separately instead of just lowering/increasing the overall exposure value since that might not always work.
Adjusting Shadows
This technique is very powerful and it will help you get the shadows looking perfectly blended together while maintaining each image’s natural look. This method works really well if both of your images are exposed properly, but if this isn’t the case then what do you do? You simply fix this issue either by increasing/decreasing exposure on one of the images until they blend nicely together.
Adjusting Highlights
Then there is another technique where you can adjust highlights on each image separately in order to make sure that both images are properly exposed. This way you end up with two perfectly blended shots that still maintain their individual looks which are perfect for certain styles of photographing people in different types of scenarios.
Conclusion
Now that you have a better understanding of how Adobe Lightroom presets work in different situations, it is time to learn how to process your images using these amazing presets. If you are new to color blending I highly recommend working with the video included in this article since it contains detailed information on how to use Adobe Lightroom presets for effective color blending. This will allow you access this knowledge on whatever device you might prefer without having to pay anything.

Vampire Crawlers Coin Farming Guide

Forza Horizon 6 Performance: Why 60 FPS Is Still the Console Standard

Yoshi and the Mysterious Book (2026) – Full Completion Guide, Rewards & Secret Ending

How to Get Free Pets in Adopt Me: A Guide for Players

Roblox Username Generator – Create a Cool & Unique Username in Seconds
How to Get Free Pets in Adopt Me: A Guide for Players

Grow a Garden Recipes in Roblox: Guide to Cook (Donuts, Sushi, Pie, Pizza & More!)
Roblox Username Generator – Create a Cool & Unique Username in Seconds
Yoshi and the Mysterious Book (2026) – Full Completion Guide, Rewards & Secret Ending


