Guide
How to Adjust Mic Sensitivity on Mac, and Windows

While your microphone is not correctly configured, it might cause your speech-to-text software to fail, resulting in a great deal of frustration when making audio calls. In the event that your microphone isn’t working, it’s possible that the sensitivity or noise suppression settings need to be modified.
You will learn how to increase the microphone sensitivity and enable noise suppression on your Mac, or Windows device in this post.
Read Also: How to Move Windows 10 From HDD to SSD
What Is Microphone Sensitivity? Why Change It?

Unwanted sounds are eliminated by using noise reduction technology. Your dogs barking in the next room or traffic outside your workplace are examples of ambient noise that you should be aware of. Static and the “Darth Vadar effect” are also prevented by this method. It is also possible to reduce the computer’s internal squeaking sounds by using noise suppression.
Adding foam windscreens to external microphones would further enhance the filtering. It is also common for external microphones to provide better sound quality than inside microphones. When feasible, it’s best to utilize a high-quality external microphone.
The degree to which a microphone can amplify a faint sound into a clear, audible one is known as mic sensitivity. For example, your breath or the humming of a computer might be picked up by an extremely sensitive microphone. It also amplifies stronger sounds, such as your voice, to the point where the speakers can’t play them effectively because of the increased volume (called “peaking”).
Softer sounds are lost when a microphone’s sensitivity is inadequate. It’s more probable that your sensitivity is too high rather than too low unless you have a very faint voice or need to record very delicate noises.
To evaluate microphone sensitivity, you need to take into account several elements such as the amount of Audio Gain that your speakers can grasp. It also helps to safeguard and amplify these signals by pre-amplification.
How to Adjust Mic Settings in Windows

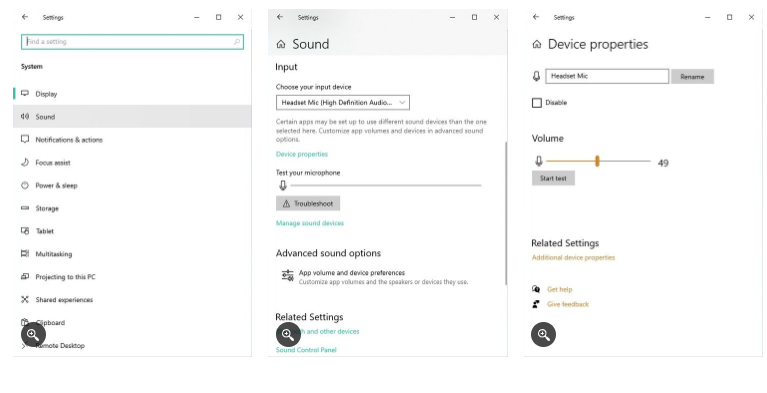
For adjusting the microphone sensitivity in Windows, you must access the microphone device settings.
- Go to System > Sound in the Settings menu.
- Make sure that your microphone is chosen in the Input section, then click on Device Properties.
- Take a closer look at the device’s settings.
- Make adjustments to Microphone levels in the Levels section (sensitivity).
- Now that the device properties window has been closed, you may begin speaking. You will hear your own voice in the microphone test. Increase or lower the mic volume as necessary until you can clearly hear your voice.
Avoid cranking up the Microphone Boost unless you’ve previously set the Microphone volume to 100 and the microphone still doesn’t pick up your sounds.
How to Adjust Mic Settings on Mac

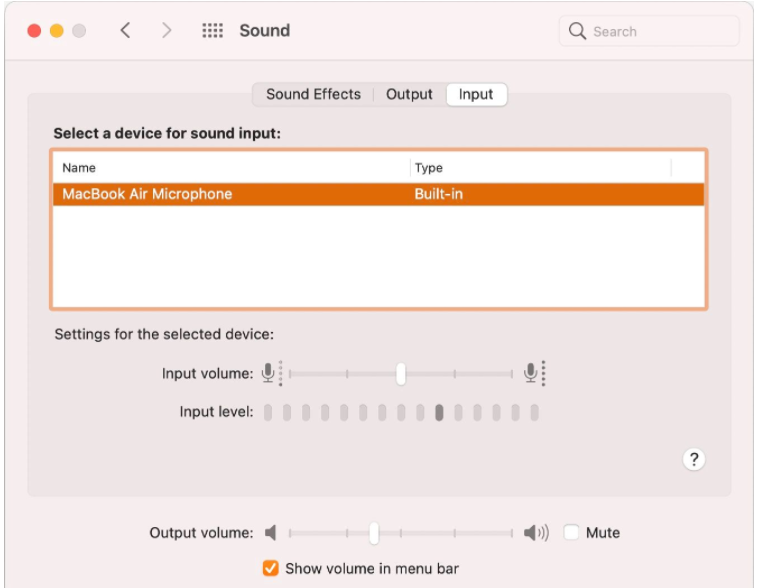
Your Mac’s sound preferences let you tweak the sensitivity of the microphone.
- Go to Sound > Input Preferences and use the Gain slider to fine-tune the microphone (sensitivity).
The Ambient Noise Reduction switch can also be used to turn on noise suppression. In order to take full use of Apple’s outstanding Dictation function, certain settings need be changed.
Video


