Guide
How to Change Resolution in Photoshop
There are a lot of different scenarios in which you might want to modify the image resolution. It’s possible that you’d like to create a large print of a photograph. You might also need to reduce the size of an image before posting it on social media. In either case, altering an image’s resolution is a straightforward process within Adobe Photoshop.
In this piece, I’ll walk you through the five simple steps necessary to alter the resolution of any image you choose.
Read Also: How to Zoom In And Out in Photoshop
How to Change Image Resolution in Photoshop
Adobe Photoshop makes it simple to change the resolution of an image in either direction. Allow me to walk you through the process step by step.
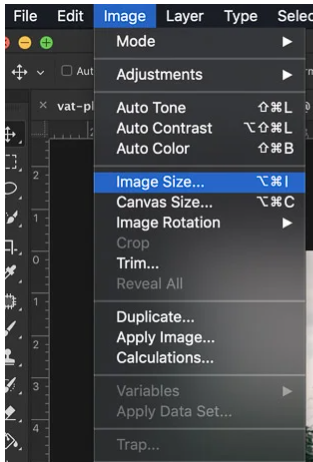
Step 1: Finding the Image Size
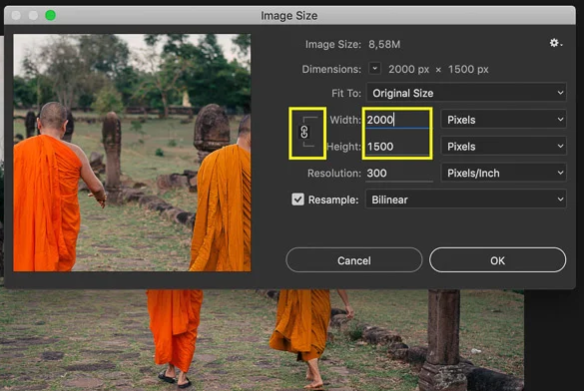
To begin, open the image size dialogue box so that you may determine the dimensions of your image. Navigate to Image and then Image Size… alternatively, you can use the keyboard shortcut Option + Command + I (Alt + I on Windows).
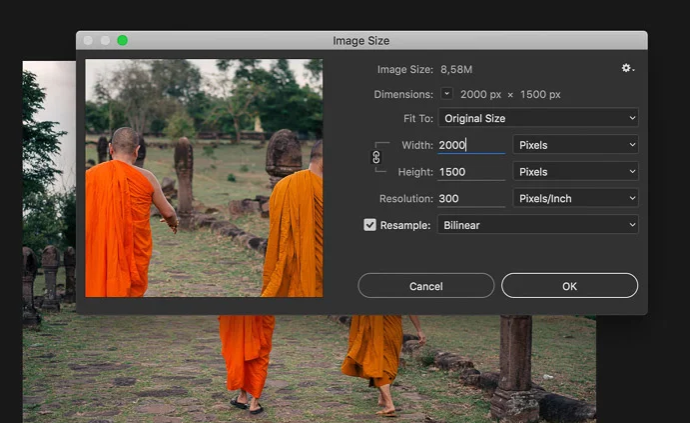
You may get the dimensions of your image in this dialogue box. You will notice that there is a width and height pixel dimension.
You will see the size displayed in pixels by default while using Adobe Photoshop; but, you have the option to alter it to inches, centimetres, or even a percentage. Your initial photograph will be one hundred percent original. Your image’s file size will be displayed at the very top of the window. We are going to adjust the resolution of your photograph by utilizing the tools that are contained within this window.
Step 2: Changing the Image Size
When it comes to changing the image resolution, you have a few different choices. When you print, you have the option of selecting one of the presets that is based on the typical dimensions of paper and prints.
To select a document size, use the drop-down menu that is labelled “Fit To.”
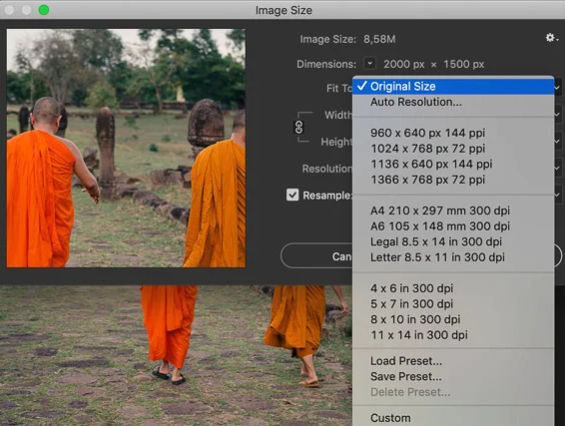
You are not need to keep to traditional print sizes if you are going to upload the image to the internet. In most cases, it is best to determine the size on your own. You just need to enter in the size you want on top of the existing size.
Photoshop’s settings will, by default, impose a limit on the aspect ratio. If you enter a value to change the width of the image in Photoshop, the programme will automatically adjust the height to maintain the same proportions.
Click on the icon that looks like a chain connecting the width and height pixel dimensions. This will allow you to modify the width and height pixel dimensions individually. This instructs Photoshop to ignore the aspect ratio constraints. In the “Height” or “Width” box, type the number of pixels that you want your image to have.
Take note of the number that appears at the top of the dialogue box indicating the change in file size as you adjust the size of your image. This value, expressed in megabytes, represents the document size of your image.
Step 3: Resolution
The number of pixels that are packed into an inch is determined by the image resolution box. If you want to print the image, everyone will tell you that this figure needs to be 300 pixels per inch, however that’s not entirely accurate. The recommended resolution for printing photos is 300 dots per inch (DPI). However, the resolution of an image displayed online is limited to that of the screen resolution of the computer. The standard screen resolution is 72 DPI.
You don’t need to make any changes to this number. It will make no difference if the photographs are 300 or 72 DPI if they are uploaded to the internet. Changing the DPI will result in a change in the size of the image. If the DPI field is changed to 150 from its default setting of 300, your image will be reduced to half its original size. Additionally, it will alter the size of your document.
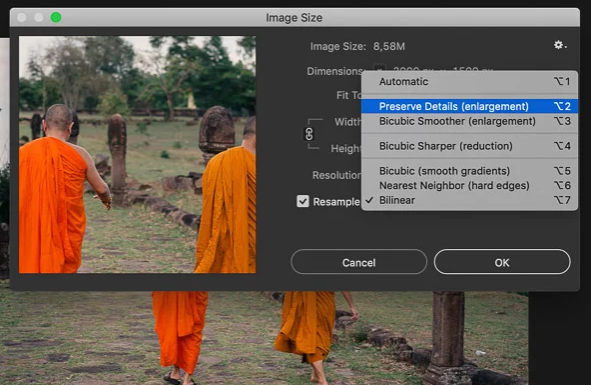
Step 4: Selecting a Resampling Mode
The resampling mode in Photoshop is responsible for determining which algorithm will be used to add new pixels. The ‘Preserve Details’ and the ‘Bicubic Smoother’ settings are two excellent choices when it comes to boosting the resolution.
Bicubic Smoother, in my experience, produces the most desirable outcomes. You are welcome to try either option in order to compare them.
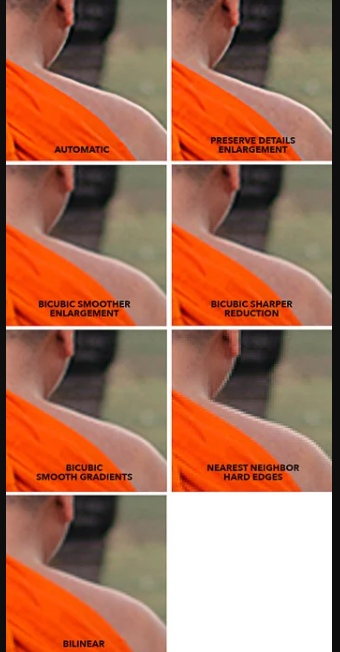
The various resampling modes are compared in the following table.
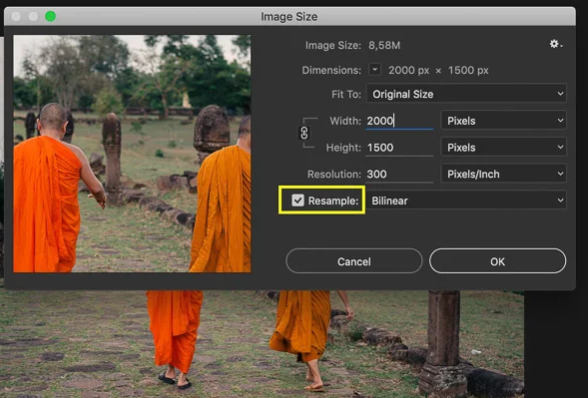
Make sure the ‘Resample’ box is checked, and then choose a resampling mode that suits your needs.
Step 5: Sharpening the Image
After increasing the image resolution or prior to uploading it for online viewing, sharpening is always a good idea to perform.
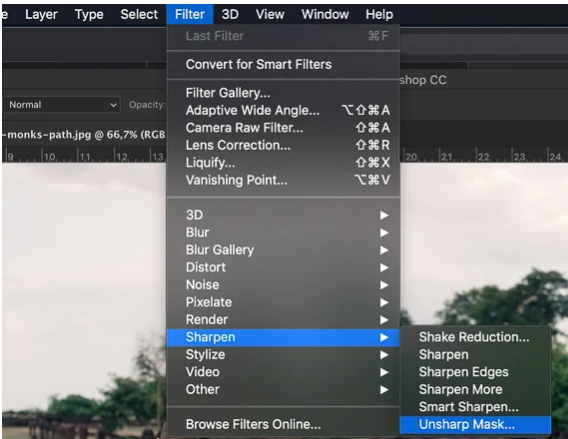
To unsharp mask an image, go to the Filter menu, then to the Sharpen submenu.
Move the Amount slider all the way to the right until it reads 100 percent, then set the Radius to 1. When expanding the size of an image, beginning with that setting is a smart idea.
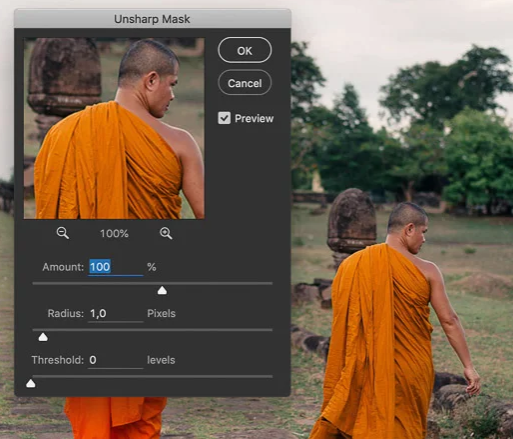
If the end result does not appear to be satisfactory, you can adjust the amount of sharpness used.
FAQs
Is there an app to increase photo resolution?
Top 1: Pixlr
Pixlr is an application that may simply fulfil your requirement for a higher photo resolution. In addition to this, it offers a broad variety of tools for altering photographs, such as the ability to generate picture collages and produce effects such as double exposure. It is simple to use. Increase the resolution of the photo.
How do you make a blurry picture clear in Photoshop for free?
Launch Photoshop, choose the image you want to work on, and then hit the Ctrl key and the J key simultaneously to duplicate the background layer. Make sure that you choose Layer 1 in the Layers window by clicking on it. Next, select High Pass by going to the Filter menu, then the Other menu. Your image will become sharper in proportion to the increase in the value that you give it.
Can Photoshop fix blurry photos?
There is yet a chance! If you have Photoshop or PhotoShop Elements, you can repair a minor blur by following these simple steps: Once your photo is open, navigate to the filter and sharpen sections of the editing software, and select “Unsharp Mask.” Try out these different options: a radius of 150 percent and a threshold of 10.
How do I remove blur in Photoshop?
Select “Shake Reduction” from the option labelled “Sharpen” located under the “Filter” menu. Adobe Photoshop does an analysis on your image, activates the filter’s floating interface, and searches for a place in the image that has blur that the filter can evaluate and eliminate.
Why is my image in Photoshop blurry?
The correct response The image downsampling method that is currently employed in Muse is of lower quality than Photoshop’s, which is the primary reason why photos appear blurry (that was compounded in early betas due to a bug in the JPEG compression library we were using at that time).

Vampire Crawlers Coin Farming Guide

Forza Horizon 6 Performance: Why 60 FPS Is Still the Console Standard

Yoshi and the Mysterious Book (2026) – Full Completion Guide, Rewards & Secret Ending

How to Get Free Pets in Adopt Me: A Guide for Players

Roblox Username Generator – Create a Cool & Unique Username in Seconds
How to Get Free Pets in Adopt Me: A Guide for Players
Yoshi and the Mysterious Book (2026) – Full Completion Guide, Rewards & Secret Ending
Forza Horizon 6 Performance: Why 60 FPS Is Still the Console Standard


