Apple
How to Change Your AirPods and AirPods Pro Settings
How to customise the way your AirPods operate by modifying their settings is covered in detail in this tutorial. The instructions on this page are applicable to all AirPod devices, including the first generation (with the Lightning case), second generation (with the wireless case), and AirPods Pro, among others.
Read Also: How To Connect Two Airpods To One Phone
How to Change AirPod Settings
Regardless matter how you wish to personalize your AirPods, the process always starts with the same set of steps. Start with these four steps for all of the sections that follow in the rest of this article:
1. To access the Settings app on an iPhone, iPad, or iPod touch, press and hold the Settings icon.
2. Select Bluetooth from the drop-down menu.
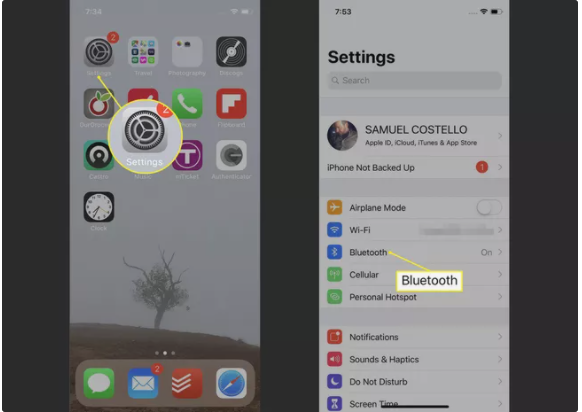
3. To access the AirPods settings page, choose the I symbol next to your AirPods from the docking station.

TIP: It is necessary to have your AirPods linked in order to make changes to the settings. It is important to connect them first if they are not already linked on this screen in order for them to work together.
How to Change AirPods Name Settings
You will immediately be assigned the moniker “[your firstnameAirPods.”when ]‘s you purchase AirPods. In most cases, you won’t see your AirPods’ name unless you attempt to connect them to another device or use Find My AirPods to locate them if they go misplaced; otherwise, you won’t see it very often.
It’s possible that you’ll want to give them a new (and probably more hilarious) moniker after all. More information may be found in this post on how to rename AirPods.
How to Change AirPods Double-Tap Settings
When you swiftly double-tap your AirPods, you may trigger a variety of various activities, such as playing/ stopping audio or activating Siri on your smartphone. By following these steps, you may control the action that occurs on a double-tap and apply different settings to each AirPod:
1. Alternatively, in the Double-Tap on AirPod section, you may swipe left or right to select the AirPod’s settings you want to modify.
2. On the following page, select the action you wish to be triggered when you double-tap the AirPods in question. Siri, Play/Pause, Next Track, Previous Track, and Off are all available as options.
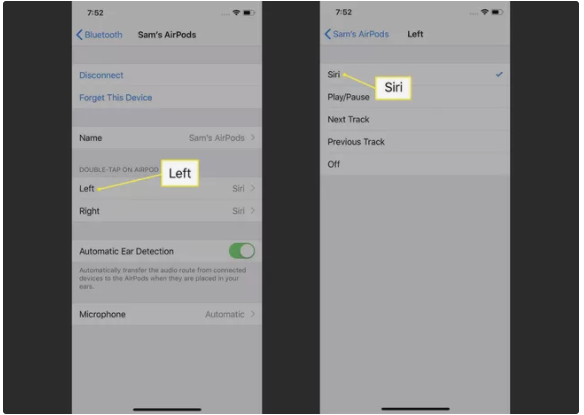
3. To return to the previous screen, press the back arrow in the upper left corner, then press the other AirPod and select your preferences.
How to Change AirPods Automatic Ear Detection Settings
Whenever you put your AirPods in your ears, the audio that is currently playing on the devices to which your AirPods are connected (such your iPhone, iPad, Mac, or other device) is instantly transferred to the AirPods. This is the default setting. This is both clever and convenient, but it may not be something you want to happen. When you place your AirPods in your ears, the Automatic Ear Detection slider should be set to off/white. This will prevent your AirPods from immediately picking up any audio that is currently playing.
TIPS: Have you ever noticed that when you pull your AirPods out of your ears, the audio stops playing on them? If you turn off this feature, audio will continue to play even if you don’t have your ears in your ears.
How to Change AirPods Microphone Settings
Both AirPods contain a microphone in the bottom that picks up your voice while you’re on a phone conversation or utilizing the Siri virtual assistant. By default, any AirPod serves as the microphone, which means you may wear either one in your ear and it would still function properly. You may also select to have only one AirPod’s microphone operate all of the time, while the other does not, by following the instructions below:
1. In the AirPods settings page, select Microphone from the drop-down menu.
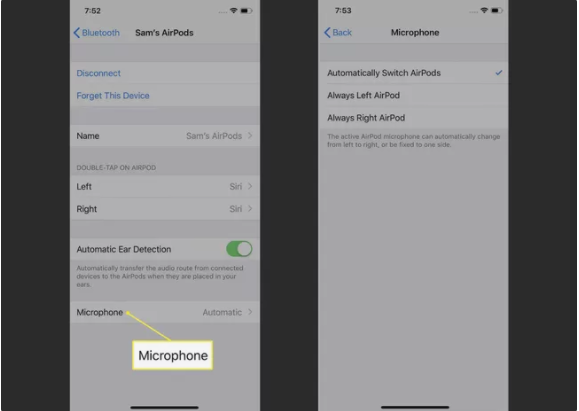
2. Automatically Switch AirPods is the default setting, which means that both AirPods are used at the same time. You may also select Always Left AirPod or Always Right AirPod from the drop-down menu.
Video

Vampire Crawlers Coin Farming Guide

Forza Horizon 6 Performance: Why 60 FPS Is Still the Console Standard

Yoshi and the Mysterious Book (2026) – Full Completion Guide, Rewards & Secret Ending

How to Get Free Pets in Adopt Me: A Guide for Players

Roblox Username Generator – Create a Cool & Unique Username in Seconds
How to Get Free Pets in Adopt Me: A Guide for Players
Yoshi and the Mysterious Book (2026) – Full Completion Guide, Rewards & Secret Ending
Vampire Crawlers Coin Farming Guide


