Guide
How to Check the CPU Usage on Your Computer

The central processor unit (CPU) of your personal computer (PC) or Mac is analogous to its brain. It is the component of your computer that instructs every other component on how to operate, including which programmes to run, which pictures to display, and a variety of other tasks.
A % is the unit of measurement for your CPU consumption, or, to put it another way, the amount of the CPU’s energy that is being utilized. When your computer is not being used, the percentage of CPU time used should be in the single digits or low teens at most. The CPU utilization should spike when running films, games, or other resource-intensive activities; nevertheless, it should never remain at 100 percent for an extended period of time.
If you’ve observed performance issues on your computer, such as a long startup time or apps that are lagging behind, you should examine the percentage of your machine’s CPU that is now being used. In this method, you will be able to ensure that the percentage of time spent using the central processing unit (CPU) is within a healthy range, regardless of whether or not your computer is actively processing data.
Read Also: How to Control the CPU Fan on Windows 11
How to Check your CPU Usage on a Windows PC
Using the Task Manager
- To delete a file, first press the Control key, then the Alt key, and finally the Delete key on your keyboard.
- When the drop-down menu that appears at the bottom of the screen is brought up, select “Task Manager” from it.
- To adjust your computer’s performance, open the Task Manager and navigate to the “Performance” menu option.
- Choose it from the sidebar on the left to gain access to this menu’s central processing unit (CPU). You will see a graph that indicates how the amount of CPU time you have used has varied over time. The information regarding your current consumption may be found under the heading “Utilization.”

Video
How to Check your CPU usage on a Mac
Using the Activity Monitor app
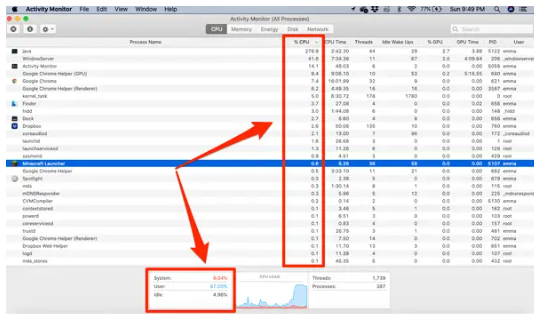
- Launch the application known as “Activity Monitor.” You can locate the application even if it is not in your Dock by searching for it using Spotlight or by navigating to your Applications folder and selecting the “Utilities” folder from there.
- You will be presented with a list of the applications that are now active on your Mac, along with data pertinent to each application in the right-hand columns. Find the column labelled “percent CPU,” and then click on it twice. This will cause the programmes that require the greatest processing power to rise to the top of the list.
- Examine the following list to determine which programmes are consuming the most processing time on your computer and how much time each one is taking up.
- You may also take a look at the box that is located at the bottom of the screen. This box displays the power consumption of your CPU broken down into three categories: “System,” “User,” and “Idle.” When you add the percentages for System and Idle together, you will receive the total usage of your CPU at this moment.
You can terminate any applications that aren’t necessary that are using too much of your computer’s processing power by using the task manager.
Video

Vampire Crawlers Coin Farming Guide

Forza Horizon 6 Performance: Why 60 FPS Is Still the Console Standard

Yoshi and the Mysterious Book (2026) – Full Completion Guide, Rewards & Secret Ending

How to Get Free Pets in Adopt Me: A Guide for Players

Roblox Username Generator – Create a Cool & Unique Username in Seconds
How to Get Free Pets in Adopt Me: A Guide for Players
Yoshi and the Mysterious Book (2026) – Full Completion Guide, Rewards & Secret Ending
Forza Horizon 6 Performance: Why 60 FPS Is Still the Console Standard


