Guide
How to Control the CPU Fan on Windows 11
Even though the CPU fan on a computer is crucial for keeping the machine cool when it is under severe load, Windows does not provide tools for altering the CPU fan speed. In this post, you will discover how to regulate the CPU fan on a Windows 11 computer.
Read Also: How to Enter the BIOS on Your Windows 11 PC
How to Control the CPU Fan on Windows 11
Windows 11 does not come with any built-in tools for monitoring or changing the speed of the CPU fan. If you want to regulate the CPU fan on Windows 11, you must use one of three alternate techniques.
- Use first-party software. Modern computers are often compatible with proprietary software to lets you change the CPU fan speed. This is the quickest, easiest solution, but you must download the correct software.
- Use BIOS. Most PCs ship with a BIOS which can display the current speed of your CPU fan, while more feature-rich BIOS will let you change the fan speed. You can accomplish this without downloading software, but it can be complex.
- Use a third-party utility. Third-party utilities are capable of detecting the speed of your CPU fan. A few even let you change it. These utilities work on a wide variety of hardware, but you may encounter bugs and compatibility issues.
How to Control the CPU Fan With First-Party Software
Software developed by your computer’s manufacturer, or the manufacturer of your computer’s motherboard, for use with specific hardware is referred to as first-party software. It will work without any concerns with compatibility and is frequently the least complicated to use.
1. Make a note of the manufacturer and model number of your Windows 11 computer. If your Windows 11 computer is a custom build, you must first identify the manufacturer and model of the motherboard on your computer.
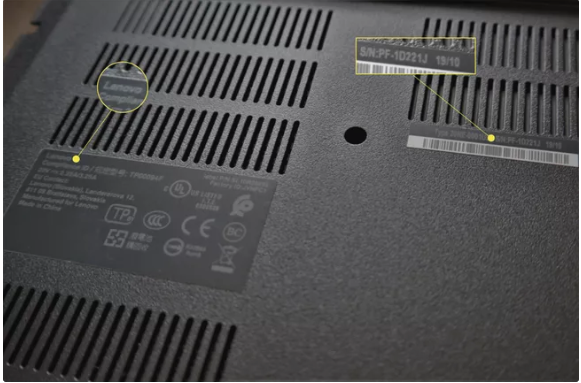
2. To find your PC model, go to the support site maintained by the company that made your computer. You may search for items by serial number or even by purchase number, if you have one, on several websites.
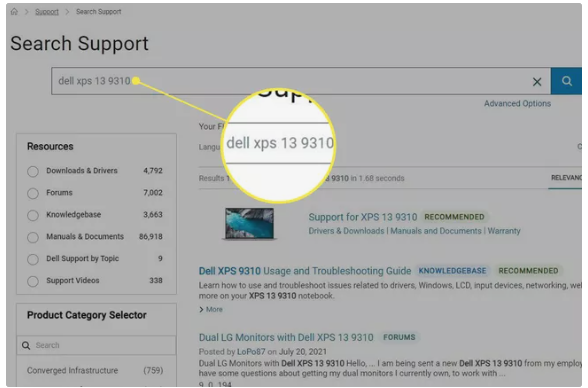
3. Navigate to the downloads part of the support page for your PC’s model and seek for the system utility that was created for it. To use the utility, you must first download it.
4. Look for fan speed control in the utility after you’ve installed and opened it. For example, entering the Settings menu in MSI Afterburner’s menu and selecting the Fan tab will display the fan control choices available to you.
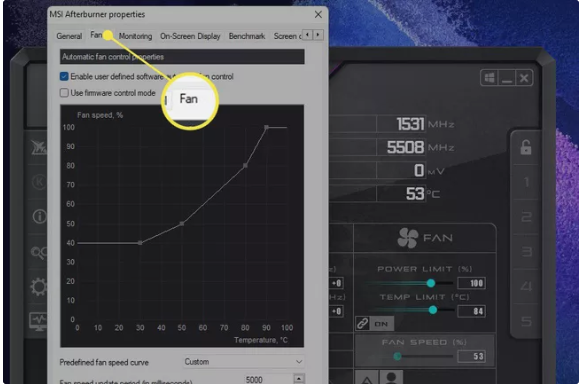
5. The majority of applications displays fan speed settings as a percentage of the maximum speed setting. The fan’s highest setting is 100, while its lowest setting is 0. A number of 0 represents the fan’s lowest setting. Higher fan speeds provide better cooling but generate more noise, whereas lower fan speeds provide less cooling but generate less noise.
Why Can’t I Control My CPU Fan on Windows 11?
a If you try all three of the ways above and none of them work, it’s conceivable that your computer does not allow you to change the CPU fan speed. It is possible that the system BIOS prevents this from happening, which is sometimes the case with laptops, or that your CPU fan is not attached to a motherboard fan connector that allows for fan speed adjustment.
Video

Roblox Username Generator – Create a Cool & Unique Username in Seconds

Grow a Garden Recipes in Roblox: Guide to Cook (Donuts, Sushi, Pie, Pizza & More!)

Job Opportunities in Dubai – 2026

Mr Bit at the SBC Awards Europe 2025: The Bulgarian Brand Setting New Standards in the European Gaming Industry

Dennis Rodman Net Worth 2026 – Everything You Need to Know

Bloxburg Neighborhood Codes 2026
Grow a Garden Recipes in Roblox: Guide to Cook (Donuts, Sushi, Pie, Pizza & More!)
Job Opportunities in Dubai – 2026
Dennis Rodman Net Worth 2026 – Everything You Need to Know


