Guide
How to Check Your Graphics Card on Windows 11
In order to display graphics, the computer running Windows 11 requires a graphics processing unit, often known as a GPU, or a graphics card. It isn’t always evident, but there are instances when you need to know which graphics processing unit (GPU) your computer utilises. This is how to check it out.
Read Also: How to Make a Zip File in Windows 11
How to Check Your Graphics Card on Windows 11
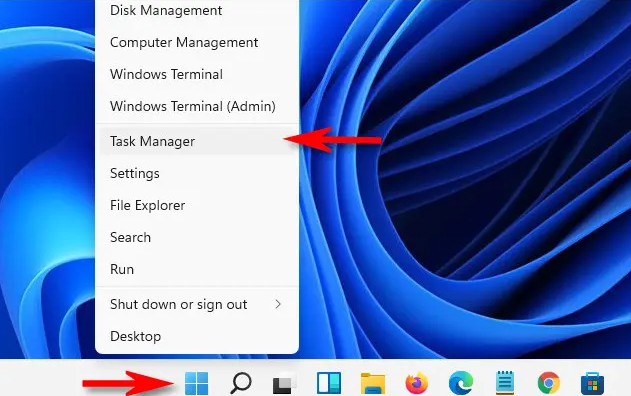
Utilizing the built-in Task Manager tool is the quickest approach to determine which graphics card is installed in your personal computer. To open the Task Manager, right-click the Start button and choose “Task Manager” from the context menu that appears.
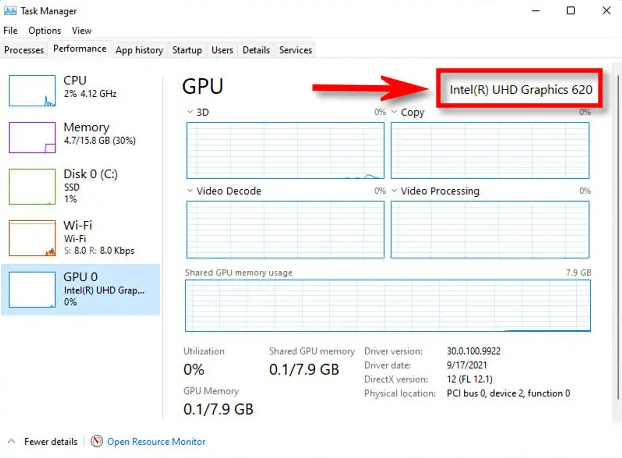
The “Performance” tab can be accessed once Task Manager has been opened. If you have more than one GPU installed in the computer, each one of them will be mentioned in the sidebar with a number and a name, such as “GPU 0” or “GPU 1.” Simply select the one about which you would want further information by clicking on it.

The name of the graphics card or processor that is now being used can be located in the top-right corner of the information panel for the GPU that you have selected, just above the charts. The name of the GPU is “Intel(R) UHD Graphics 620” in this example; however, it is possible that the name will be different in your instance.
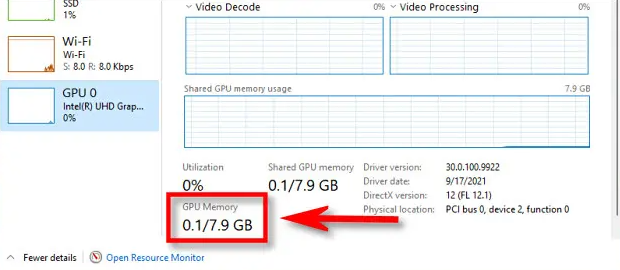
The amount of RAM that your GPU possesses may also be accessed through the GPU task management panel, which is located in the same location. You should be able to locate it in the bottom-left corner under the heading “GPU Memory.”
When you are finished, make sure to exit Task Manager. Simply relaunch Task Manager whenever you feel the need to check again, and make sure to look at the tabs labelled Performance > GPU. I wish you the best of luck!
FAQs
What are the steps to updating a graphics card?
In order to upgrade from the graphics card you are now using to a more recent model, you must first ensure that the new card is compatible with your computer in terms of its dimensions, the connections it requires, and the amount of power it needs. The particular instructions may vary slightly depending on the model of your computer; but, in most cases, all you need to do is open the tower, remove the existing card from the PCI-e slot, and then install the new card in its place. Install the drivers for your graphics card on your personal computer.
What Is the Difference Between an Integrated and Dedicated Graphics Card?
The most important distinction is that an integrated graphics card does not have its own CPU (Central Processing Unit or “processor”); rather, it makes use of the processor that it is coupled to and the RAM that is found in the system. The central processing unit, sometimes known as the GPU, and the random access memory make up a dedicated graphics card (VRAM). A dedicated graphics card can contain thousands of processing cores, which results in a large increase in performance but comes at the expense of significant increases in power consumption, cooling requirements, and overall cost.

Vampire Crawlers Coin Farming Guide

Forza Horizon 6 Performance: Why 60 FPS Is Still the Console Standard

Yoshi and the Mysterious Book (2026) – Full Completion Guide, Rewards & Secret Ending

How to Get Free Pets in Adopt Me: A Guide for Players

Roblox Username Generator – Create a Cool & Unique Username in Seconds
How to Get Free Pets in Adopt Me: A Guide for Players
Roblox Username Generator – Create a Cool & Unique Username in Seconds
Yoshi and the Mysterious Book (2026) – Full Completion Guide, Rewards & Secret Ending
Forza Horizon 6 Performance: Why 60 FPS Is Still the Console Standard


