Guide
How To Connect Canon Printer To WiFi
Wireless printers are a blessing for folks whose occupations rely on obtaining several printouts and filling them properly. This remarkable gadget rids you of all the problems connected with connecting multiple wires and detangling them after a few of usage.
You’ve undoubtedly read for hours online and scratched your head trying to grasp how to connect a Canon printer to a wireless network. Don’t worry; you do not have to be a computer genius when connecting a Canon printer to your Wi-Fi. Just follow the directions below, and in no time, you will set up Canon wireless printer and enjoying your favourite prints from the comfort of your sofa, without having to worry about any USB cable or wires!
What You Need to Know Before Connecting your Canon Printer to WiFi
- Connecting a Canon printer to a Wi-Fi-enabled device is as simple as plugging in a USB cable from a PC, Mac, iPhone, iPad, iPod, or other iOS device. A simple download of the “CANON PRINT App” and a tap of a connect button on your wireless printer takes care of all you need to know. Your name and WiFi will also be sent automatically so that the setup procedure may be streamlined.
- You’ll need a network and a Canon wireless printer to get started. To help you out, we’ll explain everything to you in a way that you can understand. A wireless router links all of your home network devices, such as your phone, printer, and computer, to the internet. All of your home’s gadgets may interact with your network using this wireless network device. As a result, you must ensure that your router is properly configured and that your wireless connection is functional before beginning the installation procedure.
- To send a command to the printer, you’ll need a networked computer. Whether you’re unsure if your printer is connected to your computer, you may check by going online and seeing if you can visit a website.
If you experience trouble in setting up wireless LAN, then consider the following:
- Consult your router’s manual or contact the manufacturer for further information on how to set up and use your wireless network.
- To get your computer up and running, see the instruction manual or the manufacturer’s website for help.
WPS Connection for Canon Printer
There is no one right way to connect your Canon Printer to WiFi. So first, we will explore the WPS connection to see if you are comfortable employing this method.
Before we proceed, make sure that your Canon wireless printer meets these conditions to know whether you can use the WPS push button method:
- A physical WPS push button must be present on the access point.
- You may verify this by consulting the device’s user handbook. Head on to the alternative way below if the WPS push button is missing.
- WiFi Protected Access (WPA) or WiFi Protected Access 2 (WPA2) must be used to secure your network. This protocol is used by the vast majority of wireless access points that support WPS.
Confirmation of Network Settings
You may print out your printer’s network settings if you want to verify that your printer has properly connected to your wireless network without the need of a USB connection.
- Your printer has to be turned on.
- In the printer, put in an A4 piece of paper or any letter-sized paper.
- Take a moment to press and hold the Resume/Cancel button until the alarm light flashes 15 times. Once you’ve released it, you’ll see a printout of the network information page.
Make that the connection is active and the SSID (the name of your wireless network) is right.
That’s all there is to it! This is everything you need to know about how to set up WPS. To get the most out of your printer, be sure to utilise the included installation CD.
Connecting your Canon Printer to WiFi for Mac OS X
- Activate the printer by turning it on.
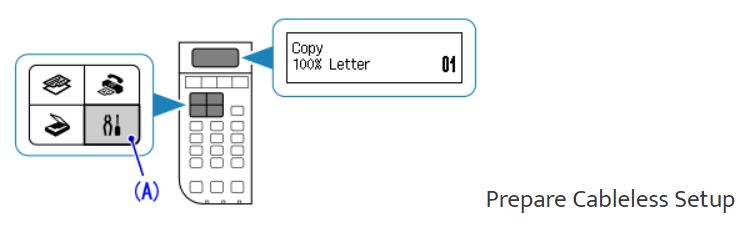
- You may do this by pressing the printer’s Setup button (A).
- Select Wireless LAN configuration and hit the OK button.
- Press OK after selecting Other Setup.
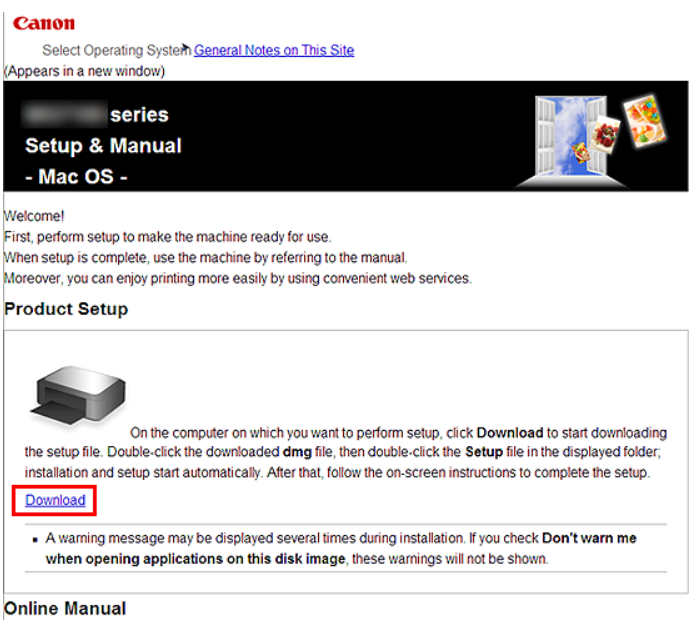
Install the Software
- Visit http://canon.com/ijsetup/
- Your area, printer name, and operating system should be selected.
- After clicking download in Product setup, the installation file is downloaded and installed.
- Open the.dmg file you downloaded earlier.
- Take a look at the symbol for setup.
- The next step is to click on the Next button.
- Type in the password and the administrator’s name on the screen that appears.
- Install Helper after that.
- Click on “Next” to proceed.
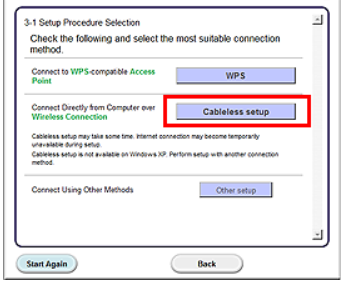
- Activate the Wireless LAN Connection
- Select the option to connect through a wireless router.
- Select the next option.
- Select Cableless Setup from the drop-down menu.
- Select the next option.
- To add a printer, go to Devices > Add Printer.
After the “Canon xxx series,” the alphanumeric characters represent the machine’s Bonjour service name or MAC address.
If the device is not detected, check the following:
Read More: How To Lock Apps On Android
- First, make sure the device is on.
- The computer is connected to the wireless router.
- The firewall function of any installed security software is off.
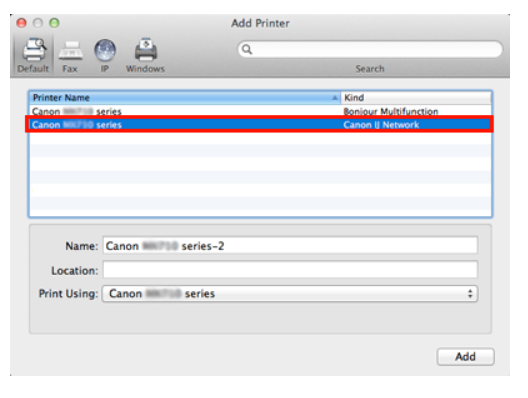
- To add a Canon xxx Series camera, choose the desired model and click Add.
- You may proceed by using the Next button.
- If the Extended Survey Program displays on the screen, click Agree to proceed.
- Don’t agree means that the Extended Survey Program will not be installed, although this will not have a substantial effect on device performance.
- When you’re finished, click Exit to close the window. Keep the setup CD-ROM in a secure place once you’ve used it.
The Easy Way to Connect Canon Printer to WiFi
This method is pretty straightforward, so you can try this one if you do not want to get your hands dirty with something more technical. Just follow the below steps.
To start, follow these steps:
- Press the Power button and turn on your Canon printer.
- Press the Settings Button.
- Press the arrow button and navigate to Device Settings and then press OK.
- Operate the arrow button till you reach LAN Settings and then press OK.
In order for the Canon printer to begin looking for a compatible wireless network, you’ll observe a flashing light.
- Simply hit Stop to return to the wireless LAN configuration > basic setup and press OK if searching for WiFi is taking longer than planned.
- Press OK once you’ve used the arrow buttons to find the proper WiFi network.
- Click OK once you’ve entered your password.
- After the screen says Connected, press OK again.
Add Your Canon Printer to the Computer
After completing the first step of the connection, you are now in the second phase. In order to get the job done, you must add your computer once you’ve properly linked the printer to WiFi. By following these instructions, you’ll be able to:
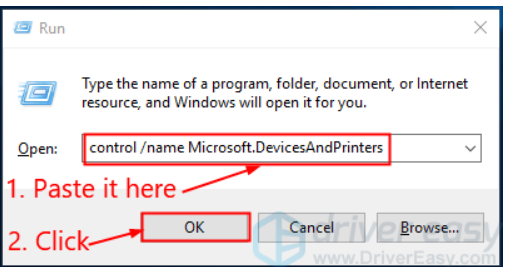
- Windows logo and R keys must be simultaneously pressed to open the Run command. Finally, type Microsoft.DevicesAndPrinters into the box and click OK.
- Follow the onscreen instructions to add a printer by clicking Add a Printer.
Congratulations! You have successfully connected your printer to your WiFi network. Do not shy away from testing a page. It should work!
Is Your Printer Not Working Properly?
Don’t worry if your wireless Canon printer isn’t operating properly; this is a very typical problem. Many times, even after all your effort, the print in your hands isn’t exactly what you had hoped for. However, there are lots of ways to fix this.
If the Canon printer is acting strangely, such as:
- It is not printing at all
- An error notification keeps on popping up randomly
You have a printer driver that is either corrupt, obsolete, or defective. Check to see whether this is the problem by updating the printer driver. If you don’t want to wait that long or don’t know where to begin, contact the product’s makers for assistance.
Restore your Network Settings to Factory Default
Changing your access point is as simple as following the steps listed below to restore your network settings to their factory defaults.
Reconfiguring the printer will be necessary after startup if you want to print from a computer connected to the network, so keep this in mind. Synchronization is essential.
Follow the guidelines below to initialize network settings:
- PressThen, presshold the Resume/Cancel button till the alarm flashes 17 times.
- Release the button.
There must be a problem with the network settings now that they’ve been reset to factory defaults.
Contact the manufacturers if you’re still having issues after completing the aforementioned instructions. Please get in contact with Canon’s customer support if you have any questions. They can most likely assist you.
Video

Vampire Crawlers Coin Farming Guide

Forza Horizon 6 Performance: Why 60 FPS Is Still the Console Standard

Yoshi and the Mysterious Book (2026) – Full Completion Guide, Rewards & Secret Ending

How to Get Free Pets in Adopt Me: A Guide for Players

Roblox Username Generator – Create a Cool & Unique Username in Seconds
How to Get Free Pets in Adopt Me: A Guide for Players

Grow a Garden Recipes in Roblox: Guide to Cook (Donuts, Sushi, Pie, Pizza & More!)
Roblox Username Generator – Create a Cool & Unique Username in Seconds
Yoshi and the Mysterious Book (2026) – Full Completion Guide, Rewards & Secret Ending


