Guide
How to Convert PowerPoint to Video

The usage of PowerPoint decks is highly recommended for the purpose of showcasing and communicating a message, a product, or data visualization since viewers are more likely to retain information when it is provided in video format as opposed to when information is offered in text format. There are a variety of programmes that may be used to convert a PowerPoint presentation into a movie, including PowerPoint for Microsoft 365, Microsoft PowerPoint 2016, PowerPoint 2013, Microsoft PowerPoint 2010, and PowerPoint for Mac.
Read Also: How to Embed a YouTube Video in PowerPoint
How to Save PowerPoint as Video on Windows
After you’ve finished creating your presentation, turn your slides into visually appealing videos. The procedures outlined below demonstrate how to convert a PowerPoint file into a movie. The end result is a file that incorporates animation, narration, and other custom material that was originally contained in the PPT or PPTX file that was converted.
The following are the steps to follow in order to create a video from a PPT or PPTX file in PowerPoint on Windows operating systems:
1. Launch PowerPoint and navigate to the presentation file that you wish to convert to a video format. Make sure the most recent version of the file is saved by selecting File > Save or by clicking on the Save button on the Quick Access Toolbar if the file is currently open.
2. Select File > Export from the menu bar.
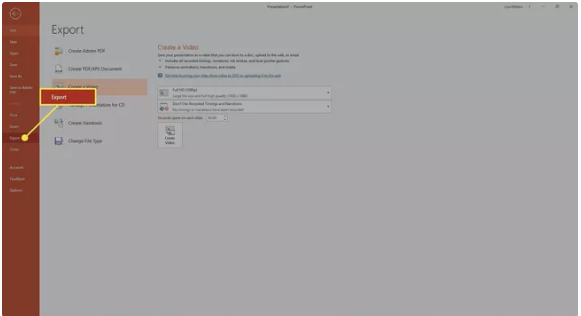
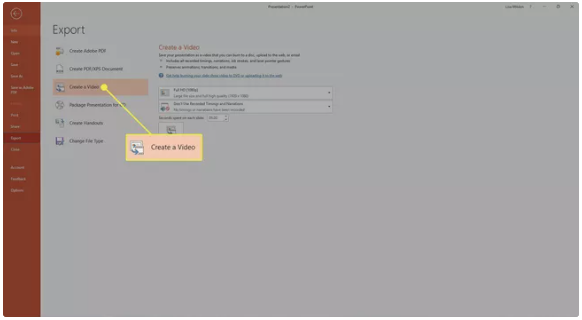
3. Choose the option to create a video.
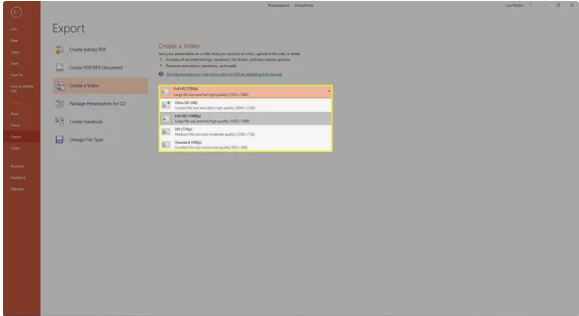
4. Select the video quality that you wish to use for your video slideshow from the drop-down menu. A high-quality screen resolution results in a bigger file size as a result of the higher resolution. A low-quality output results in a smaller file size because the output is of lower quality.
5. In the movie, you can specify whether or not you want to add recorded time stamps and narrations. If your presentation includes timings or narrations, choose Record Timings and Narrations from the Record menu. These narrations can feature a thumbnail image of yourself taken with your webcam and used in the narration.
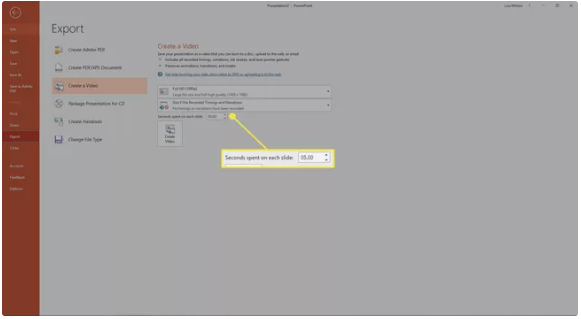
6. Enter the time in the Seconds spent on each slide text box to specify the amount of time that each slide is displayed for on the screen.
7. After you’ve made your selections, click on Create Video.

8. In the Save As dialogue box, specify a place for your new video file and a filename for it to be saved under.
9. Select the Save as type drop-down arrow and then either MPEG-4 Video (MP4) or Windows Media Video from the list that appears. Click Save (WMV). To begin the video making process, click on the Save button.
10. You can see how far you are along with your video creation by looking at the status bar. Depending on the size and intricacy of the video being generated, this could take anything from a few minutes to several hours to complete.
Video
FAQs
Why can’t I export my PowerPoint to video?
It could be due to any of the following factors: a) It’s possible that the size of your PowerPoint file is too large. There are too many slides in your PowerPoint file, or the slide timings are set for too long. It is possible that there is some content off-slide or that there is an object within your slide that interferes with the conversion to video.
Why can’t i video record on PowerPoint?
You will need to make sure that the Recording Tab is enabled in PowerPoint. To do so, select File > Options from the menu bar. Once in Options, select Customize Ribbon from the drop-down menu. On the right-hand side of the screen, under Main Tabs, choose the checkbox next to Recording.

Vampire Crawlers Coin Farming Guide

Forza Horizon 6 Performance: Why 60 FPS Is Still the Console Standard

Yoshi and the Mysterious Book (2026) – Full Completion Guide, Rewards & Secret Ending

How to Get Free Pets in Adopt Me: A Guide for Players

Roblox Username Generator – Create a Cool & Unique Username in Seconds
How to Get Free Pets in Adopt Me: A Guide for Players
Yoshi and the Mysterious Book (2026) – Full Completion Guide, Rewards & Secret Ending
Vampire Crawlers Coin Farming Guide


