Guide
How to Create a Snapchat Filter

It is explained in detail in this post how to create a Snapchat filter that will allow you to customise your snaps with the photos and text you choose. The cost of these customized Snapchat filters can range from a few dollars to $100 or more, depending on the size of the region covered by the filter, the popularity of the place, and the length of time the filter is set to be available.
Read Also: How to Unmute Someone on Instagram
How to Create a Snapchat Filter on the Web
Navigate to Snapchat.com in a web browser and click on Create from the top menu, followed by the yellow Get Started button on the following page to begin creating your account. Then, from the Creative Tools menu, choose Filters.
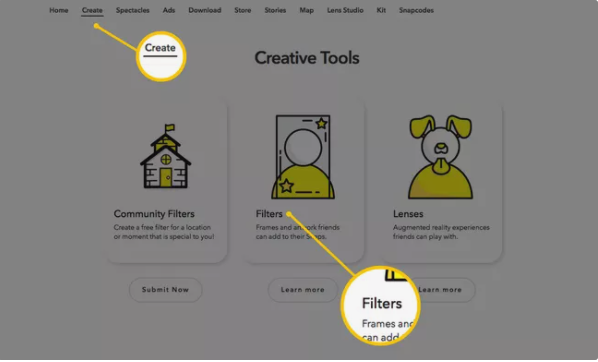
Upon entering the filter creation tool, you’ll see a smartphone-shaped preview area in the middle with editing features on either side of the screen. You may now begin working on the design of your filter.
Option #1: Upload Your Own Filter Design
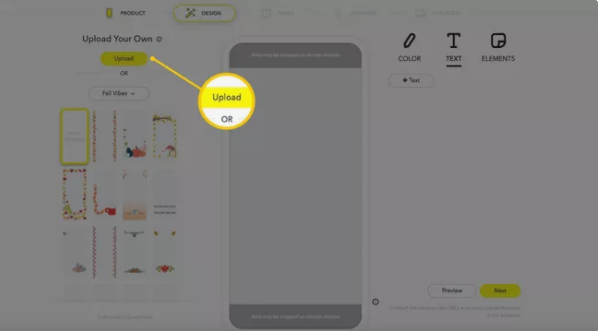
If you’ve previously created your filter in a third-party application like as Adobe Photoshop or Illustrator, you may pick the yellow Upload option to select the file and import it into the Snapchat previewer by selecting it from your computer’s desktop.
Before you do, make sure that your file:
- is saved as a PNG file format;
- has a transparent background;
- has dimensions of 2340px (height) by 1080px (width); and
- is under 300KB in size.
Option #2: Create Your Own Filter Design in Snapchat
If you want to design your filter from scratch using Snapchat’s filter-making tool, you can use the editing features to do so.
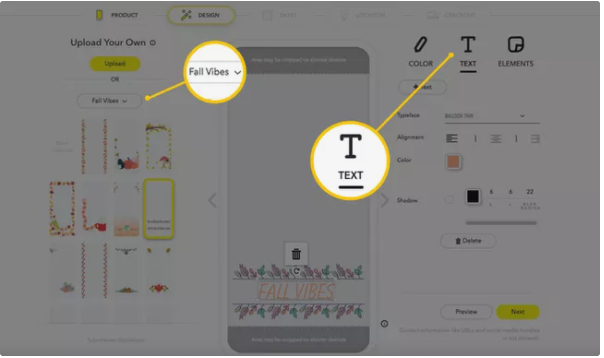
Pick a theme design: Select the default theme on the left side to see a dropdown list of themes like Game Day, Weddings, Birthdays, and more. Next, select a design in the grid below to see a preview of what it looks like.
Customize your theme design: You can click on any part of the design to edit it. For example, if we click on the text portion in the design shown above, we can drag and drop it around to a different area, select the corners to adjust the size or even select the trash icon to delete it.
Additional editing options for the selected design element also appear on the right side. With the text still selected, we can change the typeface, alignment, color and shadow.
Change the color scheme: The Color option in the top right allows you to change the colors of the theme design. Simply select Color and choose a color to transform the color scheme of the overall design (including the text and graphics).
Add your own text and elements: Beside the Color option are Text and Elements options. Select Text > +Text button to add additional text to the filter and use the editing features that appear on the right to customize it.
Select Elements > yellow Upload button to select a file to import and add to your filter. For example, you could upload a smaller image graphic as a PNG file with a transparent background to drag and drop into the bottom left corner of the filter. You can also select the blue Log in link beneath the Bitmoji graphic to connect to your Bitmoji account and start adding Bitmoji characters to your filter.
When you’re satisfied with your filter, click on the yellow Next button in the bottom right corner of the screen.
Set Your Filter Time Period
You may choose which days your filter should be accessible by using the calendar on the right, and you can also choose whether you want it to be a one-time event or a reoccurring event by using the choices on the left.
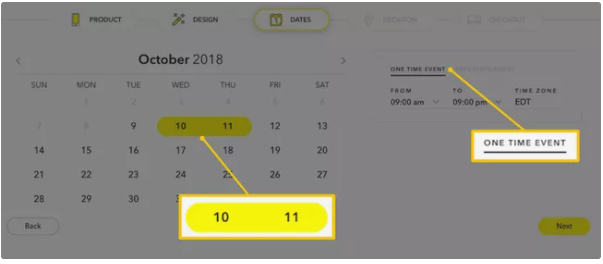
By selecting ONE TIME EVENT, your filter will only be available for a maximum of two days, beginning on the day you set it up and continuing for a further maximum of four days after it has been set up. If you choose RECURRING EVENT, you have the option of having it repeat daily or weekly.
The filter may also be made available at specific times of day, as well as by selecting a time zone and specific days of the week for repeating weekly events, if applicable. When you’re finished, click on the yellow Next button to be sent to the location information page.
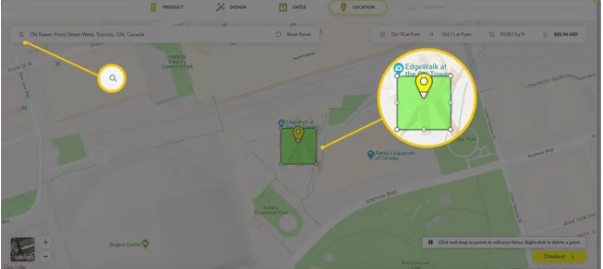
Set Your Filter Location
Public access to your filter is always available, but only from a certain geographic region. If you want to utilize the filter, you can’t pick and choose which friends you want to include. Anyone who takes a photo from inside the designated area of your filter can utilize it.
Enter your location’s address in the address field and choose the correct option from the drop-down menu. Geofence is the default square fence that will display around your address. You may alter or enlarge your Geofence by selecting any circular point and dragging it.
Then click the yellow Checkout button in the lower right corner of the screen when you’re all done. It’s possible that Snapchat will ask you to verify that your Geofence is set up correctly.
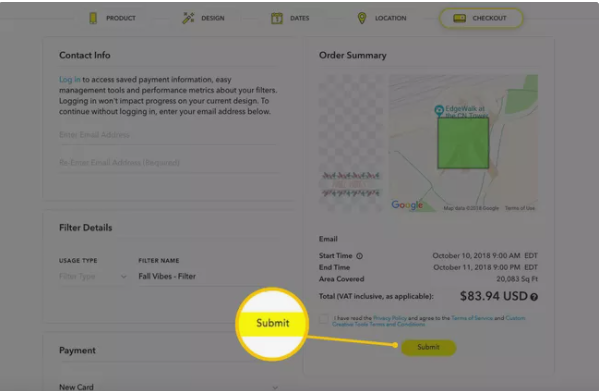
Check Out and Pay for Your Filter
You’ll see your order total on the checkout page. Logging in is an option, but it is not required to complete your order. If you haven’t done so before, choose Log in. Enter your email address, filter information, and payment information in the fields provided. Snapchat only takes credit card payments at this point in time.
Select the yellow Submit button after checking the box that states you’ve read the Snapchat Privacy Policy and your filter will be approved and published.
How to Create a Snapchat Filter on the App
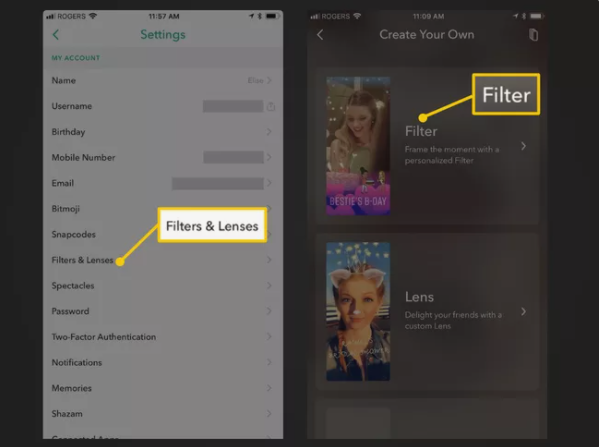
Make sure you’re signed in to your Snapchat account before you begin. To access your profile, tap your Bitmoji or profile symbol in the upper right corner of the screen.
After that, you may access your settings by tapping the gear symbol in the upper-right corner of the screen. After that, select Filters & Lenses > Get Started! > Filter from the drop-down menu that appears.
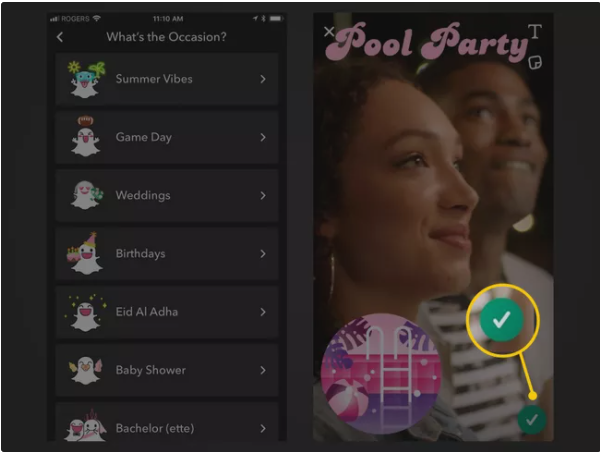
Choose a Theme Design and Customize It
A theme design may be selected from the What’s The Occasion? menu. A preview of the theme’s design will be displayed. Using the X in the upper left of the screen, you may return to previous designs.
In the previewer, tap on different aspects of the design to bring up editing possibilities. (Not all components, such as some picture graphics, are editable.) Additionally, you may pinch your index and thumb fingers together while holding down an element to increase or decrease its size.
To add your own text or emojis, use the T or sticker icons in the upper right corner of the screen. You may save your filter design by tapping the green checkmark icon in the bottom right corner.
Set Your Filter Time Period
You may use the scrolling dates and times at the bottom of the following page to pick a time period for your filter. From the app, you may specify a filter time period that is more than two days, unlike when you do it on Snapchat’s website. However, unlike on Snapchat.com, you can’t set up recurring events. When you’re done, press the green Continue button.
Set Your Filter Location
Using the address area at the top, put in a place and choose from the drop-down option what you think is right. You’ll be greeted by a square barrier at your location. To resize or reshape your fence, simply drag and drop it from one circular corner to another. Go to the checkout by pressing the green Continue button.
Video

Vampire Crawlers Coin Farming Guide

Forza Horizon 6 Performance: Why 60 FPS Is Still the Console Standard

Yoshi and the Mysterious Book (2026) – Full Completion Guide, Rewards & Secret Ending

How to Get Free Pets in Adopt Me: A Guide for Players

Roblox Username Generator – Create a Cool & Unique Username in Seconds
How to Get Free Pets in Adopt Me: A Guide for Players
Yoshi and the Mysterious Book (2026) – Full Completion Guide, Rewards & Secret Ending
Vampire Crawlers Coin Farming Guide


