Guide
How to Create Rules in Your Gmail

The steps required to configure email filters in Gmail using the web browser of your choice are outlined in this article for your convenience. It will walk you through the process of generating a filter from scratch as well as show you how to create a new filter based on an existing message. Both of these processes will be demonstrated in a step-by-step format. In addition to this, it will provide you with instructions on how to manage the settings of your filter. The method of creating rules in Gmail is going to be broken down into steps for you in this post. So let’s get started:
Read Also: How to Email a Google Docs From Gmail on Desktop
How to Create Rules in Your Gmail
From Scratch
To build a rule in Gmail from scratch, follow these steps:
1. Launch a web browser and open Gmail there.
2. Click the down arrow next to the Search mail option.

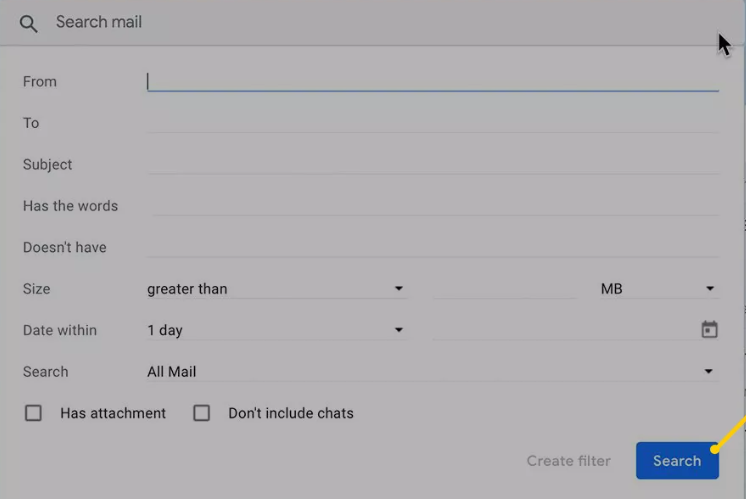
3. On the screen labelled “Search mail,” choose one or more of the following criteria for the new rule:
- From: Choose emails from a single sender or multiple senders who are specified.
- to: Specify the email that was sent to a single recipient or several recipients in a defined list.
- Subject: In the “Subject” line of your message, you can either specify a partial or whole text.
- Has the Words: Messages can be filtered out based on certain words that are contained in the body of the email.
- Doesn’t have: Messages can be filtered out based on certain words that are absent from the body of the message.
- Size: Filter messages according to their size, selecting those that are either larger than or smaller than a given baseline measurement.
- Date no later than: Apply a filter that considers the time at which each message was sent. There are a number of intervals that have already been established.
- Search: You can restrict the search to particular folders or labels, or you can choose to look through all of the messages.
- Has an attachment: The rule should only be applied to messages that have files attached to them.
- You shouldn’t include the chats: You should only apply the rule to email correspondence and not to chat sessions.
4. Select the Create filter option.
5. Mark the checkbox next to the items that indicate the action you want this rule to take and then click the “Apply” button. To create archived mail in Gmail, for instance, you would choose the check box labelled “Skip the Inbox (Archive it).”
6. To activate the new rule, select the Create filter option.
From Existing Emails
Create a rule from the message that you want to use whenever you get an email that you want to automatically transfer to a different folder, mark as read, or delete.
In order to generate a rule based on an already existing email:
1. Launch a web browser and open Gmail there.
2. Choose the radio button that corresponds to the message that satisfies the requirements for your new rule.
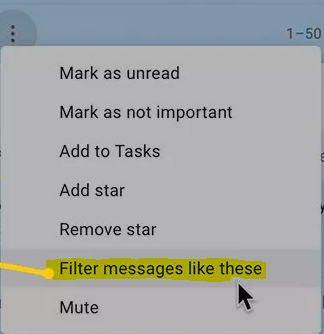
3. More can be selected here (the three vertically aligned dots on the Gmail toolbar).
4. Choose Filter messages like this.
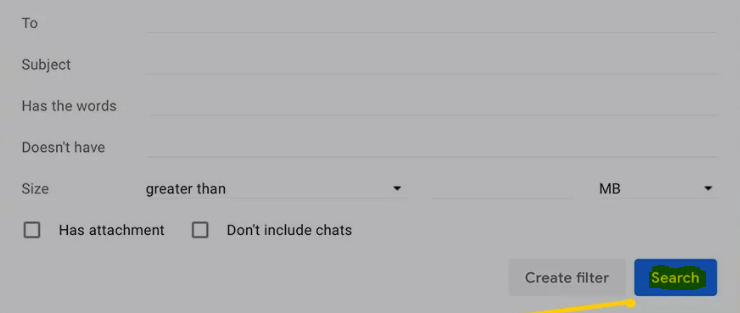
5. Choose the criteria to apply to the new rule and make any necessary adjustments to them. Certain fields may already have information entered into them based on the message that was chosen.
6. Select the option to Create a filter.
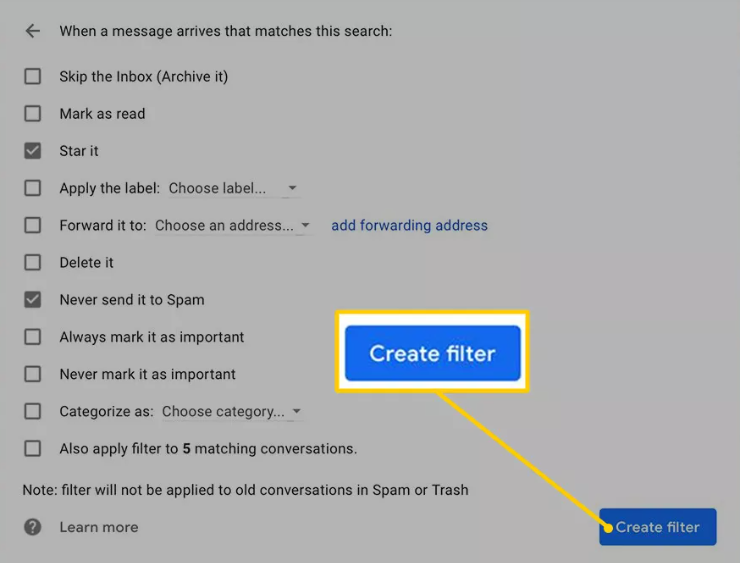
7. Check the box next to the options that specify the behaviour you wish to apply to the rule by selecting the checkbox next to the options. It is also possible to delete the message, mark it as read, favourite it, or skip it entirely from the inbox.
8. To activate the new rule, select the Create filter option.
FAQs
What are the steps to creating folders in Gmail?
Labels, which are used in Gmail instead of folders, make it simple to organize your inbox within the service. Simply navigate to Settings > Labels > Create New Label in order to generate individualized labels.
Where can I find the instructions for creating an email signature in Gmail?
Go to the Settings menu in Gmail and select General. The field labelled “Signature” is where you should enter your preferred signature. Once you select Save Changes, you can enter your signature into your email.


