Guide
How to DownGrade From Windows 11 to Windows 10

Windows 11 introduces a clean new design as well as some new features that give the operating system a more contemporary feel. But whether it’s the glitches or the things that aren’t there, you might discover that you’re longing for the good old days, especially when you compare Windows 11 and Windows 10 side by side.
Through the settings page in Windows 11, Microsoft makes it easy enough to simply restore to an earlier version. Because of this, when you upgrade from Windows 10 to Windows 11, Windows 11 will actually store a copy of Windows 10 on your computer for a period of ten days so that you can revert back to Windows 10. You may need to reinstall some apps and programmes if you downgrade from Windows 11 to Windows 10, so keep in mind this possibility if you decide to make the switch. Anything that you saved on your computer while running Windows 11 will not be brought over to Windows 10, even if you try.
Read Also: How to Turn On Bluetooth in Windows 11
How to Downgrade From Windows 11 to Windows 10
Additionally, the first section of our advice is only relevant if you upgraded to Windows 11 less than ten days ago. If it has been the last 10 days, then the following portion of our post contains some recommendations that may be helpful to you. It’s possible that all of this will make you feel anxious, but there’s no need. Our guide was written with this purpose in mind.
Step 1: The first thing you’ll need to do to start the process of downgrading from Windows 11 to Windows 10 is to navigate to the settings page for Windows 11. While you are in any app or on your desktop, press the Windows Key and the letter I on your keyboard.
Step 2: Once that is complete, navigate to the bottom of the sidebar and select Windows Update. For the next few steps, this is the location that you’ll want to be in. It’s possible that you’ve noticed that Windows Update is the hub for everything concerning software and device upgrades, as well as scheduling and even becoming a member of the Windows Insider programme. You may put those concerns to rest for the time being, as the following procedure will just require you to concentrate on updating the history.
Step 3: The next thing you need to do is click the Update History button that is located in the middle of your screen. It’s possible that you’ll need to scroll down to find it. Once you are there, scroll down below the list of updates that have been installed until you reach the Recovery Options section.
Using the backup that was described earlier, which was made by Windows 11, is required in order to return to Windows 10, and Recovery Options is where you will find this backup. Remember that you will only see this if it has been less than ten days since you switched to Windows 11, so keep that in mind again. After 10 days, the option will no longer be available, and you will be required to look at a different choice at the end of our guide.

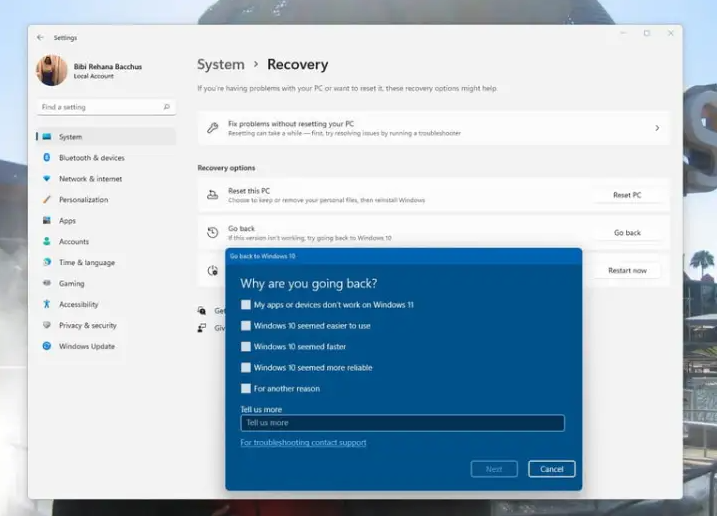
Step 4: After you have selected the “Go Back” button, Microsoft will inquire as to the rationale behind your decision to revert to Windows 10. You have the option of selecting a response from one of the choices presented on your screen or typing in your own response. Your response is helpful to the development team working on Windows 11. After you have completed the form, click the Next button at the bottom.
Windows 11 will then inquire as to whether you would want to check for available updates. You should give these an attempt because they might help fix the issues you’re facing (such as the performance issues with AMD GPUs), therefore I recommend that you try them out. If it does not work, you can try going back through the steps again and selecting the “No, Thanks” option this time.
You will receive a warning from Microsoft regarding the matters pertaining to data that were discussed at the beginning of the article, and if you are comfortable with them, you can proceed by selecting the Next button. Also, bear in mind that in order to login in to Windows 10, you will need to remember your password, so make sure you don’t forget it. To confirm, click the Next button once more.
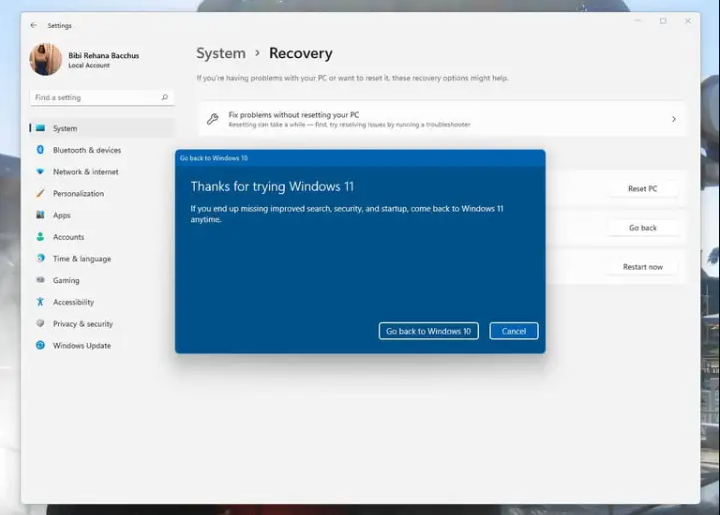
Step 5: Once you have completed the previous steps and clicked Next a few times, Windows 11 will present you with the option to return to Windows 10. Simply clicking this button will cause Windows 11 to perform its enchantment. Your computer will revert to Windows 10 without your intervention. It should take less than five minutes on average, although the exact time can vary depending on how fast your own computer is. Your computer will restart approximately twice, and each time it happens, you will be brought directly back to the desktop of your Windows 10 installation.

How to Downgrade from Windows 11 past 10 days
If it has been more than ten days after you upgraded to Windows 11, then the solutions that we described above will not be effective for you. You’ll need to perform what’s known as a “clean install” of the Windows operating system in order to roll back to Windows 10’s previous version. Because this will require deleting everything on your computer and beginning from scratch, you should make sure that you have a backup of your files.
On a computer running Windows 11, going to the download page for Windows 10 on Microsoft’s website and looking for the option to “Create Windows 10 Installation Media” is the simplest way to accomplish this task. First, save the tool to your computer, then launch it, and finally, stick to the instructions that appear on the screen. It is imperative that you select the option “Upgrade This PC Now” when prompted to do so. If you comply with all of the instructions that appear on your screen, Windows 10 will be installed on your computer, restoring it to the state it was in when it was first purchased.


