Guide
How to Drag and Drop Files into OneDrive

OneDrive, the cloud-based online storage facility offered by Microsoft, is an excellent tool for backing up your work and clearing up space on your local computer. OneDrive’s free tier offers users 5 GB of storage space, and if you subscribe to Microsoft 365, you’ll have access to a lot more space in OneDrive to utilise — at least 1 TB, and possibly even more, depending on your plan. Simply dragging and dropping the files that you wish to move within the Windows File Explorer onto OneDrive makes it easy to transfer data from your local computer to the cloud storage service OneDrive.
Read Also; How to Recover an Unsaved Document in Microsoft Word
How to Drag and Drop Files into OneDrive
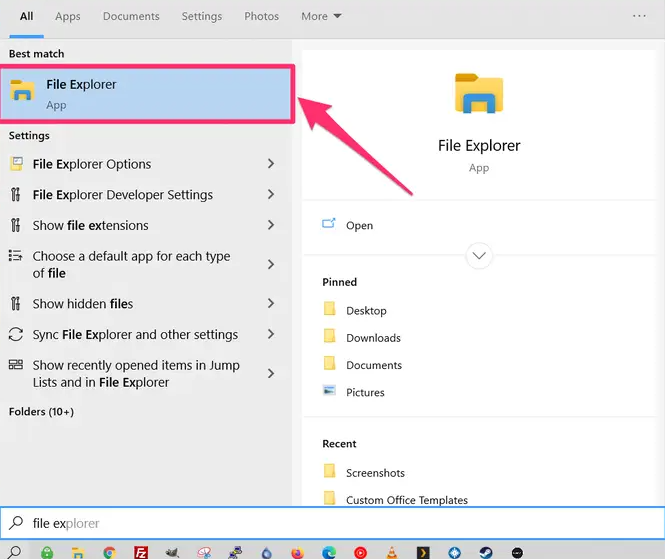
1. Launch the File Explorer application on your personal computer. You may find the File Explorer software by conducting a search for it, by tapping the folder icon if you have the shortcut for it on your taskbar, or by navigating to the “Windows System” folder and looking for it there.
2. Using the left-hand panel of File Explorer, look for the file that you wish to upload to OneDrive; this file will be displayed there. Simply clicking on the file will choose it for you. Next, click and hold the icon over OneDrive or a folder within OneDrive until it becomes highlighted. Finally, release the icon and the file will be dropped there.
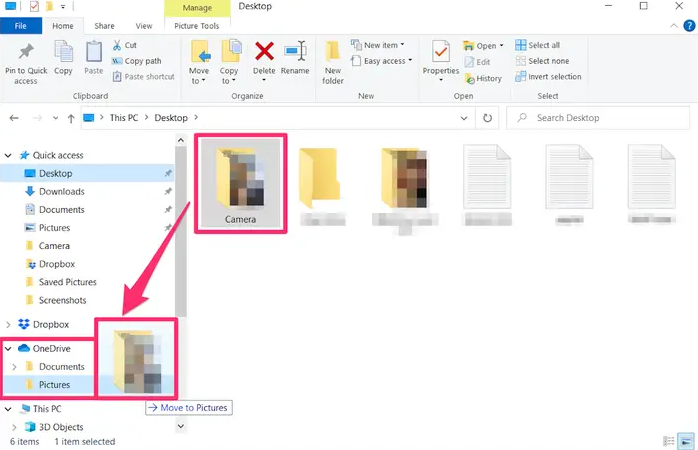
You’re all set. It is important to keep in mind that transferring a file from your local computer to OneDrive by dragging and dropping it will just move the file from your local computer to OneDrive; it will not create a copy of the file.
You can right-click on a file in OneDrive and select the option to “Always keep on this device” if you want to make sure that you always have local access to a specific file on your personal computer, even if you are in a location that does not have Wi-Fi, such as on an aeroplane. This will allow you to access the file even if you are not connected to the internet. You might also right-click the file, go to the menu that appears, and choose the option that says “Free up space.” This will save the file only on the cloud.
FAQs
Why is drag and drop not working?
You will need to restart the programme that you are using.
There is a possibility that the software has frozen if you find that you are unable to drag and drop items into a certain programme. Save your work and then restart the software to solve the problem as quickly as possible. Then, try dragging and dropping again.
How does drag and drop work?
To carry out this operation, the user must first pick the text to be moved or the object to be moved, then press and hold down the left mouse button to grab the object. Only then will the action be carried out. The next step is for the user to move the object to the area of their choosing while maintaining pressure on the mouse button.
Why does drag and drop not work in Windows 11?
Your machine with the Windows 11 operating system does not have the capability to use the drag and drop feature since Microsoft has indicated that the feature will never be reinstated. Windows 11 does not presently enable the ability to open a file by dragging it onto an app that is located in the taskbar. This is the reason for this limitation.
Why is my Mac not letting me drag and drop?
To configure your trackpad, navigate to Apple > System Preferences > Accessibility > Pointer Control > Trackpad Options >. Enable dragging, and then select the three-finger option from the drop-down menu. You can drag and drop files on your Mac by simultaneously touching the trackpad with three fingers using this feature. This method is preferred by certain individuals over the standard one-finger option.

Roblox Username Generator – Create a Cool & Unique Username in Seconds

Grow a Garden Recipes in Roblox: Guide to Cook (Donuts, Sushi, Pie, Pizza & More!)

Job Opportunities in Dubai – 2026

Mr Bit at the SBC Awards Europe 2025: The Bulgarian Brand Setting New Standards in the European Gaming Industry

Dennis Rodman Net Worth 2026 – Everything You Need to Know

Bloxburg Neighborhood Codes 2026
Grow a Garden Recipes in Roblox: Guide to Cook (Donuts, Sushi, Pie, Pizza & More!)
Job Opportunities in Dubai – 2026
Dennis Rodman Net Worth 2026 – Everything You Need to Know


