Guide
How To Get iMessage On Windows 10
iMessage, Apple’s exclusive programme for sending and receiving instant messages, is one of a kind and can only be used with other Apple products. No longer, though! You can also utilize iMessage on a computer running Windows 10, as is the case. Do you want additional information regarding iMessage for Windows 10? We can help you. After installing iMessage on a computer, you will be able to send messages to anyone and everyone without needing to pull out your iPhone at any point.
It is widely acknowledged that iMessage is one of the most effective texting tools available for iOS users. However, as of recently, users of Android devices can also access the iMessage feature on their personal computers running Windows. The use of iMessage on a computer can be accomplished using a variety of means, such as Chrome Remote Desktop and Emulator, amongst others.
Read Also: How to Find the Version of DirectX in Windows 10
How To Get iMessage For Windows 10 PC?
Here are a few different ways that you can use iMessage on your PC.
Method 1: Using Chrome Remote Desktop
In order to follow the path, you will need a laptop that is compatible with both Windows and Mac operating systems.
Step 1: First, launch Google Chrome and install Chrome Remote Desktop by selecting the “Add to Chrome” option. This will get you started. This step is required to be completed on both of the systems.
Step 2: When the authorization box appears, tap “Accept” and then “Add” to continue installing the programme.

Step 3: After typing chrome:/apps into your Windows PC’s address bar, click on the app’s icon to begin the installation process.
Step 4: Proceed to install the Chrome Remote Desktop host installer on your Mac in the same manner as described previously. After the installation is complete, you will need to relaunch the Chrome Remote Desktop extension on your Mac.

Step 5: Click the button labelled Enable Remote Connections.
Step 6: Create a personal identification number (PIN) and then verify it.
Step 7: The subsequent pop-up window iMessage support for Windows 10 PCs has already been enabled by Window.
Method 2: Using iPadian Emulator
An iPadian emulator is required in order to link iMessage on a Windows 10 PC, although doing so is completely free of charge.
Step 1: On your Windows computer, go to the website and download the iPadian emulator.
Step 2: The second step is to download it onto your PC and then launch the emulator. To proceed, you are required to accept all of the terms and conditions.
Step 3: Use the search bar to look for the iMessage app on your device. Simply navigate to the program’s website, click on it, and save it to your Windows computer.
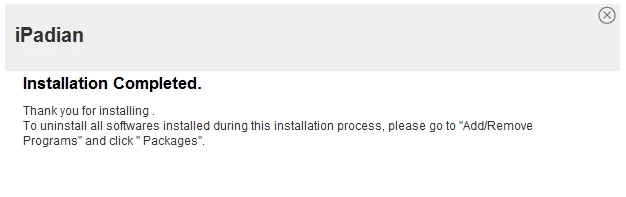
After it has been downloaded, Apple iMessage for PC can be utilized without any issues.
Method 3: Using Cloud Service ‘Cydia’
To reiterate, there is no requirement to jailbreak the iPhone! To accomplish this, check to see that both your personal computer and your iOS device are linked to the same Wi-Fi network.
Step 1: First, go to the application store on both your iOS device and your personal computer and download Cydia.
Step 2: After the installation is complete, go to the Settings menu and select Remote Messages.
Step 3: In the new window, select the authentication option by tapping on it, and then enable the programme so that it can be used further.
Step 4: When you arrive to the following page, this is where you will input your username and password.
Step 5: Now it is time to open a browser on the personal computer. Under the enable tab, enter the IP address, and then enter the colon.
Step 6: To finish the setup process, simply hit the enter key after the password and user credentials have been presented.
The iMessage app can be downloaded onto a Windows PC in the following manner.
Video

Vampire Crawlers Coin Farming Guide

Forza Horizon 6 Performance: Why 60 FPS Is Still the Console Standard

Yoshi and the Mysterious Book (2026) – Full Completion Guide, Rewards & Secret Ending

How to Get Free Pets in Adopt Me: A Guide for Players

Roblox Username Generator – Create a Cool & Unique Username in Seconds
How to Get Free Pets in Adopt Me: A Guide for Players
Yoshi and the Mysterious Book (2026) – Full Completion Guide, Rewards & Secret Ending
Forza Horizon 6 Performance: Why 60 FPS Is Still the Console Standard


