Guide
How to Increase Virtual Memory in Windows 11
Virtual memory, also referred to as a “paging file,” is a feature introduced with Windows 11 that allows for temporarily storing page files that are loaded into system memory (also known as RAM or Random Access Memory) onto the hard drive. Because of this functionality, Windows can use quicker physical memory when running applications and processes. The end effect is improved performance, as well as protection against the computer being unresponsive in the case that it runs out of memory. The system can handle the automatic management of the paging file size. On the other hand, there are circumstances in which it can be necessary to adjust the default parameters for the virtual memory manually. The following steps will walk you through increasing the amount of virtual memory in Windows 11:
Read Also: How to Turn On TPM 2.0 in BIOS on Windows 11
How to Increase Virtual Memory in Windows 11
The following is a walkthrough of the steps required to remove the warning about low virtual memory that appears when you use Windows 11 and manually change the paging file size.
1. To launch the Settings app, simultaneously press the Windows key and letter I.
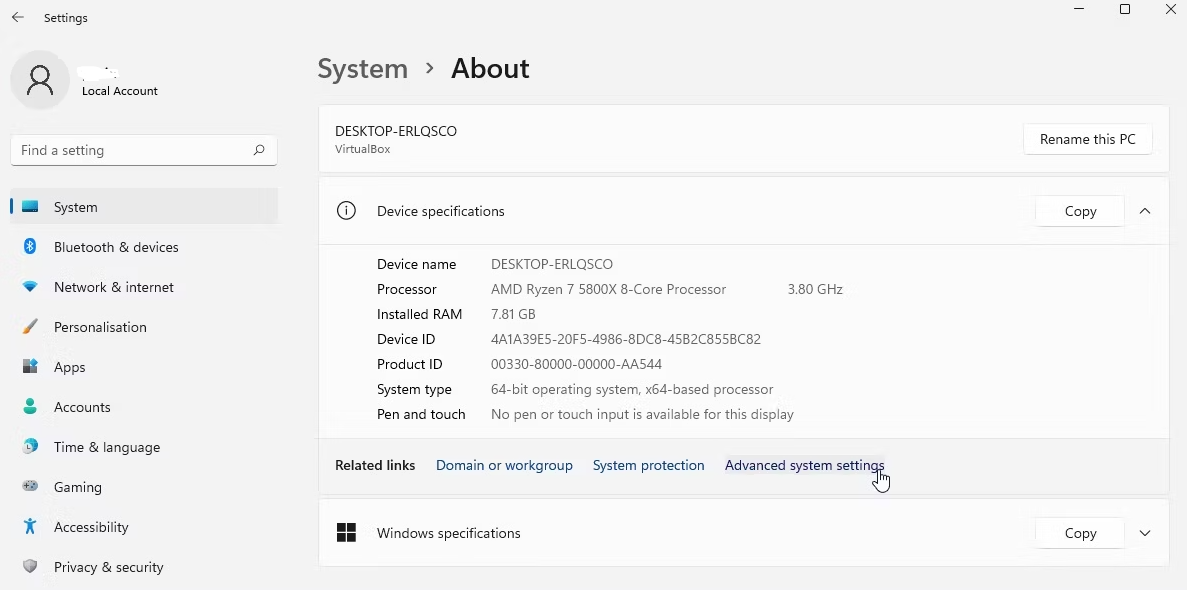
2. Navigate to the System > About menu item.
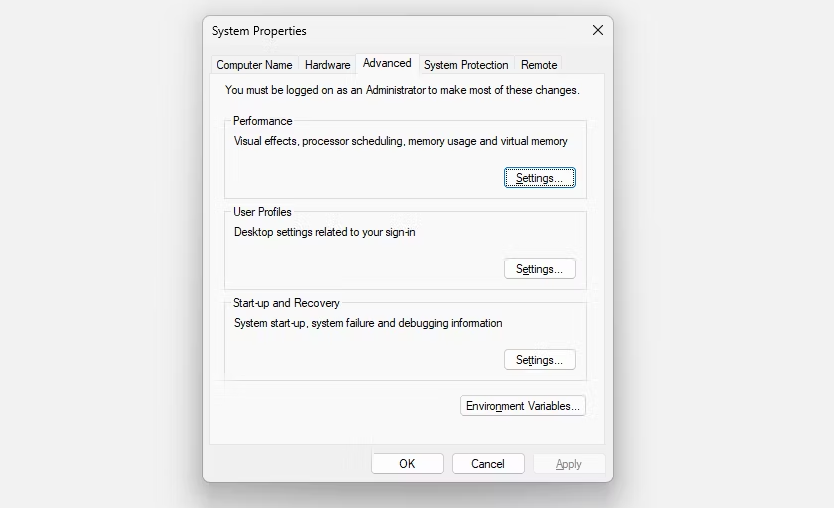
3. Click the button labeled Advanced system settings.
4. Choose Settings from the menu that appears under Performance.
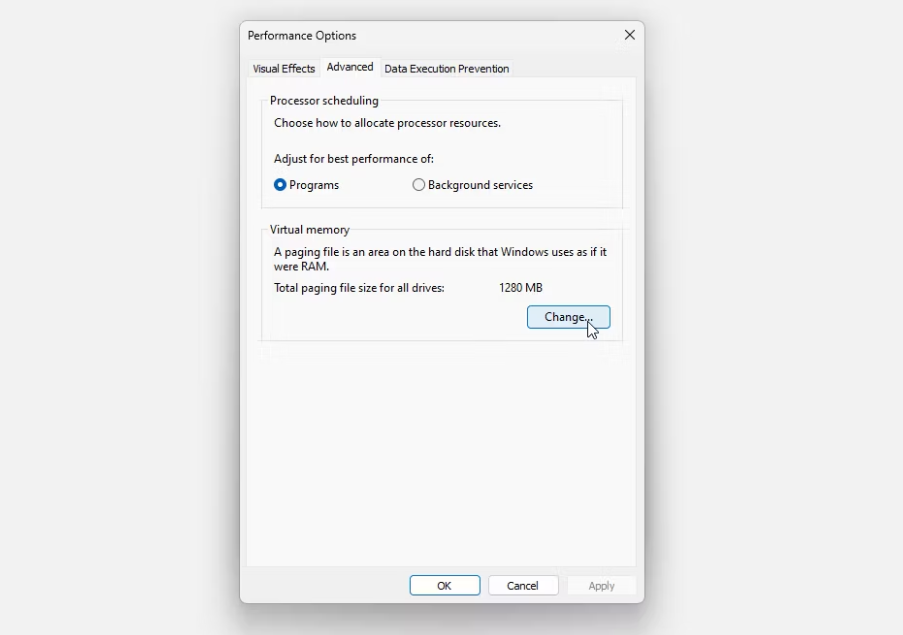
5. Launch the tab labeled Advanced. Click the Change button located under Virtual Memory. The following is a list of your available Virtual Memory settings.
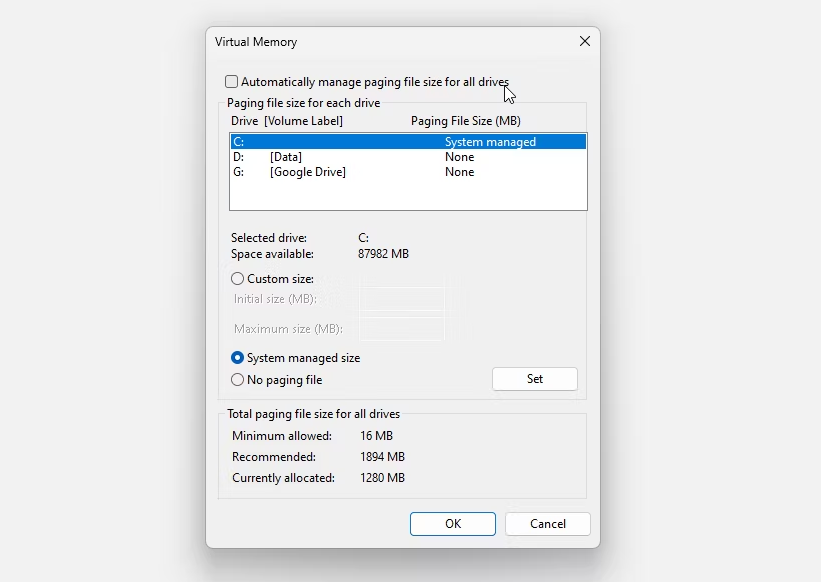
To establish custom virtual memory settings, you must uncheck the option to manage paging file size for all drives Automatically. This is because you must manually manage the paging file’s size. When you uncheck the box, the Virtual Memory settings farther down the page will become available. Choose the Custom Size option, type in the size of the virtual RAM you want, and select OK.
Remember the suggestions for managing virtual memory provided in the previous section. It could appear that significantly expanding the size of your paging file is a good idea, but in reality, doing so will almost always result in unexpected instances of the system becoming unstable.
FAQs
Does increasing virtual memory improve performance in Windows 11?
Because it may take the place of RAM when the latter runs out of space, virtual memory allows the operating system to function more efficiently and effectively. Therefore, check out the different ways virtual memory can be expanded in Windows 11. When expanding the virtual memory on your computer, make sure to keep it between 1.5 and 3 times the amount of RAM that is already accessible.
What is a good virtual memory size for Windows 11?
Virtual memory should be configured to no less than 1.5 times and no more than 3 times the amount of RAM that is installed in the computer, according to Microsoft’s recommendation. There is probably at least 2 GB of RAM available for power PC owners, who make up the majority of users of UE and UC; hence, the maximum amount of virtual memory that may be configured is 6 GB.
What is the maximum virtual memory limit for Windows?
The operating system determines the maximum amount of virtual memory that can be used; for instance, the upper limit of 32-bit Windows is 16 terabytes, whereas the upper limit of 64-bit Windows is 256 terabytes. The maximum limit is the available space on the disk itself.
Is it safe to overclock RAM?
When compared to overclocking a CPU, GPU, or other component, overclocking RAM poses less of a risk and is less unsettling. When you are overclocking components that belong to the latter group, such as the central processor unit (CPU), one of your primary concerns is whether or not the cooling system or component can keep up with the increased processing speed.

Vampire Crawlers Coin Farming Guide

Forza Horizon 6 Performance: Why 60 FPS Is Still the Console Standard

Yoshi and the Mysterious Book (2026) – Full Completion Guide, Rewards & Secret Ending

How to Get Free Pets in Adopt Me: A Guide for Players

Roblox Username Generator – Create a Cool & Unique Username in Seconds
How to Get Free Pets in Adopt Me: A Guide for Players
Yoshi and the Mysterious Book (2026) – Full Completion Guide, Rewards & Secret Ending
Forza Horizon 6 Performance: Why 60 FPS Is Still the Console Standard


