Guide
How To Insert A Watermark In A Word Document
You may use the watermark tool in Microsoft Word to label your document (confidential, draught, ‘do not copy,’ and so on) or to put a translucent logo to it (such as that of your business or trademark). Watermarks may be added to documents using Microsoft Word in a few simple steps. Watermarks can be selected from a library of pre-designed templates, or they can be created from scratch.
Using this tutorial, you will learn how to put watermarks into documents, how to create your own watermarks from scratch, and how to make photographs behave like watermarks in documents.
Read Also: How to Show the Ruler in Word
How to Insert Watermark in Word (Office 365 and Word 2019)
While this example is for Office 365 and Word 2019, the process of adding a Watermark is the same in some older versions of the Word programme. To include a watermark, you need do the following:
1. Click on the word “Open.”
2. Select the ‘Design’ tab from the drop-down menu.
![]()
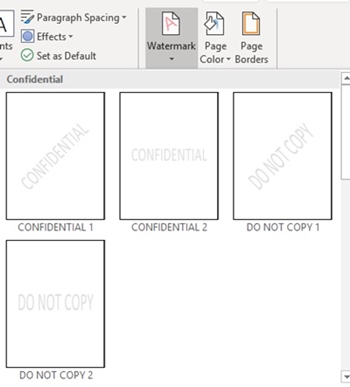
3. Select ‘Watermark’ from the drop-down menu on the far right. Depending on the version of Word you are using, you will see a number of different templates from which to pick.

4. Select one by clicking on it.
5. In order for the watermark to display on the page.
How to Insert Custom Watermark in Word
Make your own own watermark if you want to stand out from the crowd! In order to accomplish this, you should:
1. Steps 1-3 from the previous section must be repeated.
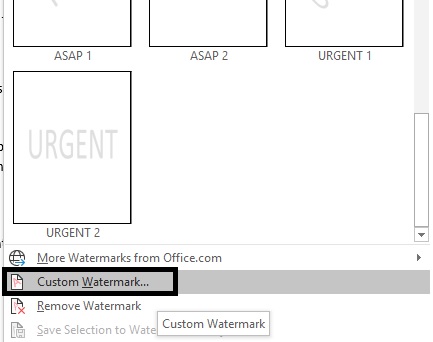
2. Custom watermarks may be created by selecting the ‘Custom Watermark’ option from the drop-down menu underneath the menu with readymade watermarks.
3. Select ‘Custom Watermark’ from the drop-down menu.
4. Select ‘Text Watermark’ from the drop-down menu.
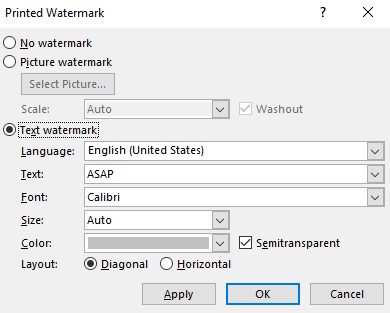
5. You can include a string of text in the ‘Text’ line if you want it to display anywhere on your page. Besides that, you may change the font’s colour and size. Additionally, you may choose whether the watermark should be shown vertically or horizontally.
6. Select ‘Apply’ from the drop-down menu.
7. After you click ‘OK,’ the window should shut.
8. You should be able to see your own watermark on the paper.
How to Insert a Picture Watermark
You have the option of including an image watermark in your document. You may simply incorporate a non-intrusive company logo or a modest backdrop into your design with this option. You should do the following in order to apply a photo watermark:
1. Repetition of steps 1-3 from the previous section will bring you to the ‘Custom Watermark’ panel.
2. Select ‘Picture Watermark’ from the drop-down menu.

3. To choose a picture, choose it by clicking on it.
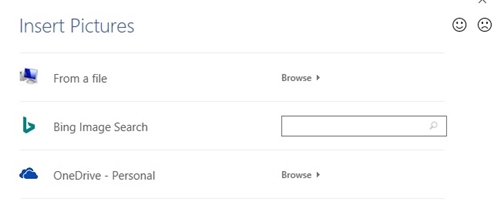
- Select the ‘Browse’ option next to the ‘From a file’ icon to browse for a photo on your computer’s hard drive. Then browse to the site where the image is to be found.
- You may use the Bing search engine to find images on the internet to include in your post. To make a selection, type something into the search field and hit ‘Enter.’
- Select ‘Browse’ to browse for an image on your OneDrive. Sign into your One Drive account, if you have one, and look for the image.
4. Hold on while you wait for the photo to upload.
5. It is possible to change the size of your image by selecting it from the ‘Scale’ dropdown menu. Automatic scaling returns the image to its original size if you select this option. Depending on how small you want your image to be, you may need to scale it up to 500 percent. Keep in mind that the picture quality may become blurry as a result of the compression.
6. When you select the ‘Washout’ option, your watermark will become almost completely transparent. Leaving it unchecked will make your watermark more obvious, which is exactly what you want.
7. Select ‘Apply’ from the drop-down menu. The watermark should display at this point.
8. Select ‘OK’ from the drop-down menu.
Video

Job Opportunities in Dubai – 2026

Mr Bit at the SBC Awards Europe 2025: The Bulgarian Brand Setting New Standards in the European Gaming Industry

Dennis Rodman Net Worth 2026 – Everything You Need to Know

Katt Williams Net Worth 2026 and Everything You Need to Know

Bloxburg Neighborhood Codes 2026
Bloxburg Neighborhood Codes 2026
Job Opportunities in Dubai – 2026
Dennis Rodman Net Worth 2026 – Everything You Need to Know


