Guide
How To Remove Watermark In Word

Adding a logo, a picture, or other distinguishing markers to the pages of your document, protecting your material by adding text or images over the content, establishing the status of your project or its security needs, and so on are all possible using watermarks in Microsoft Word. If you have permissions, you may quickly delete them and re-add them at the beginning of the process if necessary.
How to Remove a Watermark in Word for Windows or Word Online
Watermarks in Word may be used to identify the pages of your document, safeguard your information, and indicate the status or security requirements of your project, among other things. It’s just as simple to remove them after they’ve served their function as it is to include them in the first place.
Select Watermark from the Design drop-down menu, which is found on the far right of the screen. Remove the watermark by selecting it. Watermark may be found in the Page Layout tab, as well as in the Page Background group, in both Microsoft Word 2010 and Microsoft Word 2007.
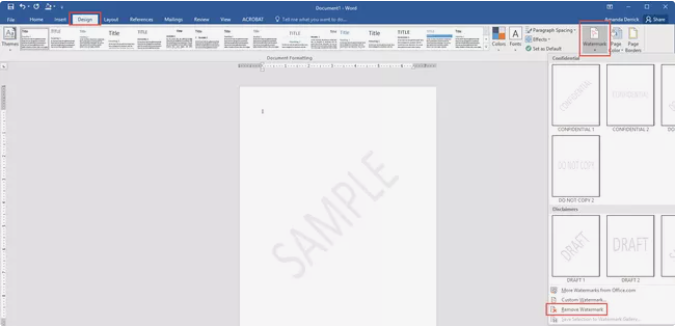
Alternatively, if the watermark is still visible, it’s likely that Word has anchored it in the header area if it’s related to a particular piece of the document. Double–click on the header area, pick the watermark itself, and then hit the Delete key on your keyboard.
How to Remove a Watermark in Word for Mac
Click the Design tab. In the Page Background group, click Watermark to display the Insert Watermark box. Select No watermark. In Word for Mac 2011, click the Page Layout tab, select the Page Background group and then click Watermark.
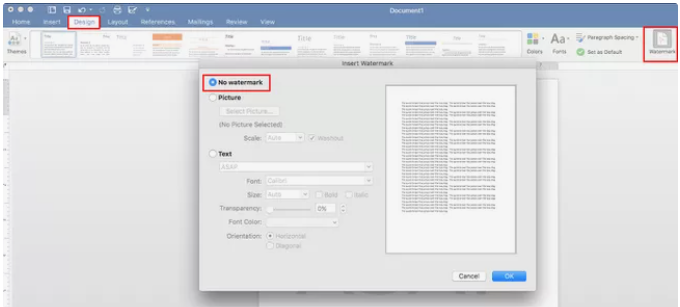
If the watermark is still visible, it is possible that it is fixed to the header in a certain area. The answer is the same as it is for the Word for Windows version: To open the header area, double-click it to reveal it. Then right-click the watermark and choose Delete.
Read More: How To Record Screen On Mac – Complete Guide
Video Guide

Vampire Crawlers Coin Farming Guide

Forza Horizon 6 Performance: Why 60 FPS Is Still the Console Standard

Yoshi and the Mysterious Book (2026) – Full Completion Guide, Rewards & Secret Ending

How to Get Free Pets in Adopt Me: A Guide for Players

Roblox Username Generator – Create a Cool & Unique Username in Seconds
How to Get Free Pets in Adopt Me: A Guide for Players
Yoshi and the Mysterious Book (2026) – Full Completion Guide, Rewards & Secret Ending
Vampire Crawlers Coin Farming Guide


