Guide
How to Install a Second Internal Hard Drive on Your Windows 10

Undoubtedly, you are aware of how simple it is to set up an external hard drive on a computer running Windows 10. Basically, you need to power down the computer running Windows 10, connect the USB or eSATA cable to your PC, and then switch it on… and that’s it; the game is over. However, what steps should you take if you need to add a second internal hard drive to the device running Windows 10?
The process of installing a second internal hard drive into a Windows 10 computer that is designed to support two or more hard drives is only marginally more complicated than the process of connecting an external disc to your USB connection. Desktop personal computers almost universally support the use of several internal hard discs. Some laptops running Windows 10 are also capable of it.
Read Also: How to Format an External Hard Drive for Xbox One
How to Install a Second Internal Hard Drive on Your Windows 10
In order to install a second internal hard drive on a computer that is running Windows 10, the following procedures need to be completed in the appropriate order:
1. Put your PC into hibernation mode. After the new hard drive has been inserted, the cables must be connected, and the drive itself must then be secured, most likely with screws. Put a stop to this bothersome situation. After turning on the power, the next step is to log into Windows using the appropriate credentials.
2. The Disk Management menu can be accessed by executing a right click in the bottom-left corner of the screen. It will bring up a dialogue box with the heading “Disk Management.”
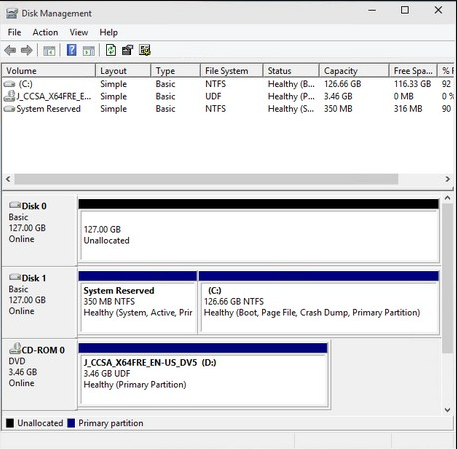
Insert the new hard drive into your computer that is running Windows 10 at this point.
3. Simply scroll down the list until you reach your new drive, which should be labelled Unallocated. The new drive has been given the number 0 as its identifier.
4. Tap and hold down in the Unallocated region on the right, or right-click and select the New Simple Volume option from the context menu. The New Simple Volume Wizard is brought into view.
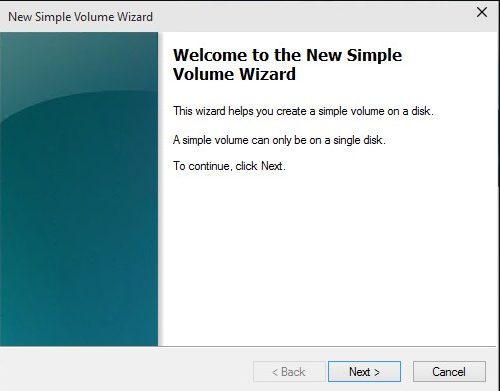
5. Tap or click the Next button. You’re asked to specify a volume size.
6. Tap or click the Next button, and keep the numbers in their current state since you want to use the entirety of the drive. The wizard will ask you to choose a drive letter before continuing. D: is the default drive letter, unless you already have a D: drive installed.
7. If you are absolutely certain that you wish to assign a different letter to the drive, you are free to do so (most people should leave it at D:). Tap or click the Next button. The wizard will ask you if you want to change the allocation unit or use a file system other than NTFS. It will also ask if you want to use a different file system. You don’t.
8. You can either tap or click Next, and then you may either tap or click Finish. Windows will make some whirring and clunking noises, and when it is done, you will have a brand new drive that is ready to be utilized.
Video

Roblox Username Generator – Create a Cool & Unique Username in Seconds

Grow a Garden Recipes in Roblox: Guide to Cook (Donuts, Sushi, Pie, Pizza & More!)

Job Opportunities in Dubai – 2026

Mr Bit at the SBC Awards Europe 2025: The Bulgarian Brand Setting New Standards in the European Gaming Industry

Dennis Rodman Net Worth 2026 – Everything You Need to Know

Bloxburg Neighborhood Codes 2026
Grow a Garden Recipes in Roblox: Guide to Cook (Donuts, Sushi, Pie, Pizza & More!)
Job Opportunities in Dubai – 2026
Dennis Rodman Net Worth 2026 – Everything You Need to Know


