Microsoft
How to Move a Picture on Microsoft Word

It is not feasible to transfer photographs (by dragging and dropping them) to any location within a Microsoft Word document without first placing them somewhere in the text. This limitation applies to both the Windows and Mac versions of Microsoft Word. This limitation is imposed without question by design. However, once you’ve made a straightforward alteration, you’ll be able to drag photographs to any location of your choosing. The following are the stages:
Read Also: How to Change Line Spacing in Microsoft Word
How to Move a Picture on Microsoft Word
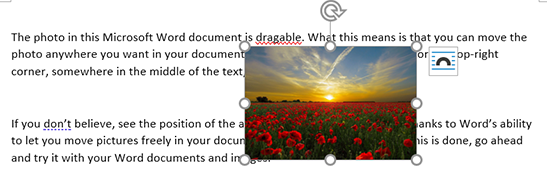
If you follow the steps that are outlined in this article, you will be able to move an image within a Word document to a spot of your choosing that is not in the normal flow of the text within the page. If you want to, you may even place the image on top of an already existing paragraph of text if that’s what you choose to do.
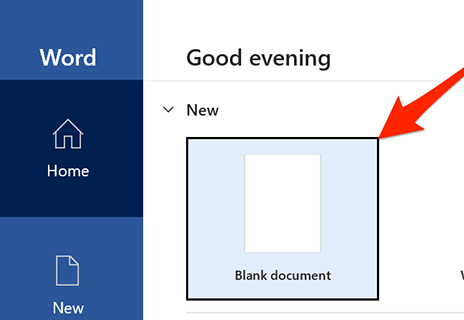
1. For the purpose of doing this work, we will make use of a blank document. Open up Microsoft Word on your computer, regardless of whether it’s a Windows or a Mac. This will get you started. Word’s “Blank Document” option may be found on the program’s main screen, where it can be selected to initiate the creation of a new document.
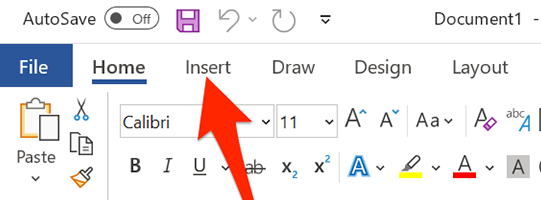
2. When you have the editing window for Word open, go to the very top of the window and select the “Insert” option from the menu that appears.
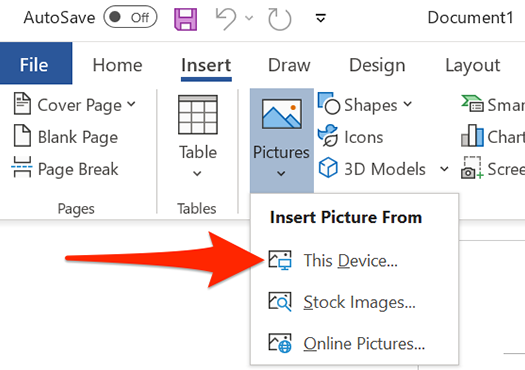
3. Within the Illustrations area of the Insert tab, which may be found under the heading “Illustrations,” select Pictures > This Device to add an image. You are able to upload an image from your own personal computer using this feature.
4. Using the “File Explorer” box that opens after you click the button, navigate to the folder that contains your picture so that you can access it. Simply double-click on the image to insert it into the project you’re working on in Microsoft Word.

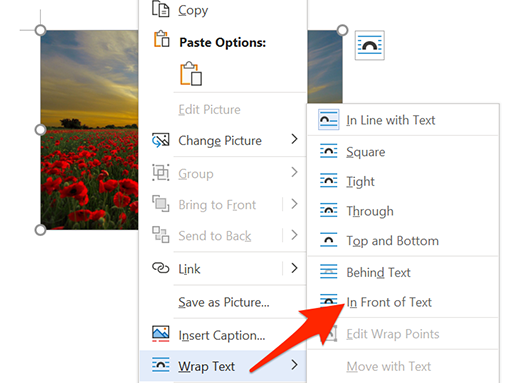
5. Once you have returned to the editing page for Word, right-click the image that you just uploaded, and then from the menu that appears, pick Wrap Text > In Front of Text.
6. You are now free to reposition your photo in any way that you see fit. You can position it anywhere you want in the document by dragging and dropping it into the desired location.
FAQs
How to Add a Caption to a Photo in Word?
Simply click the image using your right mouse button, then select “Insert Caption” from the context menu that appears. After you have entered a caption into the empty area that is supplied in the dialogue box labelled “Caption,” you will be invited to select the kind of label and the location of the caption. Choose Numbering from the menu to customise the automated captioning so that it is based on a specific number style or chapter number. You can do this by changing the chapter number.
What is meant by Caption in Word?
If you include a caption with your photo, it will be helpful to the people who view it. It is possible to use it to refer to a photograph that is situated in another part of the document or to attribute the photo to a particular source. You can also use it to attribute the photograph to a particular source.

Vampire Crawlers Coin Farming Guide

Forza Horizon 6 Performance: Why 60 FPS Is Still the Console Standard

Yoshi and the Mysterious Book (2026) – Full Completion Guide, Rewards & Secret Ending

How to Get Free Pets in Adopt Me: A Guide for Players

Roblox Username Generator – Create a Cool & Unique Username in Seconds
How to Get Free Pets in Adopt Me: A Guide for Players

Grow a Garden Recipes in Roblox: Guide to Cook (Donuts, Sushi, Pie, Pizza & More!)
Roblox Username Generator – Create a Cool & Unique Username in Seconds
Yoshi and the Mysterious Book (2026) – Full Completion Guide, Rewards & Secret Ending


