Guide
How to Overclock Your Monitor
Your monitor acts as a filter for the raw performance of your computer. Getting a good frame rate in games is important; yet, if your monitor cannot refresh quickly enough to display all of those frames, it is not. Overclocking comes into play in this situation. In this post, we’ll show you how to overclock your display in a safe and secure manner.
Increased gaming performance will not be achieved by overclocking your display; however, it will assist to make your games appear more fluid. We’ve compiled a list of three software applications that make overclocking your monitor simple, regardless of the graphics card or monitor you’re currently using.
There are no restrictions on the type of monitor that may be overclocked, but you should be aware of the port that you’re using and its constraints before you begin. The DisplayPort 1.4 standard, for example, allows 4K at up to 120Hz, whereas the HDMI 2.0 standard only supports 4K at up to 60Hz. DisplayPort 2.0 enables resolutions of up to 16K and refresh rates that are significantly faster than DisplayPort 1.4a (due to almost triple the bandwidth). Researching the panel within your monitor is also a smart idea because it will give you a better sense of how far you can push the refresh rate of your display. You might want to read our guide on the differences between HDMI and DisplayPort so you can figure out which port is ideal for you.
Read Also: How to Enter the BIOS on Your Windows 11 PC
Overclocking Your Monitor: A Primer
Let’s define overclocking before we start overclocking our monitors. Unlike a CPU or graphics card, you aren’t raising your monitor’s clock speed. Instead, overclocking refers to exceeding the monitor’s rated refresh rate.
How often does your display refresh the image in a second? This means a display will refresh 60 times per second. Contrast refresh rate with frame rate: The refresh rate is how often your display refreshes its image, whether or not new frames are given. Your frame rate, on the other hand, is the number of new frames rendered every second.
Overclocking a display increases the refresh rate, which is only relevant in gaming. Overclocking allows you to view more frames per second. Basically, it smooths out your games. For additional details, see our article on high refresh rate gaming monitors.
The issue is that each monitor is unique. Every monitor, please. Because each panel is unique, two identical monitors from the same brand may have different overclocking results. Remember that your panel may overclock better or worse than other panels from the same brand. Find out as much as you can about your monitor’s panel. That’s the screen, not the monitor. Many monitors come factory overclocked, making a second overclock dangerous.
How to Overclock your Monitor
You may overclock your monitor in several ways. We’ll show you how to use the three most common tools. Other tools exist, but the three listed below work with nearly all AMD, Nvidia, and Intel GPUs.
To truly apply the overclock, you’ll need to alter your refresh rate in Windows. Simply open the Settings app and select Advanced Display Settings. There’s a choice to change your refresh rate. It’s best to start gradually and steady with overclocking. Instead of adjusting the refresh rate all at once, make small adjustments over time, verifying your new refresh rate with each cycle.
Use Blur Busters’ frame skipping tool to accomplish so. Use this tool to swiftly flash a series of squares. To test, take a long exposure picture of your screen (not a screenshot). Capture numerous squares at once. Your overclock worked if your image shows unbroken squares. A monitor that has gaps is skipping frames.
Custom Resolution Utility (CRU)
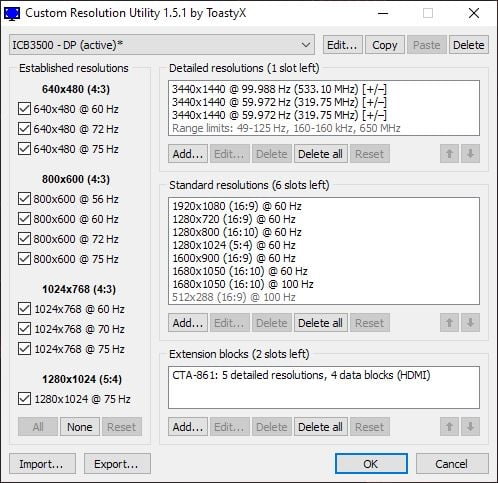
Custom Resolution Utility (CRU) is a free programme created by developer ToastyX that allows users to customise their resolution. Actually, you don’t need CRU because the graphics control panels from both Nvidia and AMD allow you to configure unique resolutions and refresh rates on your computer. Nonetheless, because it is a practically universal monitor overclocking tool, it is worthwhile to keep it in your back pocket.
Download CRU and extract the four executable files that are contained within it. Choose CRU.exe from among the options, and then complete the procedures below:
Step 1: Using the drop-down menu at the top of the screen, select the current display.
Step 2: Select Add from the Detailed Resolutions drop-down menu.
Step 3: Select Automatic (PC) from the Timing drop-down menu if you’re using a standard LCD monitor, or Automatic (HDTV) if you’re using a television.
Step 4: In the Refresh Rate box, type in the refresh rate that you choose.
Step 5: Confirm your selection by clicking OK.
After you’ve finished, restart your computer and follow the on-screen instructions to alter your refresh rate in Windows. If your screen goes black or becomes distorted, simply wait a few seconds until Windows automatically returns to the refresh rate that you were previously using. This indicates that you’ve gone too far with the overclocking. If everything is in order, you can update your profile in CRU and repeat the process.
Nvidia Control Panel
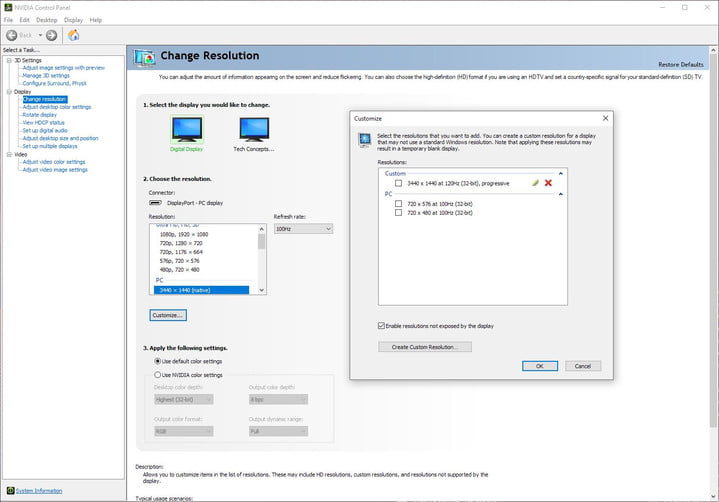
Using the Nvidia Control Panel, you can customise the resolution and refresh rate of your display if you have an Nvidia graphics card. This is the Control Panel, not GeForce Experience, where you may download and install new graphics drivers for your graphics card.
In that vein, make certain that your drivers are up to date and that you have the most recent version of the Nvidia Control Panel loaded on your computer. Open it up and follow the instructions outlined below:
Step 1: Select Change Resolution from the Display drop-down menu.
Step 2: Select Customize from the drop-down menu.
Step 3: Select Create Custom Resolution from the drop-down menu after checking Enable Resolutions Not Exposed by the Display.
Step 4: In the Refresh Rate box, type in the refresh rate that you choose.
Step 5: Select the Test button.
Step 6: Choosing your new profile and then modifying the Refresh Rate drop-down menu are the next steps.
Step 7: Click on the Apply button.
In contrast to CRU, you may test your new refresh rate within the Nvidia Control Panel interface. However, it is not always accurate, so you should wait until you have clicked Apply before checking to see if your overclock is truly working. After everything is in working order, check your new refresh rate in Windows and then repeat the method above until you achieve the desired overclock.
The Risks of overclocking your monitor
Overclocking your monitor, in contrast to overclocking your CPU or graphics card, does not pose a significant risk. If you’ve ever altered your screen resolution, you should be aware of the reasons for doing so. If you don’t confirm the new settings in Windows, the Nvidia Control Panel, or the Radeon software, your screen will automatically revert to the prior settings you selected. Consequently, if you use an excessively high refresh rate, it’s usually just a matter of waiting 15-30 seconds until your display returns to its default setting.
However, it is feasible to apply an overclock in such a way that everything appears to be normal. That’s why it’s so vital to double-check your overclock. Even if Windows and the overclocking programme you’re using indicate that your display’s refresh rate is accurate, you should still run the Blur Busters test listed above to double-check. When you operate your panel at a refresh rate that is more than its rated refresh rate, you can increase power consumption and shorten the life of your monitor.
Knowing as much as possible about the panel within your monitor can help you avoid the majority of the risks associated with overclocking. As previously indicated, certain monitor manufacturers overclock the panel at the factory, even if there is no mention of overclocking on the box or in the instructions. It is best not to add an overclock on top of an already-existing one.
Video

Vampire Crawlers Coin Farming Guide

Forza Horizon 6 Performance: Why 60 FPS Is Still the Console Standard

Yoshi and the Mysterious Book (2026) – Full Completion Guide, Rewards & Secret Ending

How to Get Free Pets in Adopt Me: A Guide for Players

Roblox Username Generator – Create a Cool & Unique Username in Seconds
How to Get Free Pets in Adopt Me: A Guide for Players
Yoshi and the Mysterious Book (2026) – Full Completion Guide, Rewards & Secret Ending
Forza Horizon 6 Performance: Why 60 FPS Is Still the Console Standard


