Guide
How To Print Gridlines in Excel
Gridlines are the light-colored lines that surround each and every cell in your spreadsheet in Microsoft Excel. These lines aid in the delineation of the area filled by a cell and, as a result, the readability of your data is improved. When you print your spreadsheet, you will note that the grid lines are not included by default, which is a good thing to know.
The gridlines must be manually specified if you want them to display on your printed sheet when you print your document. In this article, I’ll show you how to print gridlines in Excel in a simple and straightforward manner.
Read Also: How to Wrap Text in Microsoft Excel
How To Print Gridlines in Excel
When you print a worksheet or a workbook, Excel does not automatically print the gridlines that carry the information contained within the gridlines. When reading the data, gridlines are used to separate the columns and rows from one another, which makes it easier to understand. As seen in the image below, there is a side-by-side comparison of how the data will look when printed with and without gridlines.

Because the gridlines are printed, it is easier to read across rows when the gridlines are printed because the data is divided by the gridlines.

How to Show Gridlines in Excel When Printing
To make the Print Gridlines feature available, do the following steps:
- The Page LayoutTab may be found in the Ribbon of the application.
- Locate the Sheet Options Box on your PC by using the F1 key.
- Gridlines should be printed, and this should be selected from the Gridlines drop-down menu.
- If you want to open a file, click on the FileTab in the Ribbon.
- Print can be selected from the drop-down menu.
- Note that the Print Gridlines feature is only applicable to the worksheet that is currently active in your browser.
Please keep this in mind when using the Print Gridlines feature. In each worksheet, you must repeat the processes by selecting the Print option from the Gridlines drop-down menu. The procedures to print the entire workbook with gridlines must be repeated in each worksheet by selecting the Print box under Gridlines and then hitting the Print button.
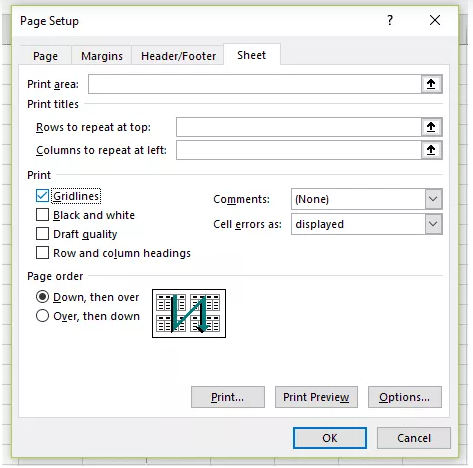
- To enter the Page Setup dialogue box, another alternative is to select Page Setup from the Sheet Options box’s right-hand corner and then click OK.
- To open the Sheet Tab, locate it on the Ribbon and click on it.
- To make the Print Gridlines feature available, choose the checkbox next to Gridlines in the Print Options section of the Print Options window.
- Then select OK to continue working on the worksheet, or Cancel to exit the worksheet.
- Print can be selected from the drop-down menu.
Please keep in mind that you will have to repeat this procedure for each worksheet that you wish to print.
The Fastest Way To Have Gridlines Printed
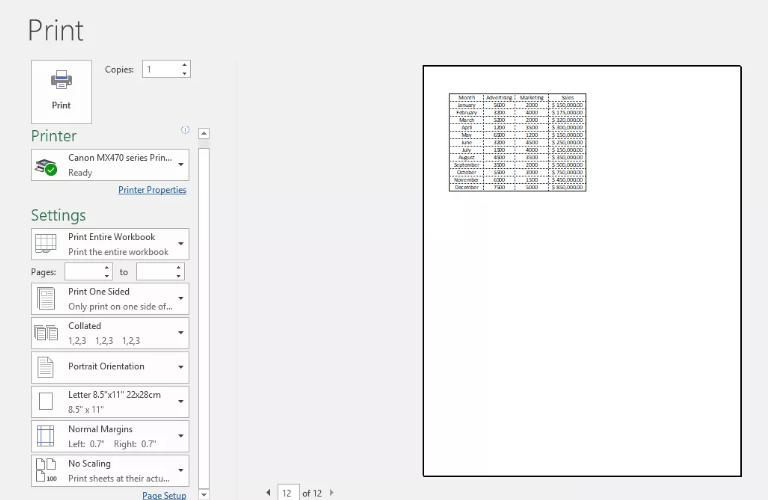
When working with a large number of worksheets that will be printed, you must select File from the Ribbon to save your work. To bring up the Print Preview screen, select Print from the menu bar. The Settings are presented on the left-hand side of the screen. The first drop-down menu should contain the option Print Entire Workbook, which will print all of the worksheets.
A link to the Page Setup dialogue box will be found at the very bottom of the page, behind the Settings section. By using the arrows, you may navigate through the worksheets. As soon as the worksheet you wish to modify is displayed, go to File > Page Setup and follow the procedures outlined above to enable the Print Gridlines functionality. Print gridlines for each worksheet after you have enabled them for each worksheet by clicking Print.
Video

How to Make Rope in Terraria: The Complete Guide

The Best Online Games in the World – Gaming Industry

WWE 2K26: The Ultimate Guide — Tips & Tricks

The Complete Guide to Kerry Eurodyne in Cyberpunk 2077

50+ Funny Pokemon Jokes for Kids That Will Make Them Giggle All Day
How to Make Rope in Terraria: The Complete Guide

How to Get a PS2 BIOS for PCSX2: The Complete Step-by-Step Guide

Phantasmal Flames Card List: Every Card, Every Rarity, Fully Explained

Hogwarts Legacy Review: The Ultimate Wizarding World RPG Experience


