Guide
How to Take a Screenshot With Microsoft PowerPoint
If you’re looking for a basic and speedy way to capture a screenshot on your own computer, you don’t need to look any farther than Microsoft PowerPoint. You are absolutely right about it! A screen recording option is one of the many tools that are included in the presentation-creation software that is made available by Microsoft. This option is included alongside the other tools. The following is the correct procedure:
Read Also: How to Insert a GIF in PowerPoint
How to Take a Screenshot With Microsoft PowerPoint
Microsoft PowerPoint includes a built-in screenshot feature. PowerPoint makes it simple to capture any visible window by letting you choose which ones to capture with a single click.
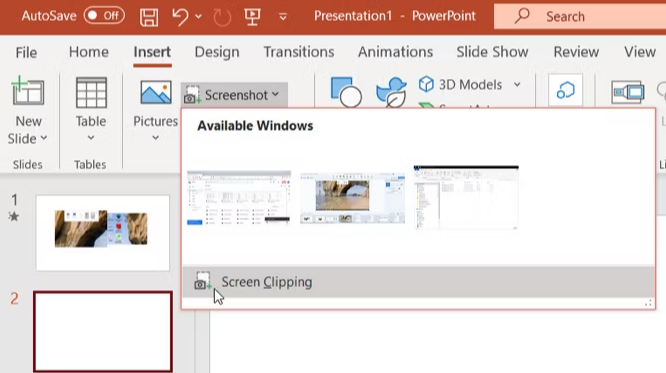
1. To include a screenshot in your presentation, click the Insert > Screenshot menu item.
2. With the exception of minimized windows, all currently active windows will be displayed in a grid.
3. To capture a snapshot of a specific window, click that window’s tab. Click Screen Clipping if you’d prefer pick a region of the screen to capture. The PowerPoint window will minimize, letting you click and drag to capture a snapshot of whatever is directly behind it.
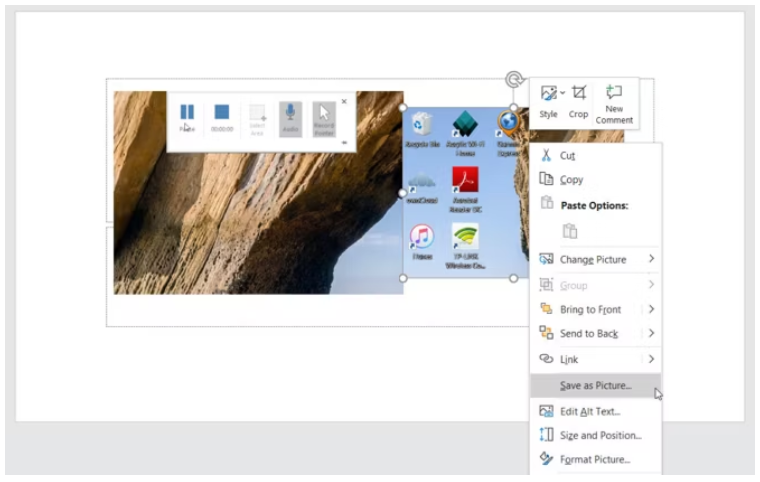
4. PowerPoint will display the captured image. Right-click the image, and then select “Save as Picture” to download it to your PC.
5. In the resulting dialogue box, you’ll be able to give the file a title and specify its type (JPG, PNG, PDF, GIF, or BMP), as well as go to its eventual storage location.
The Mac and Windows versions of Microsoft PowerPoint 2016 and 2013 with the latest updates support this function.
FAQs
What’s the shortcut for the Snipping Tool?
When you have a mouse and a keyboard, you can utilise the Snipping Tool by following these steps: Press the Windows logo key, followed by Shift, and then S. While you choose a portion of the screen to capture with your screenshot, the desktop will darken. The rectangular mode is the one that is chosen automatically.
Which is Print Screen key?
Your computer’s PRINT SCREEN key is almost always found in the upper right hand corner of your keyboard. The key has a form that is comparable to the following: It’s possible that the letters PrtSc, PrtScn, or PrntScrn are what you see on your keyboard. Typically, the other text that appears on the Print Screen key is SysRq.
Why can’t I use the Snipping Tool shortcut?
Therefore, if you have clipboard history turned off, the Snipping Tool will not operate for you. You can make the necessary adjustments in the Settings app. Launch the Settings programme by pressing the Win key and the I button simultaneously, and then go to System > Clipboard. You can choose to enable or disable the Clipboard history option, which is located to the right of the choice that can be found at the top of the window.
Is Print Screen the same as screenshot?
Windows. To take a screenshot of the complete screen, you can do so by pressing the PrtScn button, also known as the Print Scrn button. If you want to capture a screenshot of your full screen while using Windows, you may do so by pressing the Print Screen button, which is situated in the top right corner of the keyboard. When you click on this button, an image of whatever is currently on the screen will be copied onto the clipboard.

Vampire Crawlers Coin Farming Guide

Forza Horizon 6 Performance: Why 60 FPS Is Still the Console Standard

Yoshi and the Mysterious Book (2026) – Full Completion Guide, Rewards & Secret Ending

How to Get Free Pets in Adopt Me: A Guide for Players

Roblox Username Generator – Create a Cool & Unique Username in Seconds
How to Get Free Pets in Adopt Me: A Guide for Players

Grow a Garden Recipes in Roblox: Guide to Cook (Donuts, Sushi, Pie, Pizza & More!)
Roblox Username Generator – Create a Cool & Unique Username in Seconds
Forza Horizon 6 Performance: Why 60 FPS Is Still the Console Standard


