Guide
How to Take Apart an Xbox One Controller
It can be tough to find the right way to fix your Xbox One Controller. It’s not like you can run into a store and buy another. So what are your options? You could try to figure out how to repair it on your own, or you could take it apart entirely and see if that fixes the issue.
The Xbox One controller is broken in many places, but all of them are fixable with a little tinkering. Here’s how:.

How To Take Apart An Xbox One Controller
- Consider running on a tray to save you screws or different elements from falling at the ground or getting lost.
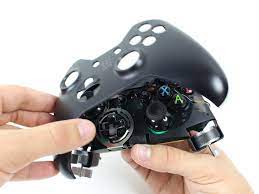
- Take the orange pry device out of your device kit.
- Slide the pry device among the plastic seam at the grips as shown.
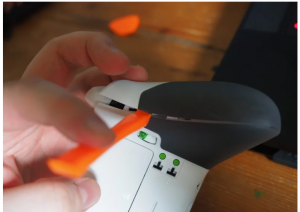
- Lever the grip far from the principle controller body. Note that there’s additionally adhesive maintaining it in location below the plastic, so do not be frightened of making use of a few force.
- Repeat this once more for each grips.
- Next, we will get rid of the screws. Once the screws are removed, your Xbox controller will come aside like a sandwich. Be extraordinarily cautious due to the fact in case you pull it aside too hard, you can harm the cable that connects the battery to the circuitry.
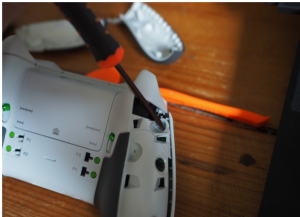
- Find your T8 screwdriver from your kit, and begin removing the five security screws as shown. Note that one of the screws is hidden behind the sticker in your battery housing.
Tools
- Phillips head screwdriver.
- Small flathead screwdriver.
- Tweezers or needle nose pliers.
Disassembly
Before you can take apart your controller, you need to know what tools you’ll need. You will need a Phillips head screwdriver, spudger, and wire cutters.
First, remove the battery pack from the back with the wire cutters. Take out the screws on the left side of the device with the Philips head screwdriver. Take out all of them. Next, with your spudger or flathead screwdriver, pop off the clips on top of either side of the controller by sliding it in between where they are glued to the body of the controller. Then use your Phillips head screwdriver to remove all of the screws that are under them with their corresponding clips.
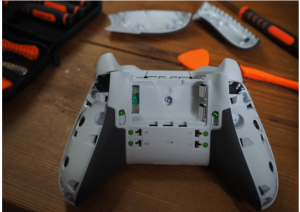
Once all of these are removed, you should be able to take off both controllers in opposite directions at once. The top half should come off first and then you can remove the bottom half.
Fixing The Parts
The first step in fixing your Xbox One controller is to identify what needs to be fixed. If the buttons aren’t working, you need to take apart the controller and make sure that none of the buttons are stuck or broken.
If one of the triggers (the parts on the back of the controller) isn’t working, you’ll need to open up and make sure nothing is blocking them.
If there’s a loose wire or something, then you’ll need to remove it from inside the console and reconnect it.
If your Xbox One is not responding, then you may have a power issue with your console – this is an easy fix if you’re experienced with electronics.
How To Put It All Back Together
You’ve now successfully taken apart your Xbox One controller. The last step is putting it all back together.
The Xbox One controller has a few different pieces. The biggest piece is the body of the controller, which includes the main buttons and joysticks, as well as the D-pad (which can be removed). The second-largest piece is the thumb stick module, which includes the two thumb sticks and triggers, as well as any shoulder buttons you might have on either side. Finally, there are the power pack and headphone jack modules, which just need to be plugged in.
Now that you know how to take apart an Xbox One controller and put it all back together again, you can save yourself some time and money by repairing your own controller instead of buying a new one every time something goes wrong.
Video For Better Understanding
Conclusion
Not only is the Xbox One controller a great controller for gaming, it can also be taken apart and fixed by hand. This guide will help you take apart and put back together your Xbox One controller in no time.

Vampire Crawlers Coin Farming Guide

Forza Horizon 6 Performance: Why 60 FPS Is Still the Console Standard

Yoshi and the Mysterious Book (2026) – Full Completion Guide, Rewards & Secret Ending

How to Get Free Pets in Adopt Me: A Guide for Players

Roblox Username Generator – Create a Cool & Unique Username in Seconds
How to Get Free Pets in Adopt Me: A Guide for Players

Grow a Garden Recipes in Roblox: Guide to Cook (Donuts, Sushi, Pie, Pizza & More!)
Roblox Username Generator – Create a Cool & Unique Username in Seconds
Yoshi and the Mysterious Book (2026) – Full Completion Guide, Rewards & Secret Ending


