Guide
How to Turn on Noise Cancelling On Your Airpods

Active noise cancellation, which employs microphones to shut out the sounds of the world around you so you can focus on your music or work, is what distinguishes the new AirPods Pro distinct from regular AirPods.
When you initially put your AirPods Pro in your ears, active noise cancellation kicks in right away, but Apple gives you various options for managing it after that. You can use the AirPods to toggle the function on and off, control it through Settings or Control Center, and even conduct a test to determine whether you’re using the right ear tips. We’ll teach you how to accomplish everything about this through.
One thing to keep in mind: when I say you can “turn off” noise cancellation, I typically mean you can switch to “Transparency” mode, which employs the microphones to let in rather than filter out sound from the outside world.
AirPods Pro, unlike regular AirPods, come with rubbery ear tips, ensuring that you always have “passive noise cancellation,” which suppresses outside noise simply because you have something crammed in your ears. This is why the transparency mode comes in handy.
How to use Siri to turn noise cancellation on or off?
Simply ask Siri to switch on noise cancelling, transparency mode, or both functions. Simply say (depending on the circumstances):
- “Hey Siri, turn on/off noise cancellation”
- “Hey Siri, turn on/off transparency.” And you’re good to go.
How to turn noise cancellation on or off on the AirPods Pro themselves?
Toggling active noise cancellation on and off is simple with Apple’s physical AirPods Pro. After you’ve removed the AirPods Pro from the case, inserted them into your ears, and linked them to your iPhone:
- Reach up to your AirPods Pro’s base and press down on the hole there. Taping it will just pause the audio track you’re currently listening to.
- After that, you should hear a high-pitched chime indicating that Noise Cancellation is turned off. Transparency mode has been enabled on your AirPods.
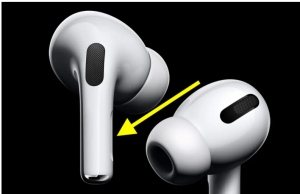
Simply repeat the procedures to reactivate noise cancellation. A low-pitched bell will sound when noise cancellation is activated again.
A lengthy press on the stem will only enable noise cancellation or transparency mode by default. Go to Settings > Bluetooth on your iPhone and push the ringed I next to the listing for your AirPods Pro to add a third option to turn off both noise cancelling and transparency mode with a long press.
Both the left and right AirPods have settings under Press and Hold AirPods. For example, if you hit Left, you’ll get options for Siri or Noise Control. You’ll get three options for Noise Cancellation, Transparency, and Off when you press Noise Control. Off should be unchecked, so if you want, turn it on. When you try to switch cycles with the left stem again, you’ll hear a very low-pitched chime, which indicates that both noise cancelling and transparency are turned off.
Make your left bud just trigger the “Off” function so you can reach for it if you’re attempting to save battery by not utilising the other capabilities. Switching between the two other settings would be done with the right bud.
If you repeat the instructions above but press Siri instead of noise cancellation, your AirPod will now activate Siri instead of noise cancellation. However, “Hey, Siri” works great on the AirPods Pro without any explicit input, so it’s difficult to recommend this.
How to turn noise cancellation on or off through Control Center?
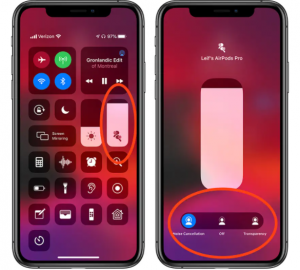
Control Center can also be used to enable noise cancellation or Transparency mode.
- Open the Control Center on your iPhone. Swipe up from the bottom of the screen if you’re using a Touch ID phone. Swipe down diagonally from the upper right of the screen if you’re using a Face ID iPhone.
- Next, hold down the volume control until an icon matching the AirPods Pro appears.
- Noise Cancellation, Transparency, and Off are the options at the bottom. Select the one you desire.
How to turn off noise cancellation through Settings
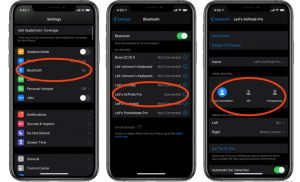
The Settings app on your iPhone is where you want to go if you want to change the noise cancelling settings on your AirPods Pro the “long way.” As we’ve seen, it’s also the ideal place to go if you want complete control over your AirPods Pro’s functionality.
- Launch the Settings app.
- Press Bluetooth.
- Tap the information icon—a blue “i” surrounded by a circle—next to the entry for your AirPods Pro.
- Under Noise Control in the menu that pops up, you’ll see three options: Noise Cancellation, Transparency, and Off. Pick the one you want.
FEATURED Video
The pros and cons of Noise Cancelling
The idea of Noise Cancelling is a good one, but the technology itself has some flaws. First, you have to be wearing your airpods in order for them to work. If you forget to activate your noise cancelling mode and someone starts talking to you, turning on noise cancelling will only temporarily block their voice from reaching your ears. Additionally, there is a high likelihood that someone else nearby may hear your music playing through your airpods. The pros of this feature are that it will help you stay safe in busy environments and gives you the option of listening to music without bothering others around you.
Conclusion
Noise Cancelling is an option on the Airpods that lets you turn on a noise-cancelling feature. This feature can be helpful if you’re listening to music or a podcast while on a crowded train or plane.
Must Read This: How To Connect AirPods To PS4

Vampire Crawlers Coin Farming Guide

Forza Horizon 6 Performance: Why 60 FPS Is Still the Console Standard

Yoshi and the Mysterious Book (2026) – Full Completion Guide, Rewards & Secret Ending

How to Get Free Pets in Adopt Me: A Guide for Players

Roblox Username Generator – Create a Cool & Unique Username in Seconds
How to Get Free Pets in Adopt Me: A Guide for Players
Yoshi and the Mysterious Book (2026) – Full Completion Guide, Rewards & Secret Ending
Forza Horizon 6 Performance: Why 60 FPS Is Still the Console Standard


