Guide
How to Uninstall Google Chrome

Chrome, developed by Google, is now one of the most popular web browsers since it offers a variety of benefits to its users. If you end up deciding that you do not like the programme and do not want to have it on your computer, you can always go back and remove it from your system at any moment by using the uninstall option. In reality, deleting the browser from your computer is a rather straightforward operation, despite the fact that doing so could give the impression of being a difficult task at first.
This article will walk you through uninstalling Google Chrome.
Read Also: How to Update Google Chrome on Your PC
How to Uninstall Google Chrome on Windows 10
On Windows 10, accessing the Windows settings app is all that is required to delete Google Chrome from your computer. Locate the browser in the list, and then remove it from the location where it appears. Detailed instructions are provided below.
Step 1: The first thing you should do is close Google Chrome. Then, press the Windows key along with the letter I on your keyboard to launch the Settings app for Windows 10. This keyboard combination can be used in any part of the operating system.
Step 2: Once the settings app has opened, navigate to the Apps section. Move your cursor to the bottom of the list.
Step 3: Select Google Chrome, and then click the Uninstall icon located in the top-right corner. Again, select the Uninstall button.
Step 4: When the confirmation prompt appears, click the Yes button, and then, if necessary, enter your password. After then, another question will appear on the screen in front of you. If you click the blue Uninstall option, which is located in the Chrome menu, Chrome will be deleted from your computer immediately.
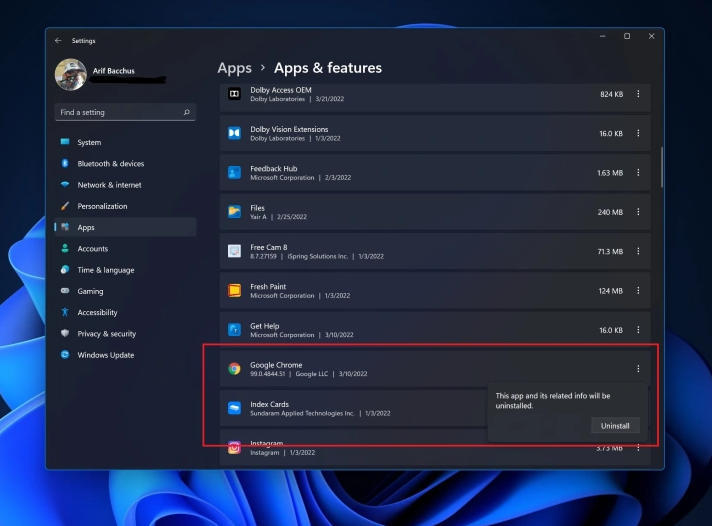
How to Uninstall Google Chrome on Windows 11
In Windows 11, uninstalling Chrome requires only a few simple steps, just like it does in Windows 10. The procedure is, for the most part, unaltered. The steps that need to be taken are as follows.
Step 1: First, exit Google Chrome by pressing the Windows key and the letter I simultaneously on your keyboard. This will launch the settings programme for Windows 11. Once you’ve arrived at the destination, navigate to the Apps section using the sidebar on the left of your screen.
Step 2: After that, select Apps and Features from the menu, and then search for Google Chrome in the available options. It’s possible that you’ll need to scroll down a bit.
Step 3: Next to Google Chrome, click the three dots with an arrow pointing downward, and then select Uninstall from the menu that appears. Click the Uninstall button one more time to confirm your choice.
Step 4: Respond “Yes” when prompted by the pop-up window, and then input your password if prompted to do so. After that, select the blue Uninstall option to finish, and Chrome will be removed from your computer permanently.
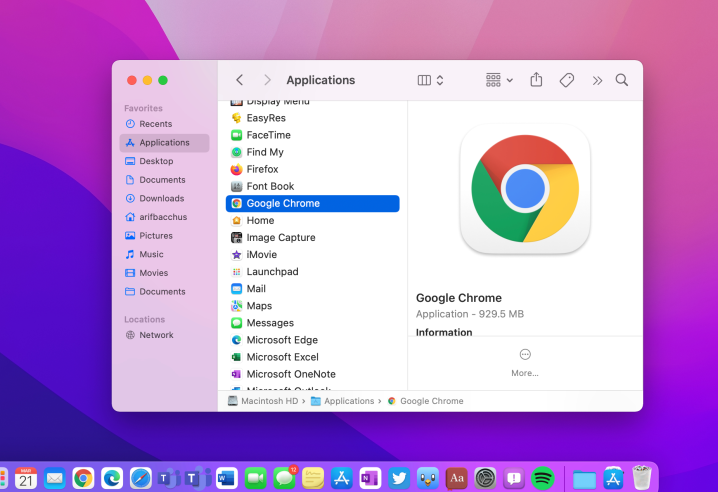
How to Uninstall Google Chrome in MacOS
MacOS makes it more simpler to uninstall Google Chrome compared to Windows 10 and Windows 11, respectively. There is no configuration menu to be found here. You won’t have to perform anything more complicated than some basic dragging and dropping. Keep reading to learn more.
Step 1: The first thing you need to do is launch a Finder window. The icon for the Finder may be found in the far leftmost position of the Dock at the very bottom of your screen. It’s a happy-looking face depicted in blue and white on an icon.
Step 2: Navigate to your Applications folder in the Finder by clicking there. The position of this item in the Finder sidebar is often the second one down from the top. Find the entry for Google Chrome and click on it. If you still can’t find it, select “File” from the menu bar, then click “Find,” and finally do a search for “Chrome.”
Step 3: When you have located Google Chrome in the list, click on its icon, and then drag it until it is dropped into the garbage bin on the right side of your dock. Your system will no longer have Chrome installed.
Video

Vampire Crawlers Coin Farming Guide

Forza Horizon 6 Performance: Why 60 FPS Is Still the Console Standard

Yoshi and the Mysterious Book (2026) – Full Completion Guide, Rewards & Secret Ending

How to Get Free Pets in Adopt Me: A Guide for Players

Roblox Username Generator – Create a Cool & Unique Username in Seconds
How to Get Free Pets in Adopt Me: A Guide for Players
Yoshi and the Mysterious Book (2026) – Full Completion Guide, Rewards & Secret Ending
Forza Horizon 6 Performance: Why 60 FPS Is Still the Console Standard


