Guide
How to Update Motherboard Drivers
With the assistance of component-specific drivers, the operating system is responsible for controlling all of the hardware—both internal and external—that is connected to the computer. The function of drivers is to provide an interface between the component of the hardware and the operating system. If you run into any problems with a piece of hardware, the problem is almost certainly with the driver for that piece of hardware.
Therefore, in order for the operating system to have a smooth and error-free information interchange with the component’s driver, it is necessary for both of them to be at the most recent version possible. The same principle applies to the drivers for the motherboard. The communication between the central processing unit (CPU), storage RAM, and peripheral devices is also controlled by the motherboard driver.
Read Also: How to Update Your Motherboard BIOS
How to Update Motherboard Drivers
Additionally, the download centre of the manufacturer is where you can locate many drivers that are specific to the motherboard. The Chipset driver is the only one that is responsible for the motherboard, despite the fact that some of these other drivers could also be considered motherboard drivers.
Downloading the driver for the Chipset can be done in a few different ways. To update this driver, follow any one of the aforementioned procedures.
Update from Device Manager
Using the tool known as Device Manager is yet another option for keeping the motherboard’s driver up to date. Using the Device Manager, you may update the drivers for all internal and external hardware components, including the motherboard, to the most recent versions.
If you would want to update the driver for your motherboard using the Driver Update, you can do so by following the procedures that are listed below.
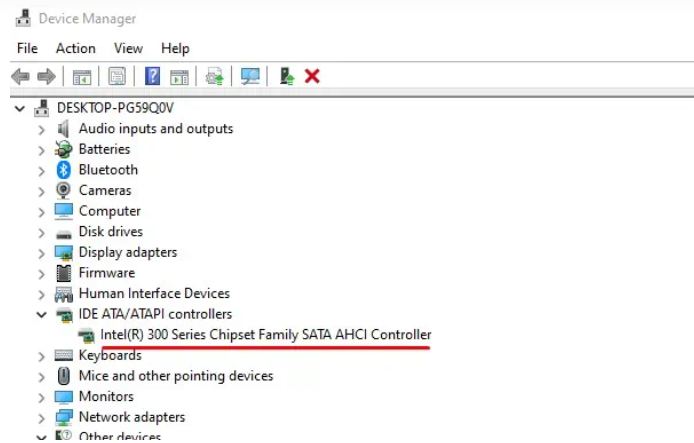
- Press the Windows key and the X key together to bring up the Device Manager.
- From this vantage point, you are able to observe the driver in its entirety. IDE ATA/ATAPI controllers are now available.
- The driver for the motherboard is the one that appears in the IDE ATA/ATAPI controllers section of the device manager. It may be updated by right-clicking on it and selecting “Update Driver.”
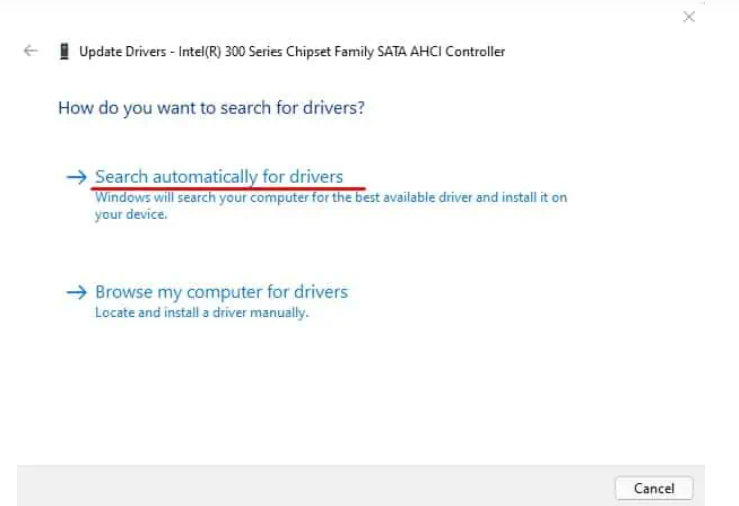
- To find drivers automatically, select the option to search.
- The Device Manager will check for updates and, if one is available, immediately download and install the most recent version.
- After the downloading and installing processes have been finished, you will need to restart the computer.
After step 3, select the option to Browse my computer for drivers if you wish to use a different driver for your motherboard that is stored locally. You will have the ability to browse the driver through the Device Manager. When you have found the driver, you can move on by clicking the Next button. The installation process will now begin. Restart your computer after the process is complete.
Using Windows Update
Another benefit is the Windows Update, which allows us to download and install any updates at once, whether they are Windows updates, driver updates, or even BIOS updates. Right-clicking on each driver in the Device Manager and selecting “Update” from the menu that appears should bring about the desired result. This inconvenience is avoided thanks to the Windows Update.
- To launch Settings, press the Windows key and the letter I together.
- Navigate to the Windows Update menu (located under Update & Security in Windows 10) to check for available updates.
- Choose whether you want to Install Updates or Check for Updates.
- Windows driver update for the motherboard.
- If there are any updates that have not yet been applied, the operating system will automatically download and apply them.
- It will install any driver, Windows, or BIOS updates that are still pending.
Video

Vampire Crawlers Coin Farming Guide

Forza Horizon 6 Performance: Why 60 FPS Is Still the Console Standard

Yoshi and the Mysterious Book (2026) – Full Completion Guide, Rewards & Secret Ending

How to Get Free Pets in Adopt Me: A Guide for Players

Roblox Username Generator – Create a Cool & Unique Username in Seconds
How to Get Free Pets in Adopt Me: A Guide for Players
Yoshi and the Mysterious Book (2026) – Full Completion Guide, Rewards & Secret Ending
Forza Horizon 6 Performance: Why 60 FPS Is Still the Console Standard


