Guide
How to Update Your Motherboard BIOS
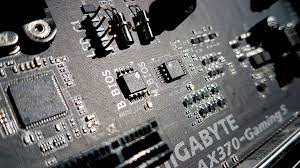
In as much as we like painstakingly selecting the highest-performing components for each new monster build, we are well aware that maintaining those components is also critical to sustaining peak performance over the long term. When it comes upgrading computer systems, a solid foundation is essential to their performance. Updating the BIOS on your motherboard can do a variety of tasks, including introducing new features and functions, supporting new CPUs, squashing bugs, refreshing a corrupted UEFI environment, and much more.
The most straightforward method of updating a BIOS is via USB, which we’ll demonstrate today in the GeForce Garage. First and foremost, you must have the appropriate instruments for the work.
Read Also: How to Enter the BIOS on Your Windows 11 PC
How to Update Your Motherboard BIOS Using A Simple USB Stick
Required Items
- USB thumb drive with no data on it (Bootable for DOS method)
- The Rufus programme (additional possibilities include the HP USB Disk Storage Format Tool, the MSI DOS Tool, and UNetbootin, among others…)
- Updated BIOS, as well as an update utility
- A working computer with a main board or motherboard on which you wish to FLASH/UPDATE BIOS an internet connection to get the BIOS update from the manufacturer’s company website
Locate Current BIOS Version
To determine whether you need to upgrade your BIOS, first determine which version of the BIOS is currently installed. It is simple to determine which BIOS version is currently in use. To enter your system BIOS, restart your computer and hit or hold down the proper key on your keyboard. Usually, this is the most important factor. On some laptops and desktop computers, the F2 or F8 keys may be used instead.
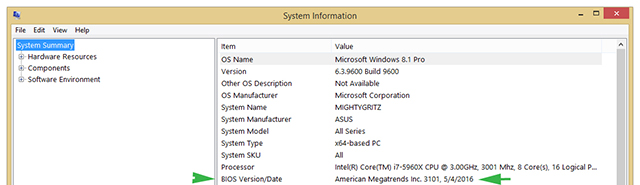
While working on Windows, you can also locate your current BIOS. To access the “RUN” command window, press the Window Key + R at the same time. Once you’ve done that, type “msinfo32” to display your computer’s System Information log. You will see your current BIOS version listed under “BIOS Version/Date” on your computer’s desktop. From the manufacturer’s website, you can now obtain the most recent BIOS update and update utility for your particular motherboard. It is common for the update utility to be included in the download package from the manufacturer. If this is not the case, contact your hardware provider. Assuming you do not have access to a network, you can still use the USB stick to update your BIOS in a UEFI environment, if your motherboard supports this functionality.
Updating BIOS – UEFI Method
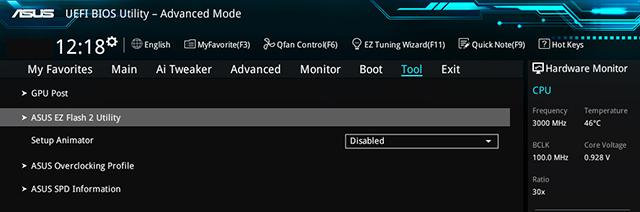
Take the BIOS update that you got from the manufacturer’s website and save it to a USB flash drive or other storage device. Continue to keep the USB stick inserted into your computer and then restart the computer. When the computer restarts, enter the BIOS by following the steps outlined above. Navigate to the board’s BIOS update area using the UEFI interface, which is typically referred to as “EZ-Flash,” “M-Flash,” or something similar. Once the programme has been launched, you will be prompted to navigate to the BIOS file. To complete your BIOS update, choose your USB stick and follow the on-screen instructions that appear.
Updating BIOS – DOS Method
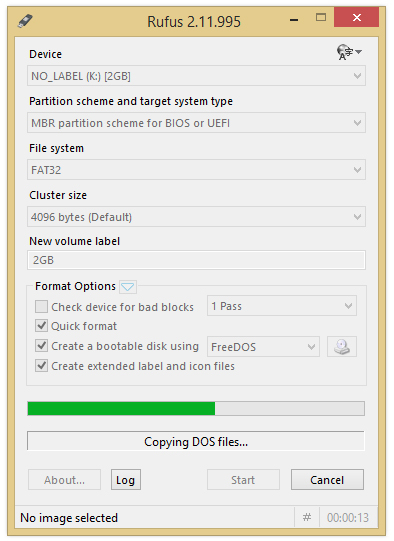
You will need a bootable USB drive in order to upgrade your BIOS using DOS. Creating one is a simple process. Rufus is the programme we’re using, but you can use any of the other solutions listed above. Rufus transforms your USB drive into the FAT32 file format by default, making it compatible with either the UEFI or DOS operating systems. It will produce a bootable USB drive that will run either MS-DOS or FreeDOS, depending on your choice. If you wish, you can build an ISO image from an existing one if you already have one. Press the button, and your bootable USB stick will be ready in a matter of minutes.
To make the freshly bootable USB stick bootable, copy the updated BIOS version and BIOS update tool that you downloaded from the manufacturer’s website to it. Keep the USB stick hooked into the computer at all times. The system should then be restarted. While the system is restarting, press or hold the F11 key. This will lead you to the Boot Selection screen, where you can select a boot device to start your computer using. Make certain that your bootable USB stick is selected as your boot device before pressing.
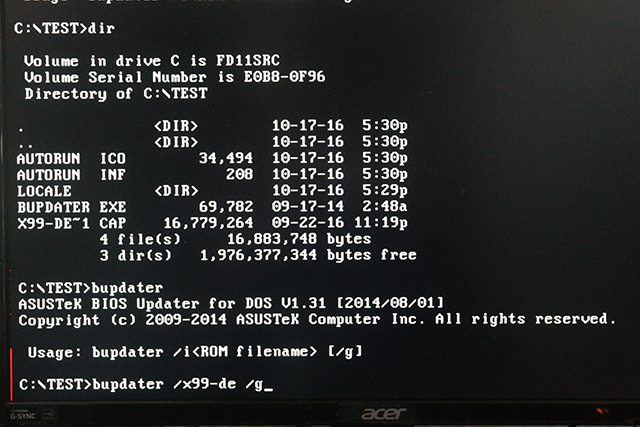
The actual name of your BIOS update application or flash tool, such as “bupdater” or “afudos” or “awdflash,” will need to be typed in when the prompt comes. You must first navigate to the location where your files and the update tool are placed, such as the one shown in the image above, before you can proceed. To do so, type the command “cd” and press to access the folder where your files and the update tool are located. Our files are located in the directory “cdTEST,” as seen in the image above. Each flash utility will be a little different from the others, but they will all be easy to comprehend. Furthermore, they always include instructions on how to proceed once the application has been launched in DOS. Please take a moment to review this information before proceeding. If you have any questions, please contact us at [email protected] or call us at [phone number].

The update should be ready after it has been checked for compatibility. To confirm and begin, click or tap on the button. Once it’s finished, you can use the methods listed above to verify that your BIOS update was a success by checking the BIOS version number.
Video

Vampire Crawlers Coin Farming Guide

Forza Horizon 6 Performance: Why 60 FPS Is Still the Console Standard

Yoshi and the Mysterious Book (2026) – Full Completion Guide, Rewards & Secret Ending

How to Get Free Pets in Adopt Me: A Guide for Players

Roblox Username Generator – Create a Cool & Unique Username in Seconds
How to Get Free Pets in Adopt Me: A Guide for Players
Yoshi and the Mysterious Book (2026) – Full Completion Guide, Rewards & Secret Ending
Forza Horizon 6 Performance: Why 60 FPS Is Still the Console Standard


