Guide
How To Map A Network Drive in Windows 10

You can rapidly access files and folders on a shared network as if they were on your local computer by creating a mapped network drive. This gives you the ability to access files and folders on a shared network. Thankfully, mapping network drives in Windows 10 just requires a few simple steps to complete.
How To Turn On Network Discovery
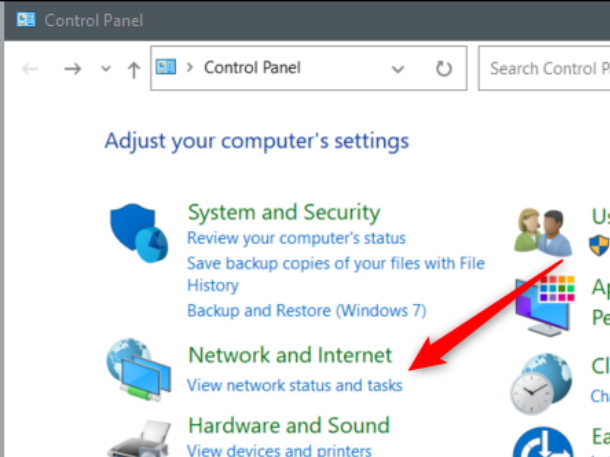
In order to map a network disc on your computer running Windows 10, you will first need to make sure that network discovery is turned on. Launch the Control Panel, then go to the Network and Internet section of the menu and choose “View Network Status and Tasks” from the drop-down menu.
Next, in the left-hand window, select the link that says “Change Advanced Sharing Settings.”
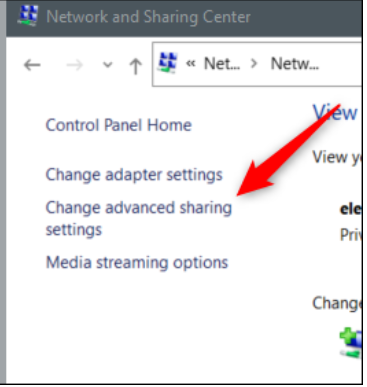
To activate network discovery on the subsequent page, you will need to click the checkbox that is next to the phrase “Turn on Network Discovery.”

When you activate network discovery by clicking “Save Changes,” it will take effect immediately.
Read More: How To Change Date of Birth in Facebook
How To Map a Network Drive
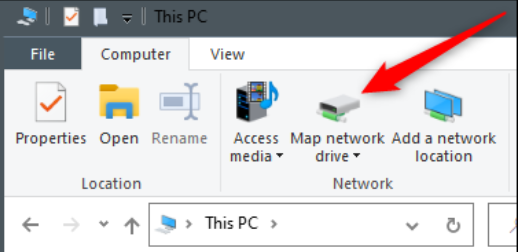
You are now able to map a network disc since you have network discovery enabled on. First, launch File Explorer, and then, in the navigation window on the left, choose “This PC.”

After that, go to the Network section of the Computer tab and choose “Map Network Drive.”
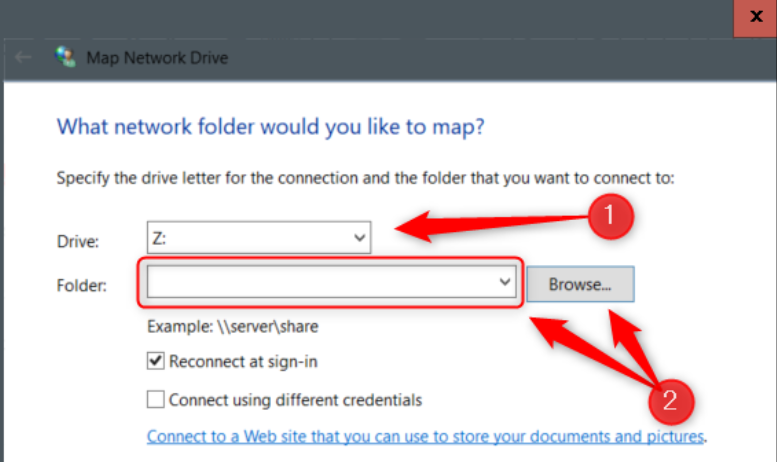
The window labelled “Map Network Drive” will show up. Choose the drive letter that you want to use in the text box that is located next to the word “Drive.” You are free to use any letter that is not being used on your device at this time. You may either click the “Browse” button and choose the device from the pop-up menu that appears after clicking it, or you can type the path to the folder or machine in the “Folder” text field. You also have the option to choose “Reconnect at Sign-in” if you would want to maintain your connection even after you have successfully logged in to your device.
After you have completed the necessary configuration steps, choose “Finish,” and the network drive will be mapped on the device you are using.
FAQ’s
Why is it that Windows 10 won’t let me map a network drive?
When consumers upgrade from version 1909 to version 2004, one of the most typical circumstances in which they are unable to map a network disc in Windows 10 occurs. Error 0x80070043 popping up every time a desktop user attempts to connect to a network disc is one of the signs that this problem is present.
How do I map to a drive on a network?
Open File Explorer. Click on This PC, which is on the left side of the File Explorer window. Click on the tab called “Computer.” Click the Map network drive button on the Computer ribbon, and then choose Map network drive from the drop-down menu.
Is there a network map in Windows 10?
Unfortunately, Windows 8 and 8.1 did away with the option to build a Network Map, and Windows 10 does not have it either.
Why can’t I map to a network drive?
Getting this error when attempting to map a network drive indicates that another disc has been mapped to the same server with a different login.
Why am I unable to view the network drives I’ve mapped?
User Account Control mostly prevents the mapped network drive from being seen on the screen, which is the main reason why it doesn’t display in network locations. Even if you utilise the usual privileges, the File Explorer still has trouble displaying up the mapped network disc.

Everyday Challenges of Living with Parkinson’s

From Features to Systems: How Innovation Is Being Reframed in Modern iGaming

Wuthering Waves Targeted Convene Guide: Choosing Your Ideal 5-Star Resonator

Pacific Drive – How to Use Transmuter

A Guide to Fishing in Pokémon Sword & Shield: Galar’s Angling Adventure
A Guide to Fishing in Pokémon Sword & Shield: Galar’s Angling Adventure
Pacific Drive – How to Use Transmuter
Wuthering Waves Targeted Convene Guide: Choosing Your Ideal 5-Star Resonator
From Features to Systems: How Innovation Is Being Reframed in Modern iGaming