How to Add a Header or Footer in Google Docs on Desktop

Headers and footers are different sections that are located at the top and bottom of the page, respectively, and are used in a range of documents, such as business reports, academic papers, and manuscripts, respectively. Headers and footers are also known as page headers and page footers. The top of the page and the bottom of the page are where you’ll find these parts, respectively.
You could use headers and footers for section titles, information about the author, page numbers, footnotes, the date, and any other information that needs to be consistent throughout a large number of pages. The tutorial that is presented here will walk you through the process of adding headers and footers in Google Docs.
Read Also; How to Make a Timeline on Google Docs
How to Add a Header or Footer in Google Docs on Desktop
Either the header or the footer of a webpage can contain a wide variety of information, and both can serve a variety of purposes. Within Google Docs, a page’s headers and footers are regarded as separate parts, and the procedure for creating them is a rather simple one. Headers and footers may be found at the top and bottom of a page, respectively.
1. Launch a web browser and go to the Google Docs page by navigating to it.
2. To begin the process of adding headers or footers to the document, either open a document that is already in existence or begin a new document.
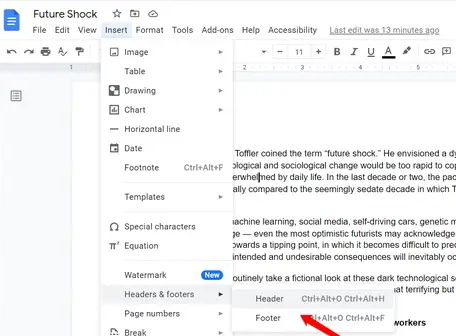
3. Select Insert from the menu that is located at the very top of the toolbar, and then select Headers & Footers from the submenu that appears. Choose either the Header or Footer option depending on your preference.

In addition, you have the option of including a header or footer by making use of the shortcuts on the keyboard, which are as follows:
Header:
- On a Windows or ChromeOS computer: Press Ctrl + Alt + O or Ctrl + Alt + H.
- On a Mac: Press Ctrl + Cmd + O or Ctrl + Cmd + H.
Footer:
- On a Windows or ChromeOS computer: Press Ctrl + Alt + O or Ctrl + Alt + F.
- On a Mac: Press Ctrl + Cmd + O or Ctrl + Cmd + F.
After you have inserted either a header or a footer into your document (you can insert either one or both, depending on your requirements), you should see a banner separating the sections and controls to set header and footer options. You can insert either one or both, depending on your requirements. If you do not see it, you can alter the text in the header or footer by double-clicking it. This will cause the banner to display.

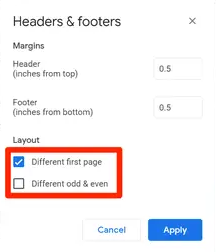
Each page’s headers and footers are, by default, identical to one another. But if you want each one to be unique, Google Docs provides you with a number of options to choose from. After clicking Options in either the header or footer banner, select Header format or Footer format from the drop-down menu. You can personalise the document in the Headers & footers options window by doing the following:
- You are able to make changes to the margin that is located above the header and below the footer.
- If you select the option labelled Different first page, the headers and footers of the first page of the document will display material that is distinct from that of every other page in the document.
- Check the box to indicate that Alternate odd and even to cause the headers and footers on even pages to display text that is distinct from that on odd pages (this is often the most useful for documents that will be printed and bound in a way so odd and even pages face each other).

If you have a really involved document, you have the option of making the headers and footers vary as often as you see fit; if you so choose, they can be unique on each page of the document. You are able to accomplish this by separating the document into different portions. This is what you should do:
1. On the page before the one on which you wish to make changes to the header and footer, position the cursor and select Insert, Break, Section Break from the drop-down menu (next page).
2. Navigate to the following page and double-click the text that is located in the top of that page.
3. Remove the tick from the box that says Link to previous.
4. Modify the wording that appears in the header.

In this new section, the header information has been updated to reflect the changes. You are free to include as many parts as you want, and each one can have its own unique headers and footers if you so choose.


